crwdns2933423:0crwdne2933423:0

Toshiba Satellite A105-S4284 Disc Drive Replacement

crwdns2942213:0crwdne2942213:0

  1. Toshiba Satellite A105-S4284 Disc Drive Replacement, Battery: crwdns2935265:01crwdnd2935265:01crwdnd2935265:02crwdne2935265:0 Toshiba Satellite A105-S4284 Disc Drive Replacement, Battery: crwdns2935265:01crwdnd2935265:02crwdnd2935265:02crwdne2935265:0
    • Make sure your computer is turned off and the computer is not plugged in.

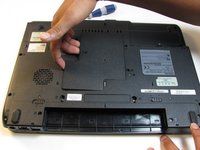
    • Turn your laptop upside down, and slide the right release tab outward.

    • Using you left hand, hold the left release tab towards the left side and then pull the battery out.

  2. Toshiba Satellite A105-S4284 Disc Drive Replacement, Disc Drive: crwdns2935265:02crwdnd2935265:01crwdnd2935265:02crwdne2935265:0 Toshiba Satellite A105-S4284 Disc Drive Replacement, Disc Drive: crwdns2935265:02crwdnd2935265:02crwdnd2935265:02crwdne2935265:0
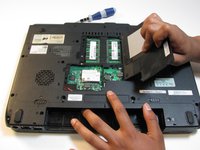
    • Loosen the screw located on the cover of the RAM using Phillips #1 screwdriver.

    • You will not be able to remove the screw from the panel as it is designed to stay in the panel.

  3. Toshiba Satellite A105-S4284 Disc Drive Replacement: crwdns2935265:03crwdnd2935265:01crwdnd2935265:02crwdne2935265:0 Toshiba Satellite A105-S4284 Disc Drive Replacement: crwdns2935265:03crwdnd2935265:02crwdnd2935265:02crwdne2935265:0
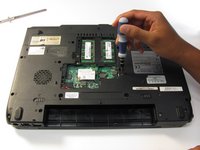
    • With your fingers, carefully remove the middle panel by lifting the edge with the indent.

  4. Toshiba Satellite A105-S4284 Disc Drive Replacement: crwdns2935265:04crwdnd2935265:01crwdnd2935265:02crwdne2935265:0 Toshiba Satellite A105-S4284 Disc Drive Replacement: crwdns2935265:04crwdnd2935265:02crwdnd2935265:02crwdne2935265:0
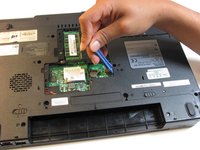
    • Remove the 4.0 mm screw above the small metal tab with a Phillips 00 screwdriver.

  5. Toshiba Satellite A105-S4284 Disc Drive Replacement: crwdns2935265:05crwdnd2935265:01crwdnd2935265:02crwdne2935265:0 Toshiba Satellite A105-S4284 Disc Drive Replacement: crwdns2935265:05crwdnd2935265:02crwdnd2935265:02crwdne2935265:0
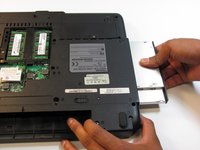
    • Push down on the metal tab under the cover with the plastic opening tool and push the disc drive partially out.

    • Grab the drive and pull it out of the laptop.

crwdns2915888:0crwdne2915888:0

To reassemble your device, follow these instructions in reverse order.

pfedigan

crwdns2935283:004/12/13crwdne2935283:0

11 crwdns2915208:0crwdne2915208:0

crwdns2935297:04crwdne2935297:0

crwdns2915084:0crwdne2915084:0

Cal Poly, Team 2-23, Maness Spring 2013 crwdns2935289:0Cal Poly, Team 2-23, Maness Spring 2013crwdne2935289:0

CPSU-MANESS-S13S2G23

crwdns2931471:04crwdne2931471:0

crwdns2935297:013crwdne2935297:0

crwdns2944067:00crwdne2944067:0

crwdns2917038:0crwdne2917038:0

crwdns2936625:0crwdne2936625:0:

crwdns2936751:024crwdne2936751:0 0

crwdns2936753:07crwdne2936753:0 0

crwdns2936753:030crwdne2936753:0 14

crwdns2942667:0crwdne2942667:0 848