crwdns2933423:0crwdne2933423:0

Toshiba Qosmio X505-Q860 Keyboard Replacement

crwdns2942213:0crwdne2942213:0

  1. Toshiba Qosmio X505-Q860 Keyboard Replacement, Battery: crwdns2935265:01crwdnd2935265:01crwdnd2935265:03crwdne2935265:0 Toshiba Qosmio X505-Q860 Keyboard Replacement, Battery: crwdns2935265:01crwdnd2935265:02crwdnd2935265:03crwdne2935265:0 Toshiba Qosmio X505-Q860 Keyboard Replacement, Battery: crwdns2935265:01crwdnd2935265:03crwdnd2935265:03crwdne2935265:0
    • Turn off laptop before starting.

    • Flip the switch on the right to the unlocked position.

  2. Toshiba Qosmio X505-Q860 Keyboard Replacement: crwdns2935265:02crwdnd2935265:01crwdnd2935265:03crwdne2935265:0 Toshiba Qosmio X505-Q860 Keyboard Replacement: crwdns2935265:02crwdnd2935265:02crwdnd2935265:03crwdne2935265:0 Toshiba Qosmio X505-Q860 Keyboard Replacement: crwdns2935265:02crwdnd2935265:03crwdnd2935265:03crwdne2935265:0
    • Hold the switch on the left and pull the battery up towards you, using the marked tab, to take it out.

  3. Toshiba Qosmio X505-Q860 Keyboard Replacement, Keyboard: crwdns2935265:03crwdnd2935265:01crwdnd2935265:02crwdne2935265:0 Toshiba Qosmio X505-Q860 Keyboard Replacement, Keyboard: crwdns2935265:03crwdnd2935265:02crwdnd2935265:02crwdne2935265:0
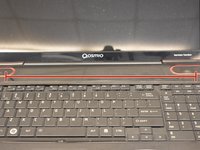
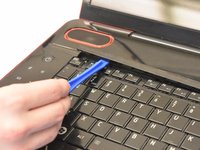
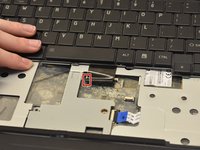
    • Locate the plastic bar at the top of the keyboard.

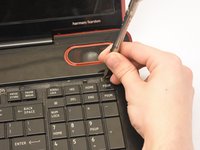
    • Wedge a plastic opening tool under the bar and pop the bar out.

  4. Toshiba Qosmio X505-Q860 Keyboard Replacement: crwdns2935265:04crwdnd2935265:01crwdnd2935265:02crwdne2935265:0 Toshiba Qosmio X505-Q860 Keyboard Replacement: crwdns2935265:04crwdnd2935265:02crwdnd2935265:02crwdne2935265:0
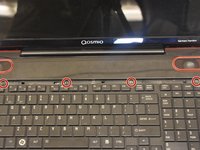
    • Unscrew the four 3.6mm long JIS #0 screws using the JIS screwdriver.

  5. Toshiba Qosmio X505-Q860 Keyboard Replacement: crwdns2935265:05crwdnd2935265:01crwdnd2935265:02crwdne2935265:0 Toshiba Qosmio X505-Q860 Keyboard Replacement: crwdns2935265:05crwdnd2935265:02crwdnd2935265:02crwdne2935265:0
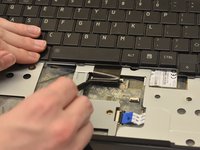
    • Lift the keyboard to get to the plastic ribbon underneath.

    • Using the Spudger, press a small tab on the left side of the ribbon. Then pull the ribbon out from the casing.

crwdns2915888:0crwdne2915888:0

To reassemble your device, follow these instructions in reverse order.

crwdns2935229:03crwdne2935229:0

Danielle Lapensee-Rankine

crwdns2935283:002/05/19crwdne2935283:0

570 crwdns2915208:0crwdne2915208:0

crwdns2935297:05crwdne2935297:0

crwdns2915084:0crwdne2915084:0

Appalachian State University, Team S2-G3, Menagarishvili Spring 2019 crwdns2935289:0Appalachian State University, Team S2-G3, Menagarishvili Spring 2019crwdne2935289:0

APSU-MENAGARISHVILI-S19S2G3

crwdns2931471:03crwdne2931471:0

crwdns2935297:018crwdne2935297:0

crwdns2944067:00crwdne2944067:0

crwdns2917038:0crwdne2917038:0

crwdns2936625:0crwdne2936625:0:

crwdns2936751:024crwdne2936751:0 1

crwdns2936753:07crwdne2936753:0 3

crwdns2936753:030crwdne2936753:0 12

crwdns2942667:0crwdne2942667:0 771