crwdns2915892:0crwdne2915892:0
With this guide, you will be able to safely remove your faulty SSD and replace it with a new SSD.
The SSD or solid state drive is responsible for containing your Chromebook’s Operating System as well as providing storage for applications on your Chromebook.
Solid state drives are heavily dependent on power supply capacitors and are free of moving parts. Therefore, they are vulnerable to malfunctions caused by power surges or logical errors. Some errors could be your machine not booting up, applications freezing, or the SSD running excessively slow. Your SSD has been proven to have a lifespan on 4 years before it will begin experiencing issues.
It is important to note that if your Chromebook is running out of storage, you may need to upgrade your current SSD. Your Chromebook supports SSDs of up to 32GB.
Make sure you back up important files on your Chromebook using an external drive or USB Drive.
crwdns2942213:0crwdne2942213:0
-
-
Remove the 2 rubber foot pads from the bottom (opposite the hinge) with the small Plastic Opening tool.
-
-
-
Remove the 10 7.1 mm screws using Phillips #1 screwdriver.
-
-
-
-
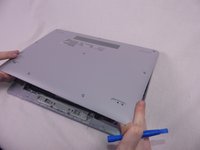
Loosen the back cover by using a plastic opening tool all the way around the device.
-
-
-
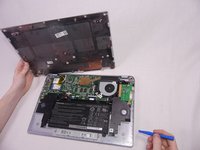
Remove the back cover by gently lifting up on one side of the device.
-
-
-
Remove the translucent yellow tape that connects the Wi-Fi card and the SSD.
-
Using a Phillips #1 screwdriver, remove the single screw connecting the SSD to the motherboard.
-
-
-
Gently grab the SSD and remove the card from the SSD slot on the motherboard, careful not to damage any of the connections on the motherboard.
-


To reassemble your device, follow these instructions in reverse order.
To reassemble your device, follow these instructions in reverse order.
crwdns2915084:0crwdne2915084:0

The Citadel Military College of South Carolina, Team S3-G6, Eggleston Spring 2021 crwdns2935289:0The Citadel Military College of South Carolina, Team S3-G6, Eggleston Spring 2021crwdne2935289:0
CMCSC-EGGLESTON-S21S3G6
crwdns2931471:03crwdne2931471:0
crwdns2935297:03crwdne2935297:0