crwdns2933423:0crwdne2933423:0
crwdns2947577:0crwdnd2947577:0crwdne2947577:0

Toilet Tank Assembly Replacement

crwdns2869540:0crwdne2869540:0: 20K

crwdns2959988:0crwdne2959988:0

crwdns2959990:0crwdne2959990:0
8
crwdns2959992:0crwdne2959992:0
75
crwdns2959994:0crwdne2959994:0
358
crwdns2959996:0crwdne2959996:0
20,085
crwdns2955950:0crwdne2955950:0: 5

crwdns2960004:02crwdne2960004:0, crwdns2960008:03crwdne2960008:0

crwdns2960000:0crwdne2960000:0
crwdns2959984:0crwdne2959984:0: 11

crwdns2959974:011crwdne2959974:0

crwdns2959986:0crwdne2959986:0: 14

crwdns2959982:014crwdne2959982:0

crwdns2955944:0crwdne2955944:0: 10 - 15 crwdns2931279:0crwdne2931279:0
crwdns2955970:0crwdne2955970:0: crwdns2937801:0crwdne2937801:0
Toilet Tank Assembly Replacement

crwdns2915892:0crwdne2915892:0

crwdns2959928:0crwdne2959928:0 ↓

Use this guide to replace the entire tank assembly on a gravity flush toilet. Removing the entire tank assembly is a helpful step when moving a toilet or replacing the toilet bowl.

crwdns2959930:0crwdne2959930:0

crwdns2943215:0crwdne2943215:0

    1. Toilet Tank Assembly Replacement, Tank Lid: crwdns2935265:01crwdnd2935265:01crwdnd2935265:03crwdne2935265:0 Toilet Tank Assembly Replacement, Tank Lid: crwdns2935265:01crwdnd2935265:02crwdnd2935265:03crwdne2935265:0 Toilet Tank Assembly Replacement, Tank Lid: crwdns2935265:01crwdnd2935265:03crwdnd2935265:03crwdne2935265:0
      • Lift the tank lid up and away from the toilet tank.

      crwdns2952109:0crwdne2952109:0

      crwdns2917038:0crwdne2917038:0

    1. Toilet Tank Assembly Replacement, Shutting off the Water Supply to a Toilet: crwdns2935265:02crwdnd2935265:01crwdnd2935265:02crwdne2935265:0 Toilet Tank Assembly Replacement, Shutting off the Water Supply to a Toilet: crwdns2935265:02crwdnd2935265:02crwdnd2935265:02crwdne2935265:0
      • Shut off the stop valve underneath the toilet by turning it clockwise until it becomes hand tight.

      • The appearance of this valve may differ from toilet to toilet, but most operate the same. Some valves require multiple turns to stop the water while others only require a quarter turn.

      crwdns2952109:0crwdne2952109:0

      crwdns2917038:0crwdne2917038:0

    1. Toilet Tank Assembly Replacement, Draining a Toilet Tank: crwdns2935265:03crwdnd2935265:01crwdnd2935265:02crwdne2935265:0 Toilet Tank Assembly Replacement, Draining a Toilet Tank: crwdns2935265:03crwdnd2935265:02crwdnd2935265:02crwdne2935265:0
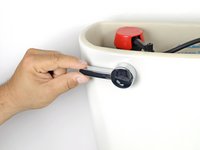
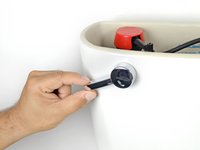
      • Push down the flush lever.

      • Hold the lever down until water stops draining from the tank.

      • A small amount of water will remain in the bottom of the tank.

      • If the flush lever or pull chain have become disconnected, lift up the toilet flapper to drain the tank.

      crwdns2952109:0crwdne2952109:0

      crwdns2917038:0crwdne2917038:0

    1. Toilet Tank Assembly Replacement, Sponge Drying a Toilet Tank: crwdns2935265:04crwdnd2935265:01crwdnd2935265:03crwdne2935265:0 Toilet Tank Assembly Replacement, Sponge Drying a Toilet Tank: crwdns2935265:04crwdnd2935265:02crwdnd2935265:03crwdne2935265:0 Toilet Tank Assembly Replacement, Sponge Drying a Toilet Tank: crwdns2935265:04crwdnd2935265:03crwdnd2935265:03crwdne2935265:0
      • Use a sponge to soak up and remove any remaining water from the toilet tank.

      • Periodically squeeze the excess water from the sponge.

      crwdns2952109:0crwdne2952109:0

      crwdns2917038:0crwdne2917038:0

    1. Toilet Tank Assembly Replacement, Supply Tube: crwdns2935265:05crwdnd2935265:01crwdnd2935265:03crwdne2935265:0 Toilet Tank Assembly Replacement, Supply Tube: crwdns2935265:05crwdnd2935265:02crwdnd2935265:03crwdne2935265:0 Toilet Tank Assembly Replacement, Supply Tube: crwdns2935265:05crwdnd2935265:03crwdnd2935265:03crwdne2935265:0
      • Place a bucket under the supply tube to catch any dripping water.

      • Turn the coupling nut on the supply tube clockwise until it releases from the threaded shank on the bottom of the tank.

      crwdns2952109:0crwdne2952109:0

      crwdns2917038:0crwdne2917038:0

    1. Toilet Tank Assembly Replacement, Tank Assembly: crwdns2935265:06crwdnd2935265:01crwdnd2935265:03crwdne2935265:0 Toilet Tank Assembly Replacement, Tank Assembly: crwdns2935265:06crwdnd2935265:02crwdnd2935265:03crwdne2935265:0 Toilet Tank Assembly Replacement, Tank Assembly: crwdns2935265:06crwdnd2935265:03crwdnd2935265:03crwdne2935265:0
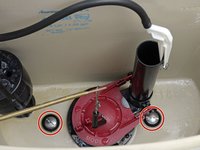
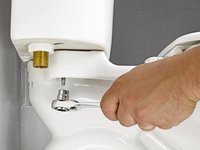
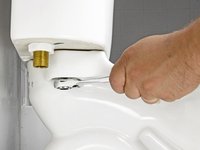
      • Using a socket wrench to hold the nuts, unscrew the two tank bolts with a screwdriver.

      • When reattaching the tank, tighten the bolts with a screwdriver, rather than tightening the nuts. Alternately tighten each bolt in increments, until the tank fits snugly against the toilet.

      • Avoid over-tightening the tank bolts. Too much force can easily crack the toilet tank or toilet bowl.

      crwdns2952109:0crwdne2952109:0

      crwdns2917038:0crwdne2917038:0

    2. Toilet Tank Assembly Replacement: crwdns2935265:07crwdnd2935265:01crwdnd2935265:02crwdne2935265:0 Toilet Tank Assembly Replacement: crwdns2935265:07crwdnd2935265:02crwdnd2935265:02crwdne2935265:0
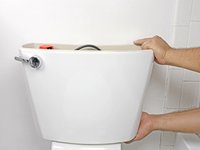
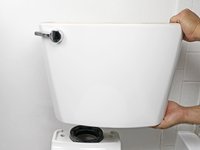
      • Lift the tank up from the lower half of the toilet.

      • Set the tank on a thick towel to avoid scraping it against the floor.

      crwdns2952109:0crwdne2952109:0

      crwdns2917038:0crwdne2917038:0

crwdns2915888:0crwdne2915888:0

To reassemble your device, follow these instructions in reverse order.

crwdns2935221:0crwdne2935221:0

crwdns2935229:011crwdne2935229:0

Ron Davis

crwdns2935283:002/17/15crwdne2935283:0

33,793 crwdns2915208:0crwdne2915208:0

crwdns2935297:013crwdne2935297:0

crwdns2947412:03crwdne2947412:0

Step 5: Clockwise or counter-clockwise depends upon whether you are looking down at the coupling nut from above or up at it from below.

I suspect that, unless it has a left-handed thread, most people would turn it in the direction that works.

John Pretz - crwdns2934203:0crwdne2934203:0 crwdns2950251:0crwdne2950251:0

Close your eyes. Attaching something, the turning motion is (usually) clockwise: Righty-tighty; lefty-loosey.

M J McAllister - crwdns2934203:0crwdne2934203:0 crwdns2950251:0crwdne2950251:0

crwdns2917038:0crwdne2917038:0

crwdns2936625:0crwdne2936625:0:

crwdns2936751:024crwdne2936751:0 8

crwdns2936753:07crwdne2936753:0 75

crwdns2936753:030crwdne2936753:0 358

crwdns2959996:0crwdne2959996:0 20,085