crwdns2933423:0crwdne2933423:0

Toaster Oven Toasting Knob Replacement

crwdns2942213:0crwdne2942213:0

  1. Toaster Oven Toasting Knob Replacement, Toasting knob: crwdns2935265:01crwdnd2935265:01crwdnd2935265:03crwdne2935265:0 Toaster Oven Toasting Knob Replacement, Toasting knob: crwdns2935265:01crwdnd2935265:02crwdnd2935265:03crwdne2935265:0 Toaster Oven Toasting Knob Replacement, Toasting knob: crwdns2935265:01crwdnd2935265:03crwdnd2935265:03crwdne2935265:0
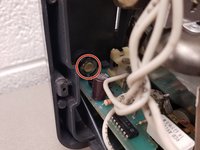
    • Remove the two 4mm by 8mm screws from the back of the toaster oven.

  2. Toaster Oven Toasting Knob Replacement: crwdns2935265:02crwdnd2935265:01crwdnd2935265:03crwdne2935265:0 Toaster Oven Toasting Knob Replacement: crwdns2935265:02crwdnd2935265:02crwdnd2935265:03crwdne2935265:0 Toaster Oven Toasting Knob Replacement: crwdns2935265:02crwdnd2935265:03crwdnd2935265:03crwdne2935265:0
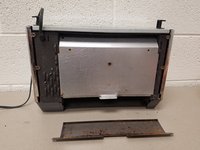
    • Remove the four 4mm by 8mm screws from the black supports from the base of the toaster oven.

    • Take the two supports off of the bottom.

  3. Toaster Oven Toasting Knob Replacement: crwdns2935265:03crwdnd2935265:01crwdnd2935265:02crwdne2935265:0 Toaster Oven Toasting Knob Replacement: crwdns2935265:03crwdnd2935265:02crwdnd2935265:02crwdne2935265:0
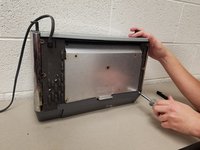
    • Remove the two 4mm by 4mm screws from the base in order to remove the tray.

  4. Toaster Oven Toasting Knob Replacement: crwdns2935265:04crwdnd2935265:01crwdnd2935265:01crwdne2935265:0
    • Slide the back panel off of the oven.

  5. Toaster Oven Toasting Knob Replacement: crwdns2935265:05crwdnd2935265:01crwdnd2935265:01crwdne2935265:0
    • Grip the sides of the metal cover and lift the cover up off the toaster oven top.

  6. Toaster Oven Toasting Knob Replacement: crwdns2935265:06crwdnd2935265:01crwdnd2935265:03crwdne2935265:0 Toaster Oven Toasting Knob Replacement: crwdns2935265:06crwdnd2935265:02crwdnd2935265:03crwdne2935265:0 Toaster Oven Toasting Knob Replacement: crwdns2935265:06crwdnd2935265:03crwdnd2935265:03crwdne2935265:0
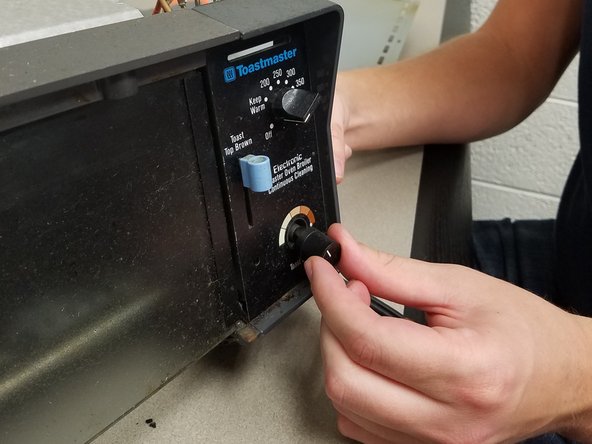
    • The knob is missing in the first picture.

    • Push the knob into the hole.

    • The knob is now back in place in the last picture.

crwdns2915888:0crwdne2915888:0

To reassemble your device, follow these instructions in reverse order.

Alissa Mell

crwdns2935283:009/26/17crwdne2935283:0

101 crwdns2915208:0crwdne2915208:0

crwdns2935295:0crwdne2935295:0

crwdns2915084:0crwdne2915084:0

Michigan Tech, Team S5-G25, Galliah Fall 2017 crwdns2935289:0Michigan Tech, Team S5-G25, Galliah Fall 2017crwdne2935289:0

MTU-GALLIAH-F17S5G25

crwdns2934841:01crwdne2934841:0

crwdns2935303:01crwdne2935303:0

crwdns2944067:00crwdne2944067:0

crwdns2917038:0crwdne2917038:0

crwdns2936625:0crwdne2936625:0:

crwdns2936751:024crwdne2936751:0 3

crwdns2936753:07crwdne2936753:0 8

crwdns2936753:030crwdne2936753:0 24

crwdns2942667:0crwdne2942667:0 1,848