crwdns2933423:0crwdne2933423:0

Texas Instruments TI-92 Batteries Replacement

crwdns2942213:0crwdne2942213:0

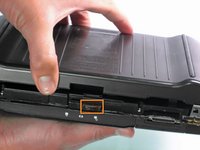
  1. Texas Instruments TI-92 Batteries Replacement, Back Cover: crwdns2935265:01crwdnd2935265:01crwdnd2935265:03crwdne2935265:0 Texas Instruments TI-92 Batteries Replacement, Back Cover: crwdns2935265:01crwdnd2935265:02crwdnd2935265:03crwdne2935265:0 Texas Instruments TI-92 Batteries Replacement, Back Cover: crwdns2935265:01crwdnd2935265:03crwdnd2935265:03crwdne2935265:0
    • The first step to any repair operation is to remove the front cover.

    • Grab the back of the calculator with one hand and the cover with the other.

    • Pull the cover off from one of the sides for easy removal.

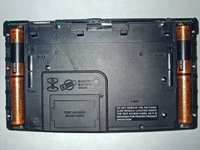
  2. Texas Instruments TI-92 Batteries Replacement: crwdns2935265:02crwdnd2935265:01crwdnd2935265:02crwdne2935265:0 Texas Instruments TI-92 Batteries Replacement: crwdns2935265:02crwdnd2935265:02crwdnd2935265:02crwdne2935265:0
    • Orientate the calculator with the top facing towards you.

    • Slide the locking tab,found on the top part of the calculator, to the unlock position.

  3. Texas Instruments TI-92 Batteries Replacement: crwdns2935265:03crwdnd2935265:01crwdnd2935265:02crwdne2935265:0 Texas Instruments TI-92 Batteries Replacement: crwdns2935265:03crwdnd2935265:02crwdnd2935265:02crwdne2935265:0
    • "Locking Tab"

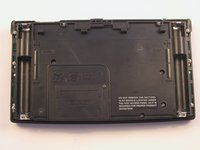
    • To remove the back cover, slide the cover away from the locking tab towards the bottom of the calculator until the cover no longer slides.

    • Then with the front of the calculator facing down, pull up on the back cover.

    • The calculator should now be orientated with the front facing down, as shown in picture 2.

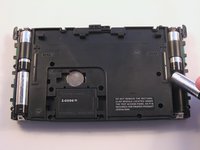
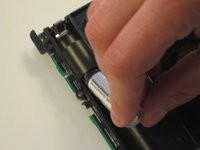
  4. Texas Instruments TI-92 Batteries Replacement, Batteries: crwdns2935265:04crwdnd2935265:01crwdnd2935265:03crwdne2935265:0 Texas Instruments TI-92 Batteries Replacement, Batteries: crwdns2935265:04crwdnd2935265:02crwdnd2935265:03crwdne2935265:0 Texas Instruments TI-92 Batteries Replacement, Batteries: crwdns2935265:04crwdnd2935265:03crwdnd2935265:03crwdne2935265:0
    • The Batteries are now exposed and the calculator is face down with the back towards you.

    • Remove the bottom batteries by pressing the battery towards you while pulling it out from the far end.

    • If you can not do the previous step with your finger try using a flat ended tool such as an Ipod opening tool.

    • After the bottom battery has been removed push or slide the other(top) battery towards you until it is fully exposed in the battery slot.

    • Now simply remove the battery.

crwdns2915888:0crwdne2915888:0

To reassemble your device, follow these instructions in reverse order.

crwdns2935229:04crwdne2935229:0

Daniel Maldonado

crwdns2935283:004/14/10crwdne2935283:0

240 crwdns2915208:0crwdne2915208:0

crwdns2935297:09crwdne2935297:0

crwdns2915084:0crwdne2915084:0

Cal Poly, Team 15-51, Garner Spring 2010 crwdns2935289:0Cal Poly, Team 15-51, Garner Spring 2010crwdne2935289:0

CPSU-GARNER-S10S15G51

crwdns2931471:05crwdne2931471:0

crwdns2935297:09crwdne2935297:0

crwdns2944067:00crwdne2944067:0

crwdns2917038:0crwdne2917038:0

crwdns2936625:0crwdne2936625:0:

crwdns2936751:024crwdne2936751:0 0

crwdns2936753:07crwdne2936753:0 6

crwdns2936753:030crwdne2936753:0 22

crwdns2942667:0crwdne2942667:0 6,931