crwdns2933423:0crwdne2933423:0
crwdns2947577:0crwdnd2947577:0crwdne2947577:0

Texas Instruments TI-30X IIS Battery Replacement

crwdns2942213:0crwdne2942213:0

    1. Texas Instruments TI-30X IIS Battery Replacement, Device Inspection: crwdns2935265:01crwdnd2935265:01crwdnd2935265:03crwdne2935265:0 Texas Instruments TI-30X IIS Battery Replacement, Device Inspection: crwdns2935265:01crwdnd2935265:02crwdnd2935265:03crwdne2935265:0 Texas Instruments TI-30X IIS Battery Replacement, Device Inspection: crwdns2935265:01crwdnd2935265:03crwdnd2935265:03crwdne2935265:0
      • Ensure that your calculator is a TI-30X IIS by looking in the top right corner of the front face.

      • Look at the rear face of the calculator and locate the four case screws. There are two at the top and two at the bottom.

      crwdns2952109:0crwdne2952109:0

      crwdns2917038:0crwdne2917038:0

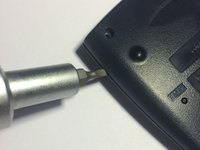
    2. Texas Instruments TI-30X IIS Battery Replacement, Removing Screws: crwdns2935265:02crwdnd2935265:01crwdnd2935265:02crwdne2935265:0 Texas Instruments TI-30X IIS Battery Replacement, Removing Screws: crwdns2935265:02crwdnd2935265:02crwdnd2935265:02crwdne2935265:0
      • Use a Philips 00 screwdriver to remove the four case screws on the rear face of the calculator.

      • Be sure to save the screws in a secure place as they are small and easy to lose. They will be needed later for reassembly.

      crwdns2952109:0crwdne2952109:0

      crwdns2917038:0crwdne2917038:0

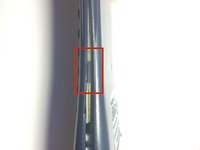
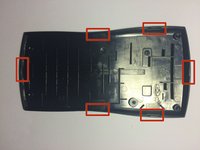
    3. Texas Instruments TI-30X IIS Battery Replacement, Unclipping Case: crwdns2935265:03crwdnd2935265:01crwdnd2935265:03crwdne2935265:0 Texas Instruments TI-30X IIS Battery Replacement, Unclipping Case: crwdns2935265:03crwdnd2935265:02crwdnd2935265:03crwdne2935265:0 Texas Instruments TI-30X IIS Battery Replacement, Unclipping Case: crwdns2935265:03crwdnd2935265:03crwdnd2935265:03crwdne2935265:0
      • With all four screws removed, use a flathead screwdriver or similar flat object to separate the front and rear casings.

      • There are six clips that keep the cases together. These areas will require extra force to separate, but use caution to not fracture the plastic pieces.

      crwdns2952109:0crwdne2952109:0

      crwdns2917038:0crwdne2917038:0

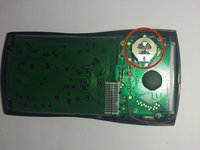
    4. Texas Instruments TI-30X IIS Battery Replacement, Removing Battery: crwdns2935265:04crwdnd2935265:01crwdnd2935265:03crwdne2935265:0 Texas Instruments TI-30X IIS Battery Replacement, Removing Battery: crwdns2935265:04crwdnd2935265:02crwdnd2935265:03crwdne2935265:0 Texas Instruments TI-30X IIS Battery Replacement, Removing Battery: crwdns2935265:04crwdnd2935265:03crwdnd2935265:03crwdne2935265:0
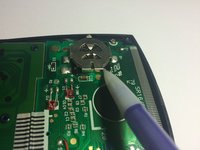
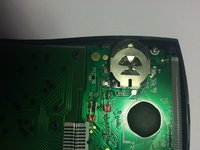
      • With the rear case off, the battery is exposed and accessible.

      • Using a pointed tool, slide the battery out of its terminal towards the near edge.

      • Once the battery is protruding from the contacts, remove it with your fingers.

      crwdns2952109:0crwdne2952109:0

      crwdns2917038:0crwdne2917038:0

    5. Texas Instruments TI-30X IIS Battery Replacement, Replacing Battery: crwdns2935265:05crwdnd2935265:01crwdnd2935265:01crwdne2935265:0
      • Properly dispose of the old battery.

      • Replace the battery with an identical one, positive terminal up and negative terminal facing down towards the circuit board.

      • Following the previous steps in the reverse order to reassemble the calculator.

      crwdns2952109:0crwdne2952109:0

      crwdns2917038:0crwdne2917038:0

crwdns2915888:0crwdne2915888:0

To reassemble your device, follow these instructions in reverse order.

crwdns2935221:0crwdne2935221:0

crwdns2935229:021crwdne2935229:0

Ryan

crwdns2935283:003/01/15crwdne2935283:0

539 crwdns2915208:0crwdne2915208:0

crwdns2935295:0crwdne2935295:0

crwdns2947412:00crwdne2947412:0

crwdns2917038:0crwdne2917038:0

crwdns2936625:0crwdne2936625:0:

crwdns2936751:024crwdne2936751:0 14

crwdns2936753:07crwdne2936753:0 86

crwdns2936753:030crwdne2936753:0 365

crwdns2942667:0crwdne2942667:0 38,090