crwdns2933423:0crwdne2933423:0

Tengda S5 Plus Rear Camera Replacement

crwdns2942213:0crwdne2942213:0

  1. Tengda S5 Plus Rear Camera Replacement, Back Panel: crwdns2935265:01crwdnd2935265:01crwdnd2935265:01crwdne2935265:0
    • Place the phone screen-side down.

  2. Tengda S5 Plus Rear Camera Replacement: crwdns2935265:02crwdnd2935265:01crwdnd2935265:02crwdne2935265:0 Tengda S5 Plus Rear Camera Replacement: crwdns2935265:02crwdnd2935265:02crwdnd2935265:02crwdne2935265:0
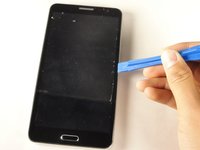
    • Using your fingernail or any prying tool (we used the Metal Spudger), begin to pry away the back panel starting at the bottom of the phone.

    • Continue to work your way around the phone counterclockwise until you can pull the back cover off.

  3. Tengda S5 Plus Rear Camera Replacement, Battery: crwdns2935265:03crwdnd2935265:01crwdnd2935265:01crwdne2935265:0
    • Remove the battery by placing your thumb in the slot, pushing the battery up and pulling it out.

  4. Tengda S5 Plus Rear Camera Replacement, Rear Camera: crwdns2935265:04crwdnd2935265:01crwdnd2935265:01crwdne2935265:0
    • Unscrew the twelve 3 mm screws from the back panel using a Phillips #00 screwdriver.

    • Keep these screws in a safe place. They are very small and easy to lose.

  5. Tengda S5 Plus Rear Camera Replacement: crwdns2935265:05crwdnd2935265:01crwdnd2935265:02crwdne2935265:0 Tengda S5 Plus Rear Camera Replacement: crwdns2935265:05crwdnd2935265:02crwdnd2935265:02crwdne2935265:0
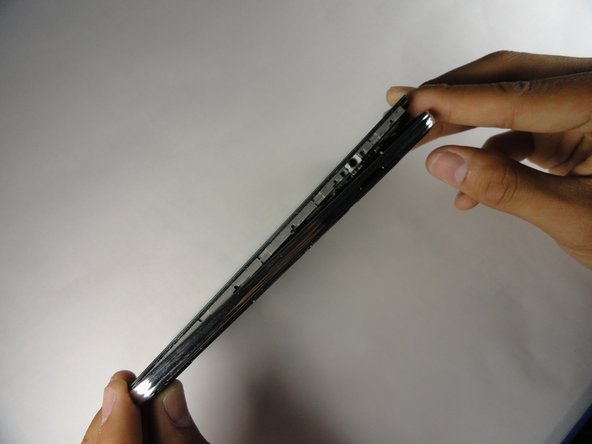
    • Using the plastic opening tool, create space between the front screen and the metal casing.

    • Once the screen is separated from the back panel, pull the two pieces apart.

  6. Tengda S5 Plus Rear Camera Replacement: crwdns2935265:06crwdnd2935265:01crwdnd2935265:01crwdne2935265:0
    • Place the phone facing screen down.

    • Using the plastic prying tool, gently disconnect the black connector cable.

    • The connector cable should easy snap out with little force.

  7. Tengda S5 Plus Rear Camera Replacement: crwdns2935265:07crwdnd2935265:01crwdnd2935265:01crwdne2935265:0
    • Using the plastic prying tool, pry the camera from the tape holding it in place.

    • Be careful not to rip the tape.

crwdns2915888:0crwdne2915888:0

To reassemble your device, follow these instructions in reverse order.

crwdns2935229:02crwdne2935229:0

Jholmesford

crwdns2935283:004/21/15crwdne2935283:0

188 crwdns2915208:0crwdne2915208:0

crwdns2935295:0crwdne2935295:0

crwdns2915084:0crwdne2915084:0

Cal Poly, Team 14-9, Amido Spring 2015 crwdns2935289:0Cal Poly, Team 14-9, Amido Spring 2015crwdne2935289:0

CPSU-AMIDO-S15S14G9

crwdns2931471:04crwdne2931471:0

crwdns2935297:010crwdne2935297:0

crwdns2944067:00crwdne2944067:0

crwdns2917038:0crwdne2917038:0

crwdns2936625:0crwdne2936625:0:

crwdns2936751:024crwdne2936751:0 0

crwdns2936753:07crwdne2936753:0 3

crwdns2936753:030crwdne2936753:0 13

crwdns2942667:0crwdne2942667:0 276