crwdns2933423:0crwdne2933423:0
crwdns2947577:0crwdnd2947577:0crwdne2947577:0

crwdns2956850:0crwdne2956850:0 crwdns2956756:0crwdnd2956756:0crwdne2956756:0

Tarox M2 Replacement

crwdns2942213:0crwdne2942213:0

    1. Tarox M2 Replacement, M2: crwdns2935265:01crwdnd2935265:01crwdnd2935265:01crwdne2935265:0
      • Flip over

      crwdns2952109:0crwdne2952109:0

      crwdns2917038:0crwdne2917038:0

    2. Tarox M2 Replacement: crwdns2935265:02crwdnd2935265:01crwdnd2935265:01crwdne2935265:0
      • Remove the 4 PH1 Phillips screws

      • CAUTION: If you pull too hard, you could damage the screws and the cover!

      crwdns2952109:0crwdne2952109:0

      crwdns2917038:0crwdne2917038:0

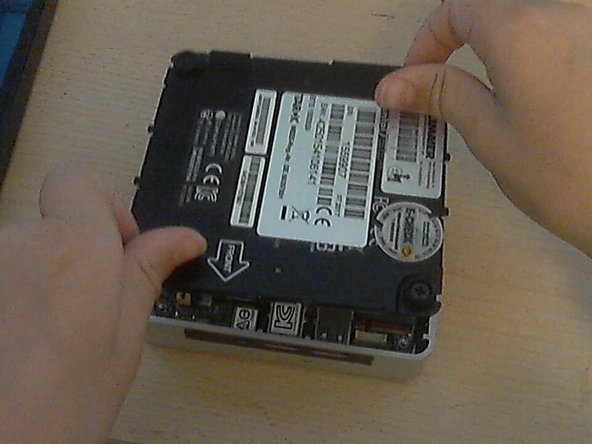
    3. Tarox M2 Replacement: crwdns2935265:03crwdnd2935265:01crwdnd2935265:01crwdne2935265:0
      • Pull the cover out.

      crwdns2952109:0crwdne2952109:0

      crwdns2917038:0crwdne2917038:0

    4. Tarox M2 Replacement: crwdns2935265:04crwdnd2935265:01crwdnd2935265:01crwdne2935265:0
      • Remove the small Phillips screw (see: red circle).

      crwdns2952109:0crwdne2952109:0

      crwdns2917038:0crwdne2917038:0

    5. Tarox M2 Replacement: crwdns2935265:05crwdnd2935265:01crwdnd2935265:02crwdne2935265:0 Tarox M2 Replacement: crwdns2935265:05crwdnd2935265:02crwdnd2935265:02crwdne2935265:0
      • Remove the M2.

      • Warning: pulling too hard may break the pins!

      crwdns2952109:0crwdne2952109:0

      crwdns2917038:0crwdne2917038:0

crwdns2915888:0crwdne2915888:0

Work through the steps in reverse order to reassemble your device.

crwdns2935221:0crwdne2935221:0

crwdns2935227:0crwdne2935227:0

NovaCrafter92

crwdns2935283:009/21/24crwdne2935283:0

121 crwdns2915208:0crwdne2915208:0

crwdns2935295:0crwdne2935295:0

crwdns2947412:00crwdne2947412:0

crwdns2917038:0crwdne2917038:0

crwdns2936625:0crwdne2936625:0:

crwdns2936751:024crwdne2936751:0 2

crwdns2936753:07crwdne2936753:0 10

crwdns2936753:030crwdne2936753:0 33

crwdns2942667:0crwdne2942667:0 144