crwdns2933423:0crwdne2933423:0

TackLife GSW01A Pump Assembly Replacement

crwdns2942213:0crwdne2942213:0

  1. TackLife GSW01A Pump Assembly Replacement, Pump: crwdns2935265:01crwdnd2935265:01crwdnd2935265:02crwdne2935265:0 TackLife GSW01A Pump Assembly Replacement, Pump: crwdns2935265:01crwdnd2935265:02crwdnd2935265:02crwdne2935265:0
    • Before you begin, be sure that the engine is powered off and is cool to the touch.

    • For safety Do Not make adjustments to your equipment without first disconnecting the spark plug.

    • Disconnect the spark plug by grabbing it and pulling it outwards.

  2. TackLife GSW01A Pump Assembly Replacement: crwdns2935265:02crwdnd2935265:01crwdnd2935265:03crwdne2935265:0 TackLife GSW01A Pump Assembly Replacement: crwdns2935265:02crwdnd2935265:02crwdnd2935265:03crwdne2935265:0 TackLife GSW01A Pump Assembly Replacement: crwdns2935265:02crwdnd2935265:03crwdnd2935265:03crwdne2935265:0
    • Pull the siphon tube apart from connector.

    • Make sure to alleviate the pressure in the pump by squeezing the trigger, acknowledging where the tip is pointed.

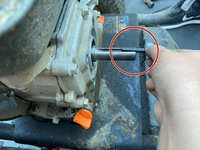
    • Try to twist the high-pressure hose off by hand. If too tight, use Vise-Grips or Channellock pliers on the grip to loosen and remove the hose. Careful to maintain a steady grip lest the handle strip.

  3. TackLife GSW01A Pump Assembly Replacement: crwdns2935265:03crwdnd2935265:01crwdnd2935265:03crwdne2935265:0 TackLife GSW01A Pump Assembly Replacement: crwdns2935265:03crwdnd2935265:02crwdnd2935265:03crwdne2935265:0 TackLife GSW01A Pump Assembly Replacement: crwdns2935265:03crwdnd2935265:03crwdnd2935265:03crwdne2935265:0
    • OPTIONAL: Remove handle for tool and hand clearance.

    • To remove the handle, unscrew the orange triangle knobs on both sides. With a firm grip on both sides pull handle apart from pressure washer.

  4. TackLife GSW01A Pump Assembly Replacement: crwdns2935265:04crwdnd2935265:01crwdnd2935265:03crwdne2935265:0 TackLife GSW01A Pump Assembly Replacement: crwdns2935265:04crwdnd2935265:02crwdnd2935265:03crwdne2935265:0 TackLife GSW01A Pump Assembly Replacement: crwdns2935265:04crwdnd2935265:03crwdnd2935265:03crwdne2935265:0
    • Remove the 4 mounting bolts. (M8x20)

    • Use an open-ended or box wrench to loosen the bolts. There is not enough clearance for using a socket wrench.

    • Gently tap with a hammer, while safely holding the wrench in place on the bolt with the other hand to loosen the bolts.

    • Be careful not to strip the heads of bolts.

  5. TackLife GSW01A Pump Assembly Replacement: crwdns2935265:05crwdnd2935265:01crwdnd2935265:03crwdne2935265:0 TackLife GSW01A Pump Assembly Replacement: crwdns2935265:05crwdnd2935265:02crwdnd2935265:03crwdne2935265:0 TackLife GSW01A Pump Assembly Replacement: crwdns2935265:05crwdnd2935265:03crwdnd2935265:03crwdne2935265:0
    • Remove the existing pump from motor shaft.

    • Retrieve the shaft key from the keyway inside the pump if it is not on the motor shaft keyseat.

  6. TackLife GSW01A Pump Assembly Replacement: crwdns2935265:06crwdnd2935265:01crwdnd2935265:01crwdne2935265:0
    • Clean and lubricate the motor shaft and key.

    • Dirt and grit on shaft can possibly cause damage to the pump over time.

  7. TackLife GSW01A Pump Assembly Replacement: crwdns2935265:07crwdnd2935265:01crwdnd2935265:03crwdne2935265:0 TackLife GSW01A Pump Assembly Replacement: crwdns2935265:07crwdnd2935265:02crwdnd2935265:03crwdne2935265:0 TackLife GSW01A Pump Assembly Replacement: crwdns2935265:07crwdnd2935265:03crwdnd2935265:03crwdne2935265:0
    • Correctly set the shaft key and hold in place while sliding the pump onto the motor shaft.

    • Align the keyway inside the pump with the key and slide the pump onto the motor shaft.

    • If key is not properly set, it could possibly cause damage to the pump or motor shaft.

  8. TackLife GSW01A Pump Assembly Replacement: crwdns2935265:08crwdnd2935265:01crwdnd2935265:03crwdne2935265:0 TackLife GSW01A Pump Assembly Replacement: crwdns2935265:08crwdnd2935265:02crwdnd2935265:03crwdne2935265:0 TackLife GSW01A Pump Assembly Replacement: crwdns2935265:08crwdnd2935265:03crwdnd2935265:03crwdne2935265:0
    • Reinstall the 4 mounting bolts.

    • Rotate the pump so that the hose feeds are properly positioned, and bolt holes are aligned with holes on motor.

  9. TackLife GSW01A Pump Assembly Replacement: crwdns2935265:09crwdnd2935265:01crwdnd2935265:03crwdne2935265:0 TackLife GSW01A Pump Assembly Replacement: crwdns2935265:09crwdnd2935265:02crwdnd2935265:03crwdne2935265:0 TackLife GSW01A Pump Assembly Replacement: crwdns2935265:09crwdnd2935265:03crwdnd2935265:03crwdne2935265:0
    • Reattach the hoses.

    • Reattach handle if removed in earlier steps (OPTIONAL step #3).

  10. TackLife GSW01A Pump Assembly Replacement: crwdns2935265:010crwdnd2935265:01crwdnd2935265:03crwdne2935265:0 TackLife GSW01A Pump Assembly Replacement: crwdns2935265:010crwdnd2935265:02crwdnd2935265:03crwdne2935265:0 TackLife GSW01A Pump Assembly Replacement: crwdns2935265:010crwdnd2935265:03crwdnd2935265:03crwdne2935265:0
    • Screw the orange triangular knobs back on.

    • Reattach the spark plug.

    • Verify all connections are snug tight before operating the pressure washer.

crwdns2915888:0crwdne2915888:0

To reassemble your device, follow these instructions in reverse order.

crwdns2935229:03crwdne2935229:0

Mallory A Gullett

crwdns2935283:006/11/20crwdne2935283:0

249 crwdns2915208:0crwdne2915208:0

crwdns2935295:0crwdne2935295:0

crwdns2915084:0crwdne2915084:0

University of Memphis, Team S1-G1, Lane Summer 2020 crwdns2935289:0University of Memphis, Team S1-G1, Lane Summer 2020crwdne2935289:0

UM-LANE-SU20S1G1

crwdns2931471:05crwdne2931471:0

crwdns2935303:01crwdne2935303:0

crwdns2944067:02crwdne2944067:0

I'm getting milky oil I want to change pump on my tacklife pressure washer 3200 psi what is a good pump?I cant find OEM pump from the number on pump?What size shaft?

Jason Blood - crwdns2934203:0crwdne2934203:0

My pump leaks. Do you know of a gasket kit? What type of replacement oil is used thank you

G Barnes - crwdns2934203:0crwdne2934203:0

crwdns2917038:0crwdne2917038:0

crwdns2936625:0crwdne2936625:0:

crwdns2936751:024crwdne2936751:0 3

crwdns2936753:07crwdne2936753:0 10

crwdns2936753:030crwdne2936753:0 43

crwdns2942667:0crwdne2942667:0 1,303