crwdns2933423:0crwdne2933423:0

TDK Life on Record A26 Battery Replacement

crwdns2942213:0crwdne2942213:0

  1. TDK Life on Record A26 Battery Replacement, Battery: crwdns2935265:01crwdnd2935265:01crwdnd2935265:01crwdne2935265:0
    • Get a replacement battery from the TDK company. The battery part number is E23-00059-01.

  2. TDK Life on Record A26 Battery Replacement: crwdns2935265:02crwdnd2935265:01crwdnd2935265:02crwdne2935265:0 TDK Life on Record A26 Battery Replacement: crwdns2935265:02crwdnd2935265:02crwdnd2935265:02crwdne2935265:0
    • Obtain the screwdriver and the T09 (Torx) bit from the iFixit toolkit and assemble them together.

  3. TDK Life on Record A26 Battery Replacement: crwdns2935265:03crwdnd2935265:01crwdnd2935265:02crwdne2935265:0 TDK Life on Record A26 Battery Replacement: crwdns2935265:03crwdnd2935265:02crwdnd2935265:02crwdne2935265:0
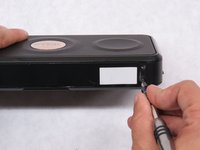
    • Use the T09-bit screwdriver to remove the two 8-mm torx screws on the bottom strip of the speaker.

  4. TDK Life on Record A26 Battery Replacement: crwdns2935265:04crwdnd2935265:01crwdnd2935265:03crwdne2935265:0 TDK Life on Record A26 Battery Replacement: crwdns2935265:04crwdnd2935265:02crwdnd2935265:03crwdne2935265:0 TDK Life on Record A26 Battery Replacement: crwdns2935265:04crwdnd2935265:03crwdnd2935265:03crwdne2935265:0
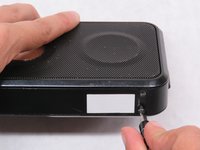
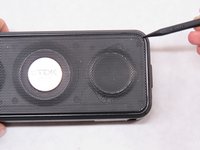
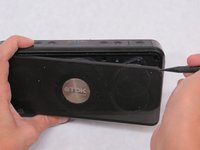
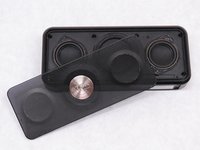
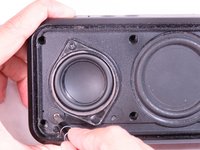
    • Remove the faceplate by using the pointy side of the black plastic spudger.

    • Stick the point of the spudger into one of the corners surrounding the faceplate and gently pull it up.

  5. TDK Life on Record A26 Battery Replacement: crwdns2935265:05crwdnd2935265:01crwdnd2935265:01crwdne2935265:0
    • Then exchange the T09 bit for a PH1 bit

  6. TDK Life on Record A26 Battery Replacement: crwdns2935265:06crwdnd2935265:01crwdnd2935265:02crwdne2935265:0 TDK Life on Record A26 Battery Replacement: crwdns2935265:06crwdnd2935265:02crwdnd2935265:02crwdne2935265:0
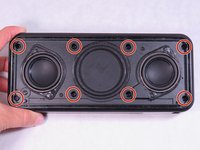
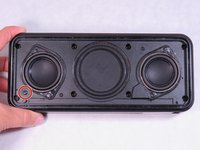
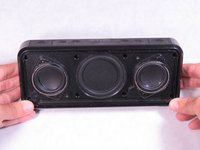
    • Use the PH1-bit screwdriver to remove the eight 11-mm Phillips head screws that are located behind the faceplate.

  7. TDK Life on Record A26 Battery Replacement: crwdns2935265:07crwdnd2935265:01crwdnd2935265:02crwdne2935265:0 TDK Life on Record A26 Battery Replacement: crwdns2935265:07crwdnd2935265:02crwdnd2935265:02crwdne2935265:0
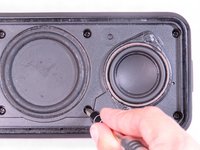
    • Remove the one 7-mm Phillips head screw located on the lower left of the front of the speaker with the PH1-bit screwdriver.

  8. TDK Life on Record A26 Battery Replacement: crwdns2935265:08crwdnd2935265:01crwdnd2935265:02crwdne2935265:0 TDK Life on Record A26 Battery Replacement: crwdns2935265:08crwdnd2935265:02crwdnd2935265:02crwdne2935265:0
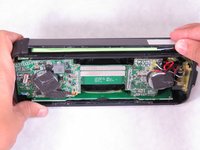
    • After all screws are removed, turn the speaker over to the back of the speaker.

  9. TDK Life on Record A26 Battery Replacement: crwdns2935265:09crwdnd2935265:01crwdnd2935265:03crwdne2935265:0 TDK Life on Record A26 Battery Replacement: crwdns2935265:09crwdnd2935265:02crwdnd2935265:03crwdne2935265:0 TDK Life on Record A26 Battery Replacement: crwdns2935265:09crwdnd2935265:03crwdnd2935265:03crwdne2935265:0
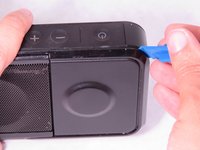
    • Use the blue plastic opening tool from the toolkit to pry off the back of the speaker, gradually moving around the device.

    • Make sure to open it evenly on all sides.

  10. TDK Life on Record A26 Battery Replacement: crwdns2935265:010crwdnd2935265:01crwdnd2935265:02crwdne2935265:0 TDK Life on Record A26 Battery Replacement: crwdns2935265:010crwdnd2935265:02crwdnd2935265:02crwdne2935265:0
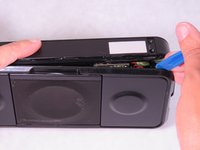
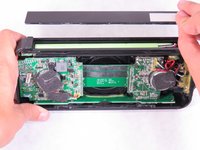
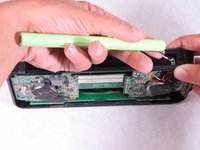
    • Then remove the bottom narrow strip of plastic to uncover the battery.

  11. TDK Life on Record A26 Battery Replacement: crwdns2935265:011crwdnd2935265:01crwdnd2935265:02crwdne2935265:0 TDK Life on Record A26 Battery Replacement: crwdns2935265:011crwdnd2935265:02crwdnd2935265:02crwdne2935265:0
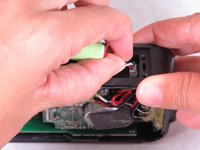
    • Follow the red, black, and white wires attached to the green battery sleeve down to the white small plug.

  12. TDK Life on Record A26 Battery Replacement: crwdns2935265:012crwdnd2935265:01crwdnd2935265:02crwdne2935265:0 TDK Life on Record A26 Battery Replacement: crwdns2935265:012crwdnd2935265:02crwdnd2935265:02crwdne2935265:0
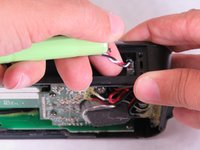
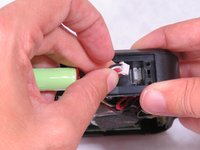
    • Once you have found the white plug, gently grip the colored wires and carefully pull to remove the white plug from the speaker.

crwdns2915888:0crwdne2915888:0

To reassemble your device, follow these instructions in reverse order.

crwdns2935229:09crwdne2935229:0

Elise Howard

crwdns2935283:010/13/15crwdne2935283:0

831 crwdns2915208:0crwdne2915208:0

crwdns2935297:03crwdne2935297:0

crwdns2915084:0crwdne2915084:0

Sam Houston State, Team 2-2, Blackburne Fall 2015 crwdns2935289:0Sam Houston State, Team 2-2, Blackburne Fall 2015crwdne2935289:0

SHSU-BLACKBURNE-F15S2G2

crwdns2931471:03crwdne2931471:0

crwdns2935297:03crwdne2935297:0

crwdns2944067:02crwdne2944067:0

This procedure is totally unnecessary! TDK has much simpler instructions. http://downloads.imationsupport.com/lor/...

Marty F - crwdns2934203:0crwdne2934203:0

Actually, this page DID help me as the other “simpler” instrucions didn’t work, as I was unable to slide the battery cover after removing the two screws.In any case the entire procedure only took about ten minutes, so THANK YOU!

Sander - crwdns2934203:0crwdne2934203:0

crwdns2917038:0crwdne2917038:0

crwdns2936625:0crwdne2936625:0:

crwdns2936751:024crwdne2936751:0 1

crwdns2936753:07crwdne2936753:0 14

crwdns2936753:030crwdne2936753:0 49

crwdns2942667:0crwdne2942667:0 6,993