crwdns2933423:0crwdne2933423:0

Replace the Fuel Tap Diaphragm and Gaskets on a Suzuki DR650 SE

crwdns2942213:0crwdne2942213:0

  1. Replace the Fuel Tap Diaphragm and Gaskets on a Suzuki DR650 SE, Fuel Tap Diaphragm and Gaskets: crwdns2935265:01crwdnd2935265:01crwdnd2935265:01crwdne2935265:0
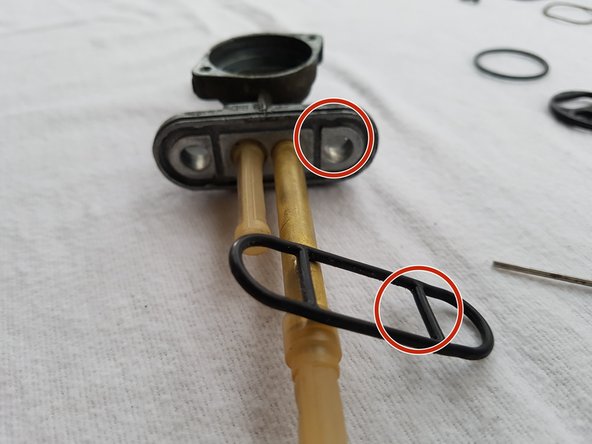
    • Loosen the two screws—either with a large Phillips screwdriver or a 10 mm open-end or ring spanner.

    • Important: The tank should be no more than 1/4 full to prevent fuel from leaking. Once it's drained enough, you can stand it upright.

  2. Replace the Fuel Tap Diaphragm and Gaskets on a Suzuki DR650 SE: crwdns2935265:02crwdnd2935265:01crwdnd2935265:03crwdne2935265:0 Replace the Fuel Tap Diaphragm and Gaskets on a Suzuki DR650 SE: crwdns2935265:02crwdnd2935265:02crwdnd2935265:03crwdne2935265:0 Replace the Fuel Tap Diaphragm and Gaskets on a Suzuki DR650 SE: crwdns2935265:02crwdnd2935265:03crwdnd2935265:03crwdne2935265:0
    • Using a PH2 Phillips screwdriver, remove the five screws from the diaphragm cover and carefully lift it off. Caution: The diaphragm spring is under tension and may pop out when opening the cover.

    • Diaphragm

    • Diaphragm spring

    • Diaphragm cover

    • Inspect the seal kit and clean the parts if necessary.

    • Now remove the diaphragm together with the backing plate.

  3. Replace the Fuel Tap Diaphragm and Gaskets on a Suzuki DR650 SE: crwdns2935265:03crwdnd2935265:01crwdnd2935265:03crwdne2935265:0 Replace the Fuel Tap Diaphragm and Gaskets on a Suzuki DR650 SE: crwdns2935265:03crwdnd2935265:02crwdnd2935265:03crwdne2935265:0 Replace the Fuel Tap Diaphragm and Gaskets on a Suzuki DR650 SE: crwdns2935265:03crwdnd2935265:03crwdnd2935265:03crwdne2935265:0
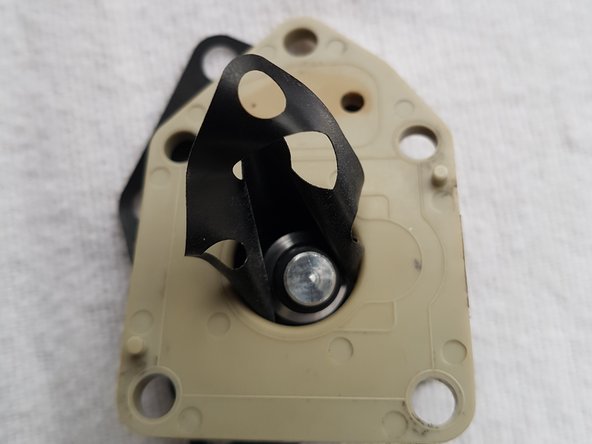
    • Using a PH2 Phillips screwdriver, remove the two screws and take out the actuator.

    • Remove the sealing plate and the O-ring.

    • Actuator

    • Spring washer

    • Cover plate

    • Now remove the base gasket.

  4. Replace the Fuel Tap Diaphragm and Gaskets on a Suzuki DR650 SE: crwdns2935265:04crwdnd2935265:01crwdnd2935265:01crwdne2935265:0
    • Remove the diaphragm. At this point, all components should now be fully disassembled.

  5. Replace the Fuel Tap Diaphragm and Gaskets on a Suzuki DR650 SE: crwdns2935265:05crwdnd2935265:01crwdnd2935265:01crwdne2935265:0
    • Diaphragm

    • Diaphragm intermediate plate

    • Diaphragm cover

    • Diaphragm spring

    • Base gasket

    • Body

    • Sealing plate

  6. Replace the Fuel Tap Diaphragm and Gaskets on a Suzuki DR650 SE: crwdns2935265:06crwdnd2935265:01crwdnd2935265:03crwdne2935265:0 Replace the Fuel Tap Diaphragm and Gaskets on a Suzuki DR650 SE: crwdns2935265:06crwdnd2935265:02crwdnd2935265:03crwdne2935265:0 Replace the Fuel Tap Diaphragm and Gaskets on a Suzuki DR650 SE: crwdns2935265:06crwdnd2935265:03crwdnd2935265:03crwdne2935265:0
    • Countersunk screws

    • Actuator

    • Spring washer

    • O-ring

    • Cover plate

    • Pan head screws

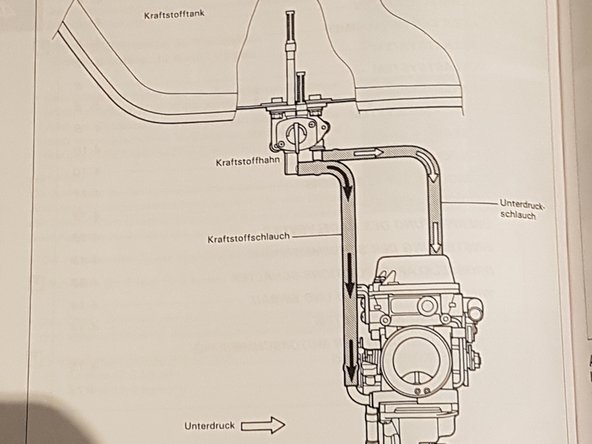
    • Here's a diagram that shows how the fuel tap works.

  7. Replace the Fuel Tap Diaphragm and Gaskets on a Suzuki DR650 SE: crwdns2935265:07crwdnd2935265:01crwdnd2935265:02crwdne2935265:0 Replace the Fuel Tap Diaphragm and Gaskets on a Suzuki DR650 SE: crwdns2935265:07crwdnd2935265:02crwdnd2935265:02crwdne2935265:0
    • Lightly grease all three gaskets. Use the metal spudger to remove the old seals. You can press the new ones in by hand.

    • Insert the sealing plate

    • Place the O-ring into the body

  8. Replace the Fuel Tap Diaphragm and Gaskets on a Suzuki DR650 SE: crwdns2935265:08crwdnd2935265:01crwdnd2935265:03crwdne2935265:0 Replace the Fuel Tap Diaphragm and Gaskets on a Suzuki DR650 SE: crwdns2935265:08crwdnd2935265:02crwdnd2935265:03crwdne2935265:0 Replace the Fuel Tap Diaphragm and Gaskets on a Suzuki DR650 SE: crwdns2935265:08crwdnd2935265:03crwdnd2935265:03crwdne2935265:0
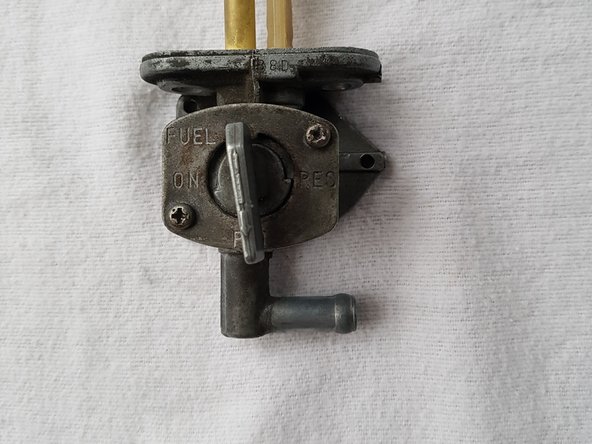
    • Insert the spring washer and the cover plate into the actuator, then install it into the main body. ⚠️ Make sure the spring washer doesn't get pinched during assembly. You’ll notice this if the fuel tap gets stuck when turning from "On" to "Res"—this indicates the washer is misaligned and needs to be repositioned.

  9. Replace the Fuel Tap Diaphragm and Gaskets on a Suzuki DR650 SE: crwdns2935265:09crwdnd2935265:01crwdnd2935265:03crwdne2935265:0 Replace the Fuel Tap Diaphragm and Gaskets on a Suzuki DR650 SE: crwdns2935265:09crwdnd2935265:02crwdnd2935265:03crwdne2935265:0 Replace the Fuel Tap Diaphragm and Gaskets on a Suzuki DR650 SE: crwdns2935265:09crwdnd2935265:03crwdnd2935265:03crwdne2935265:0
    • Install the new diaphragm into the intermediate plate

  10. Replace the Fuel Tap Diaphragm and Gaskets on a Suzuki DR650 SE: crwdns2935265:010crwdnd2935265:01crwdnd2935265:03crwdne2935265:0 Replace the Fuel Tap Diaphragm and Gaskets on a Suzuki DR650 SE: crwdns2935265:010crwdnd2935265:02crwdnd2935265:03crwdne2935265:0 Replace the Fuel Tap Diaphragm and Gaskets on a Suzuki DR650 SE: crwdns2935265:010crwdnd2935265:03crwdnd2935265:03crwdne2935265:0
    • Insert the diaphragm back into the body.

    • Position the spring in the center of the diaphragm plate.

    • When reassembling, make sure the spring sits precisely in the inner ring of the diaphragm cover—if misaligned, the valve mechanism on the opposite side may jam.

  11. Replace the Fuel Tap Diaphragm and Gaskets on a Suzuki DR650 SE: crwdns2935265:011crwdnd2935265:01crwdnd2935265:03crwdne2935265:0 Replace the Fuel Tap Diaphragm and Gaskets on a Suzuki DR650 SE: crwdns2935265:011crwdnd2935265:02crwdnd2935265:03crwdne2935265:0 Replace the Fuel Tap Diaphragm and Gaskets on a Suzuki DR650 SE: crwdns2935265:011crwdnd2935265:03crwdnd2935265:03crwdne2935265:0
    • Use a PH2 Phillips screwdriver to reattach the five screws on the diaphragm cover.
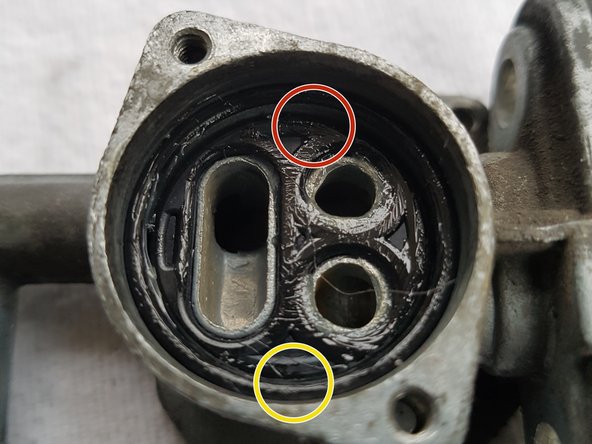
    • Fuel outlet

    • Vacuum port

    • Function test: Apply a slight vacuum to the vacuum port. The valve should open. You can test this by blowing into the fuel outlet. When the vacuum is released, the valve must close immediately.

    • Finally, install the base gasket.

  12. Replace the Fuel Tap Diaphragm and Gaskets on a Suzuki DR650 SE: crwdns2935265:012crwdnd2935265:01crwdnd2935265:02crwdne2935265:0 Replace the Fuel Tap Diaphragm and Gaskets on a Suzuki DR650 SE: crwdns2935265:012crwdnd2935265:02crwdnd2935265:02crwdne2935265:0
    • Reinstall the fuel tap onto the tank.

    • Don’t forget to place the two sealing washers under the mounting screws.

crwdns2935217:0crwdne2935217:0

crwdns2934873:0crwdne2934873:0

de en

100%

crwdns2934885:0crwdne2934885:0 crwdns2934875:0crwdne2934875:0
crwdns2934877:0crwdne2934877:0 ›

Sabrina

crwdns2935283:004/26/16crwdne2935283:0

1 crwdns2915208:0crwdne2915208:0

crwdns2935295:0crwdne2935295:0

crwdns2915084:0crwdne2915084:0

iFixit EU Team crwdns2935289:0iFixit EU Teamcrwdne2935289:0

Staff

crwdns2931471:038crwdne2931471:0

crwdns2935297:01,191crwdne2935297:0

crwdns2947412:00crwdne2947412:0

crwdns2917038:0crwdne2917038:0

crwdns2936625:0crwdne2936625:0:

crwdns2936751:024crwdne2936751:0 16

crwdns2936753:07crwdne2936753:0 25

crwdns2936753:030crwdne2936753:0 44

crwdns2942667:0crwdne2942667:0 2,106