crwdns2933423:0crwdne2933423:0

Surface Studio M.2 SSD Replacement

crwdns2942213:0crwdne2942213:0

  1. Surface Studio M.2 SSD Replacement, M.2 SSD: crwdns2935265:01crwdnd2935265:01crwdnd2935265:03crwdne2935265:0 Surface Studio M.2 SSD Replacement, M.2 SSD: crwdns2935265:01crwdnd2935265:02crwdnd2935265:03crwdne2935265:0 Surface Studio M.2 SSD Replacement, M.2 SSD: crwdns2935265:01crwdnd2935265:03crwdnd2935265:03crwdne2935265:0
    • Lay the Surface face down on a padded surface

    • Be careful not to scratch the screen when laying it face down

    • Remove the four rubber feet at each corner concealing the Torx screws

    • Remove the four Torx screws under the rubber feet.

    • Two screws on the upper corners are longer than two screws on the lower corners.

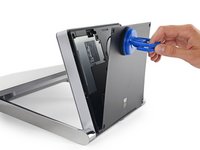
    • Attach suction cups to the bottom cover and then pull on the suction cups to free the bottom cover.

  2. Surface Studio M.2 SSD Replacement: crwdns2935265:02crwdnd2935265:01crwdnd2935265:02crwdne2935265:0 Surface Studio M.2 SSD Replacement: crwdns2935265:02crwdnd2935265:02crwdnd2935265:02crwdne2935265:0
    • Remove five torx screws holding the two fans to the midframe

    • Remove the two fans

    • The fan connectors are behind the midframe and not yet accessible. Let the fans hang loosely until you can access the connectors.

    • Four large torx screws and four small torx screws hold the midframe to the upper frame.

    • Remove four large torx screws holding the midframe

    • Remove four small torx screws holding the midframe

  3. Surface Studio M.2 SSD Replacement: crwdns2935265:03crwdnd2935265:01crwdnd2935265:01crwdne2935265:0
    • Slowly remove the midframe

    • Be careful, the speaker on the midframe is still attached to the motherboard

    • Detach the connectors for the two fans and the speaker

  4. Surface Studio M.2 SSD Replacement: crwdns2935265:04crwdnd2935265:01crwdnd2935265:02crwdne2935265:0 Surface Studio M.2 SSD Replacement: crwdns2935265:04crwdnd2935265:02crwdnd2935265:02crwdne2935265:0
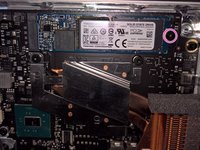
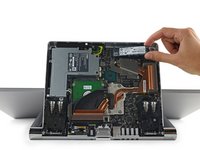
    • With the midframe removed, the M.2 SSD is now accessible

    • Remove a torx screw holding the M.2 holding the SSD to the motherboard

    • Pull the SSD straight back

    • Do not pull the SSD upward or risk damaging the M.2 socket

    • The M.2 socket is compatible with most SATA III, PCIe ACHI, and PCIe NVMe in the M.2 2280 form factor

crwdns2915888:0crwdne2915888:0

To reassemble your device, follow these instructions in reverse order.

crwdns2935229:06crwdne2935229:0

The Raptor

crwdns2935283:011/27/16crwdne2935283:0

6,219 crwdns2915208:0crwdne2915208:0

crwdns2935297:06crwdne2935297:0

crwdns2944067:021crwdne2944067:0

I know that one of the very first questions would be: Does the M.2 slot supports PCIe NVMe ?

The answer is: Yes it does.

The Raptor - crwdns2934203:0crwdne2934203:0

But it does not mean that you can get the drive to run in NVMe model.

There does not appear to be a setting to enable NVMe model for the drive.

John -

Does it support bootable NVMe?

Mark Smith - crwdns2934203:0crwdne2934203:0

@msmith4099 @theofficemaven

Sure. When installing Windows, choose to install Windows to "Drive 1" instead of "Drive 0"

The Raptor -

Is there any raid options that need to be configured?

Mark Smith - crwdns2934203:0crwdne2934203:0

crwdns2917038:0crwdne2917038:0

crwdns2936625:0crwdne2936625:0:

crwdns2936751:024crwdne2936751:0 8

crwdns2936753:07crwdne2936753:0 32

crwdns2936753:030crwdne2936753:0 139

crwdns2942667:0crwdne2942667:0 10,758