crwdns2915892:0crwdne2915892:0
This guide demonstrates how to access the Supersonic Matrix SC-91MID tablet speakers, as well as how to remove and replace them. Replacing the tablet's speakers may be necessary due to a variety of reasons due to age, water damage, or a failed wire connection, for example.
Before proceeding with this guide, make sure that the tablet is competely shut down. Also refer to this guide How To Solder and Desolder Connections to learn how to solder and desolder connections.
Caution:
When soldering and desoldering, wear the appropriate safety gear such as goggles and long sleeves, as solder can "spit" due to heat build up.
DO NOT TOUCH THE SOLDERING IRON!
If the soldering iron is too hot, you could damage the connectors and the device.
crwdns2942213:0crwdne2942213:0
-
-
Use an opening tool to separate the back cover of the tablet by wedging the tool into the crease between the back cover and touchscreen.
-
Work your way around the perimeter of the tablet to detach the back cover and remove it carefully so you don't rip any cables attached.
-
-
-
Use a spudger to carefully disconnect the display ribbons from the motherboard.
-
-
-
-
To remove the battery, use the spudger to pry the battery up and away from the tablet.
-
-
-
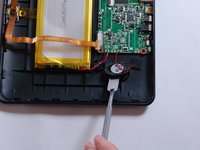
Use a spudger to remove the speakers.
-
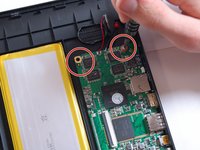
To remove the motherboard, remove the three screws that hold the board in place with a Phillips screwdriver.
-
-
-
Desolder the four speaker wires connecting the speaker to the motherboard using a soldering station.
-


To reassemble your device, follow these instructions in reverse order.
crwdns2935221:0crwdne2935221:0
crwdns2935227:0crwdne2935227:0
crwdns2935287:0crwdne2935287:0

Texas Tech, Team S46-G4, Bennett Spring 2017 crwdns2935289:0Texas Tech, Team S46-G4, Bennett Spring 2017crwdne2935289:0
TTU-BENNETT-S17S46G4
crwdns2931471:03crwdne2931471:0
crwdns2935297:06crwdne2935297:0