crwdns2933423:0crwdne2933423:0

Sun King Solo Solar Lantern Device Seals Replacement

crwdns2942213:0crwdne2942213:0

  1. Sun King Solo Solar Lantern Device Seals Replacement, Locate and Remove the Screws: crwdns2935265:01crwdnd2935265:01crwdnd2935265:01crwdne2935265:0
    • Place the lamp LED side down on a clean workspace.

    • Remove the screws holding the casing together using a Phillips #1 Screwdriver.

  2. Sun King Solo Solar Lantern Device Seals Replacement, Separate the Device: crwdns2935265:02crwdnd2935265:01crwdnd2935265:01crwdne2935265:0
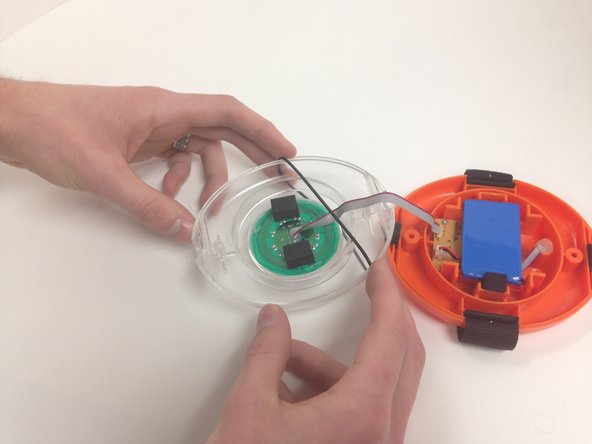
    • Gently pull the two halves of the lamp apart.

  3. Sun King Solo Solar Lantern Device Seals Replacement, O-ring Replacement: crwdns2935265:03crwdnd2935265:01crwdnd2935265:02crwdne2935265:0 Sun King Solo Solar Lantern Device Seals Replacement, O-ring Replacement: crwdns2935265:03crwdnd2935265:02crwdnd2935265:02crwdne2935265:0
    • On the clear upper half, remove the black O-ring

    • Place the new O-ring, making sure it is smooth all the way around

  4. Sun King Solo Solar Lantern Device Seals Replacement, Stand Holder Replacements: crwdns2935265:04crwdnd2935265:01crwdnd2935265:01crwdne2935265:0
    • Remove the rubber stand holders.

    • Place the new stand holders, making sure the wings of the holder are in the second opening

crwdns2915888:0crwdne2915888:0

To reassemble your device, follow these instructions in reverse order.

Josef Simek

crwdns2935283:010/23/14crwdne2935283:0

120 crwdns2915208:0crwdne2915208:0

crwdns2935295:0crwdne2935295:0

crwdns2915084:0crwdne2915084:0

Michigan Tech, Team 1-3, Lauer Fall 2014 crwdns2935289:0Michigan Tech, Team 1-3, Lauer Fall 2014crwdne2935289:0

MTU-LAUER-F14S1G3

crwdns2931471:03crwdne2931471:0

crwdns2935297:05crwdne2935297:0

crwdns2944067:00crwdne2944067:0

crwdns2917038:0crwdne2917038:0

crwdns2936625:0crwdne2936625:0:

crwdns2936751:024crwdne2936751:0 0

crwdns2936753:07crwdne2936753:0 1

crwdns2936753:030crwdne2936753:0 2

crwdns2942667:0crwdne2942667:0 463