crwdns2915892:0crwdne2915892:0
One problem with the Thermomix TM31 is that after a while the blade assembly becomes loose or free-spinning (aka "stripped"). This guide shows how to fix that.
crwdns2942213:0crwdne2942213:0
-
-
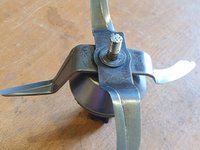
First make sure the blade assembly is removed from the Thermomix.
-
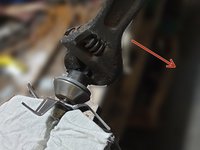
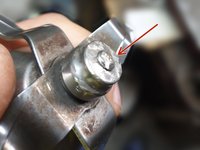
Next file (or angle grind) away approximately 2mm of metal from the top of the blade shaft head (the metal to be removed is highlighted in red in this picture).
-
-
-
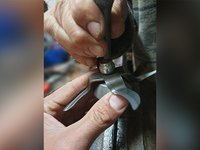
Clamp the head tightly into a vice (also use a piece of cloth or two in between to minimize damage to the head).
-
Unscrew the head using a wrench on the base and turn clockwise (left handed thread) until the head is detached. If there is considerable resistance then go back to the previous step and remove more metal from the head.
-
-
-
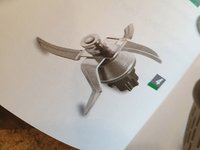
Once the head is loosened and removed take apart the blade assembly. Note the blade orientation.
-
-
-
-
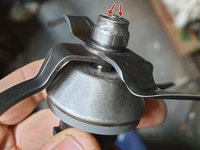
Next remove 1mm of metal (either through filing or angle grinding) from the top of the head (area to be removed highlighted in red).
-
-
-
Reassembe blade shaft together in same order, taking note that the bladed are in correct orientated (it is possible to put them upside down by mistake).
-
Clamp the head portion in a vice (with cloth) and tighten with adjustable spanner in an anticlockwise direction (left-handed thread)until tight. Do not overtighten as you risk stripping the base. The assembly should self tighten once back in the thermomix anyway.
-
-
-
Make sure to rest the assembly down against a surface that is in contact with the metal shaft underneath (we used a 3mm rod clamped in a vice).
-
Next peen over the 1mm exposed end of the threaded shaft so that it holds the head down (and rest of assembly).
-
-
-
Wash the assembly with detergent and water to remove any dust, grease or grime. The repair is now complete!
-


With the blade assembly fixed you can now reattach it to your TM31 Thermomix.
With the blade assembly fixed you can now reattach it to your TM31 Thermomix.
crwdns2935221:0crwdne2935221:0
crwdns2935229:03crwdne2935229:0
crwdns2947412:03crwdne2947412:0
I have managed to disassemble the knives. Before re-assembling and peening, how do I make sure that the free-spinning is fixed? Do I need to add an extra washer to hold the knives tighter? Is it just by re-assembling that the free-spinning will be fixed?
If you follows the steps a washer is not needed (especially make sure to do step 4). With this assembly it's basically only friction holding the knives in place, so by tightening that head nut tight (step 6) it clamps the knives down which stops them turning. Peening over the top of the threaded shaft (to stop the head nut loosening) should keep everything locked in place.
Sam -
All done with hand tools - vice grips, well wrench and heavy hammer!