crwdns2933423:0crwdne2933423:0

SteelSeries Arctis Pro Plus GameDAC 3.5mm Headphone Jack Replacement

crwdns2942213:0crwdne2942213:0

  1. SteelSeries Arctis Pro Plus GameDAC 3.5mm Headphone Jack Replacement, 3.5mm Headphone Jack: crwdns2935265:01crwdnd2935265:01crwdnd2935265:02crwdne2935265:0 SteelSeries Arctis Pro Plus GameDAC 3.5mm Headphone Jack Replacement, 3.5mm Headphone Jack: crwdns2935265:01crwdnd2935265:02crwdnd2935265:02crwdne2935265:0
    • Lift the edge of the cushion and slightly pull out.

    • Work your way around the cushion until it comes off.

    • Repeat for the other cushion.

  2. SteelSeries Arctis Pro Plus GameDAC 3.5mm Headphone Jack Replacement: crwdns2935265:02crwdnd2935265:01crwdnd2935265:01crwdne2935265:0
    • Remove the three 5mm screws with a Phillips #0 driver head on the headphone with the microphone.

  3. SteelSeries Arctis Pro Plus GameDAC 3.5mm Headphone Jack Replacement: crwdns2935265:03crwdnd2935265:01crwdnd2935265:01crwdne2935265:0
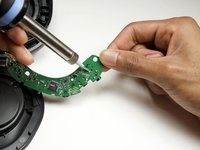
    • Lift the speaker off the headset to expose the circuit board.

    • Be careful not to lift the speaker too quickly or too forcefully to prevent the wires from being pulled out of their connections.

  4. SteelSeries Arctis Pro Plus GameDAC 3.5mm Headphone Jack Replacement: crwdns2935265:04crwdnd2935265:01crwdnd2935265:01crwdne2935265:0
    • Remove the three 5mm screws using a Phillips #0 driver head.

  5. SteelSeries Arctis Pro Plus GameDAC 3.5mm Headphone Jack Replacement: crwdns2935265:05crwdnd2935265:01crwdnd2935265:01crwdne2935265:0
    • Lift the circuit board out of the plastic housing.

    • Press in on the volume wheel while pulling on the circuit board to help maneuver the circuit board out of the housing.

  6. SteelSeries Arctis Pro Plus GameDAC 3.5mm Headphone Jack Replacement: crwdns2935265:06crwdnd2935265:01crwdnd2935265:02crwdne2935265:0 SteelSeries Arctis Pro Plus GameDAC 3.5mm Headphone Jack Replacement: crwdns2935265:06crwdnd2935265:02crwdnd2935265:02crwdne2935265:0
    • Desolder the three connecting audio jack leads from the circuit board.

    • For help desoldering connections, follow this useful guide on How To Solder and Desolder Connections.

    • Use caution when soldering. The heated tip may cause damage to the board or burn you.

crwdns2915888:0crwdne2915888:0

To reassemble your device, follow these instructions in reverse order.

crwdns2935229:05crwdne2935229:0

Juan Gonzalez

crwdns2935283:001/24/19crwdne2935283:0

422 crwdns2915208:0crwdne2915208:0

crwdns2935297:02crwdne2935297:0

crwdns2915084:0crwdne2915084:0

Cal Poly, Team S18-G1, White Winter 2019 crwdns2935289:0Cal Poly, Team S18-G1, White Winter 2019crwdne2935289:0

CPSU-WHITE-W19S18G1

crwdns2931471:04crwdne2931471:0

crwdns2935297:021crwdne2935297:0

crwdns2917034:0crwdne2917034:0

hey @juangonzal87030 I am unable to take out circuit board out of my Arctic Wireless Pro even even when all the screws are taken out. I am unable to understand what am I missing over here. Can you help

Ashutosh Kumar Singh - crwdns2934203:0crwdne2934203:0

crwdns2917038:0crwdne2917038:0

crwdns2936625:0crwdne2936625:0:

crwdns2936751:024crwdne2936751:0 2

crwdns2936753:07crwdne2936753:0 16

crwdns2936753:030crwdne2936753:0 78

crwdns2942667:0crwdne2942667:0 8,640