crwdns2933423:0crwdne2933423:0

Steam Deck OLED Battery Reconnection (No Interconnect Cable)

crwdns2862623:0crwdne2862623:0
crwdns2942641:0crwdne2942641:0
  1. Steam Deck OLED Battery Reconnection (No Interconnect Cable), Reassembly instructions: crwdns2935265:01crwdnd2935265:01crwdnd2935265:02crwdne2935265:0 Steam Deck OLED Battery Reconnection (No Interconnect Cable), Reassembly instructions: crwdns2935265:01crwdnd2935265:02crwdnd2935265:02crwdne2935265:0
    • During disassembly, skip the next three steps.

    • During reassembly:

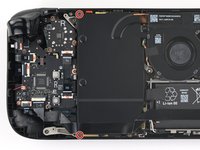
    • Reinstall the two 3.8 mm‑long screws to secure the motherboard shield.

    • Reconnect the interconnect cable ZIF connector.

  2. Steam Deck OLED Battery Reconnection (No Interconnect Cable), Reassembly instructions: crwdns2935265:02crwdnd2935265:01crwdnd2935265:03crwdne2935265:0 Steam Deck OLED Battery Reconnection (No Interconnect Cable), Reassembly instructions: crwdns2935265:02crwdnd2935265:02crwdnd2935265:03crwdne2935265:0 Steam Deck OLED Battery Reconnection (No Interconnect Cable), Reassembly instructions: crwdns2935265:02crwdnd2935265:03crwdnd2935265:03crwdne2935265:0
    • During reassembly:

    • Use the flat end of a spudger to slide the battery connector into its socket on the motherboard.

  3. Steam Deck OLED Battery Reconnection (No Interconnect Cable), Reassembly instructions: crwdns2935265:03crwdnd2935265:01crwdnd2935265:03crwdne2935265:0 Steam Deck OLED Battery Reconnection (No Interconnect Cable), Reassembly instructions: crwdns2935265:03crwdnd2935265:02crwdnd2935265:03crwdne2935265:0 Steam Deck OLED Battery Reconnection (No Interconnect Cable), Reassembly instructions: crwdns2935265:03crwdnd2935265:03crwdnd2935265:03crwdne2935265:0
    • During reassembly, follow this step and the above three steps to reconnect the battery.

    • Use your T6 Torx driver to remove the two 3.8 mm‑long screws securing the motherboard shield.

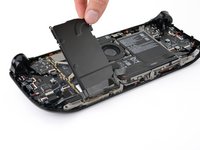
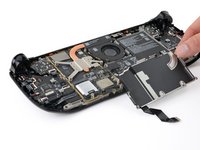
    • Lift the top edge of the motherboard shield up and flip it over the bottom edge of the frame, away from the motherboard.

    • Be careful not to crease or strain the cable.

crwdns2915888:0crwdne2915888:0

To reassemble your device, follow these instructions in reverse order.

Clay Eickemeyer

crwdns2935283:009/19/22crwdne2935283:0

83.348 crwdns2915208:0crwdne2915208:0

crwdns2935297:0455crwdne2935297:0

crwdns2915084:0crwdne2915084:0

Guide Team crwdns2935289:0Guide Teamcrwdne2935289:0

Staff

crwdns2931471:09crwdne2931471:0

crwdns2935297:011.859crwdne2935297:0

crwdns2947412:00crwdne2947412:0

crwdns2917038:0crwdne2917038:0

crwdns2936625:0crwdne2936625:0:

crwdns2936751:024crwdne2936751:0 0

crwdns2936753:07crwdne2936753:0 2

crwdns2936753:030crwdne2936753:0 3

crwdns2942667:0crwdne2942667:0 40