crwdns2915892:0crwdne2915892:0
Sphero R2-D2 Lithium Polymer Battery Replacement
The original battery is a 3.7V 1400mAh battery manufactured by Ascent Batteries.
Model: ABI-H832370
Original battery dimensions:
H 6.35 mm
W 22.22 mm
L 69.85 mm
This battery also has a yellow wire for an NTC thermistor embedded in the battery pack to monitor battery temperature while charging.
Replacement Battery
Amazon: https://www.amazon.com/dp/B0CSC3WYTZ
It's sold as a "3.7V Rechargeable Lipo Battery 1400mAh Replacement for Logitech MX Keys Mini Minimalist Wireless Illuminated Keyboard"
It's a little bit smaller in length than the original battery but it fits fine.
Note: Please leave a comment if you were able to find other suitable replacement batteries.
crwdns2942213:0crwdne2942213:0
-
crwdns2935267:0crwdne2935267:0Jimmy$7.95
-
Start by removing the bottom ring. If the droid can still be turned on, open the Sphero app to connect and turn it on to extend its central and side legs, then remove the bottom ring.
-
Otherwise, you'll have to first remove the side legs. Use a Jimmy to pop up the covers of the arms and remove the 3 screws holding the arms. Slowly remove the arms and then the bottom ring.
-
-
-
Turn off the droid to return the central and side legs to their original positions.
-
-
-
crwdns2935267:0crwdne2935267:0Jimmy$7.95
-
Use a Jimmy or another prying tool to remove the two vertical back panels. Remove the screws holding the back of the droid.
-
-
-
Slowly work your way to separate the back of the droid from the front. Now you should have access to the internal components.
-
-
-
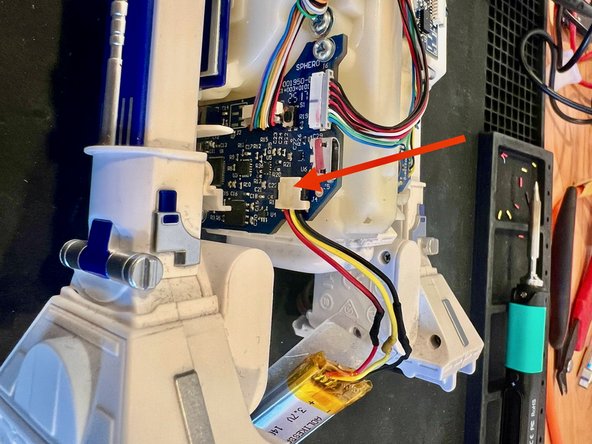
Carefully unplug and remove the original battery from the slot. The original battery connector is proprietary and needs to be spliced into the new battery. Cut the connectors from both batteries. Splice the original battery connector with the replacement battery.
-
Insert the new replacement battery into the slot.
-
Plug in the battery connector.
-
-
-
Before closing it, plug in a micro USB cable to make sure the droid is charging the new battery.
-


To reassemble the droid, follow the instructions in reverse order.
To reassemble the droid, follow the instructions in reverse order.
crwdns2935221:0crwdne2935221:0
crwdns2935229:02crwdne2935229:0

crwdns2947412:03crwdne2947412:0
Hey there, thanks for all the info here! One question, what type/size wire connectors did you use to splice the old wires to the new battery?
Hi! Both battery wires are the same. You just have to cut the wires - keeping the original propriety connector - of the original battery and solder the wires to the replacement battery wires - which, of course, you also have to cut the wires to remove the connector that comes with it. You can use heat shrinking tubing after soldering the wires. I hope it helps!
Hi there
Will this fit into R2Q5? It seems to me the original battery comes with 5.18Wh. The Amazon replace ment is 5.55Wh. Does that make any difference?
Thanks a lot