crwdns2933423:0crwdne2933423:0

crwdns2942213:0crwdne2942213:0

  1. crwdns2935201:0crwdne2935201:0 crwdns2935203:0crwdne2935203:0

    : crwdns2935265:01crwdnd2935265:01crwdnd2935265:03crwdne2935265:0 : crwdns2935265:01crwdnd2935265:02crwdnd2935265:03crwdne2935265:0 : crwdns2935265:01crwdnd2935265:03crwdnd2935265:03crwdne2935265:0
    • Before you begin this repair, make sure the device is completely powered off.

    • Press and hold down the small round button on the back of the Joy Con controller.

    • While you hold down the button, slide the controller upward.

  2. crwdns2935201:0crwdne2935201:0 crwdns2935203:0crwdne2935203:0

    : crwdns2935265:02crwdnd2935265:01crwdnd2935265:03crwdne2935265:0 : crwdns2935265:02crwdnd2935265:02crwdnd2935265:03crwdne2935265:0 : crwdns2935265:02crwdnd2935265:03crwdnd2935265:03crwdne2935265:0
    • Continue sliding the Joy Con upward until it's completely removed from the console.

    • Repeat this same process for the other Joy Con.

  3. crwdns2935201:0crwdne2935201:0 crwdns2935203:0crwdne2935203:0

    : crwdns2935265:03crwdnd2935265:01crwdnd2935265:01crwdne2935265:0
    crwdns2935267:0crwdne2935267:0
    Magnetic Project Mat
    $19.95
    • Use a Y00 screwdriver to remove the four 6.3 mm-long screws securing the rear panel.

    • Throughout this repair, keep track of each screw and make sure it goes back exactly where it came from.

  4. crwdns2935201:0crwdne2935201:0 crwdns2935203:0crwdne2935203:0

    : crwdns2935265:04crwdnd2935265:01crwdnd2935265:02crwdne2935265:0 : crwdns2935265:04crwdnd2935265:02crwdnd2935265:02crwdne2935265:0
    • Use a JIS 00 driver to remove the following screws securing the rear panel:

    • One 2.5 mm-long screw on the top edge of the device

    • Two 2.5 mm-long screws on the bottom edge of the device

    • To prevent these tight screws from stripping, apply firm downward force, work slowly and try another JIS 00 driver if the screws won't come out. Make sure the driver is fully inserted.

    • You can use a Phillips #000 screwdriver in a pinch, but you risk damaging or stripping the screws. Push down firmly on the screwdriver and twist slowly. Often, switching drivers may help, even if they are the same size.

  5. crwdns2935201:0crwdne2935201:0 crwdns2935203:0crwdne2935203:0

    : crwdns2935265:05crwdnd2935265:01crwdnd2935265:02crwdne2935265:0 : crwdns2935265:05crwdnd2935265:02crwdnd2935265:02crwdne2935265:0
    • Use a JIS 00 driver to remove the two 3.8 mm center screws on the sides of the device (one on each side).

  6. crwdns2935201:0crwdne2935201:0 crwdns2935203:0crwdne2935203:0

    : crwdns2935265:06crwdnd2935265:01crwdnd2935265:02crwdne2935265:0 : crwdns2935265:06crwdnd2935265:02crwdnd2935265:02crwdne2935265:0
    • Use your finger to flip up the kickstand on the back of the device.

    • If there's a microSD card in the microSD card slot, remove it now before you continue to the next step.

  7. crwdns2935201:0crwdne2935201:0 crwdns2935203:0crwdne2935203:0

    : crwdns2935265:07crwdnd2935265:01crwdnd2935265:01crwdne2935265:0
    • Use a JIS 00 driver to remove the 1.6 mm screw in the kickstand well.

    • Close the kickstand.

  8. crwdns2935201:0crwdne2935201:0 crwdns2935203:0crwdne2935203:0

    : crwdns2935265:08crwdnd2935265:01crwdnd2935265:03crwdne2935265:0 : crwdns2935265:08crwdnd2935265:02crwdnd2935265:03crwdne2935265:0 : crwdns2935265:08crwdnd2935265:03crwdnd2935265:03crwdne2935265:0
    • Open the game card cartridge flap.

    • The game card cartridge flap attaches to the other half of the plastic shell, preventing you from completely lifting up the rear panel if it's closed.

    • Lift the rear panel up from the bottom of the device and remove it.

  9. crwdns2935201:0crwdne2935201:0 crwdns2935203:0crwdne2935203:0

    : crwdns2935265:09crwdnd2935265:01crwdnd2935265:01crwdne2935265:0
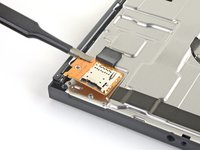
    • Use a JIS 00 driver to remove the 3.1 mm screw securing the microSD card reader to the device.

  10. crwdns2935201:0crwdne2935201:0 crwdns2935203:0crwdne2935203:0

    : crwdns2935265:010crwdnd2935265:01crwdnd2935265:02crwdne2935265:0 : crwdns2935265:010crwdnd2935265:02crwdnd2935265:02crwdne2935265:0
    crwdns2935267:0crwdne2935267:0
    Tweezers
    $4.99
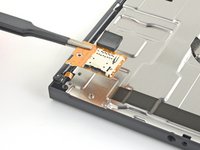
    • Use your fingers or a pair of tweezers to lift the microSD card reader straight up from the device to disconnect and remove it.

    • During reassembly, make sure the press connector underneath the foam pad is firmly connected to the motherboard. It may help to remove the foam pad before reinstalling the card reader.

crwdns2935217:0crwdne2935217:0

crwdns2935229:0163crwdne2935229:0

Craig Lloyd

crwdns2935283:002/10/16crwdne2935283:0

39,585 crwdns2915208:0crwdne2915208:0

crwdns2935297:082crwdne2935297:0

crwdns2947412:063crwdne2947412:0

My SD reader never worked.

Used this guide to find that it was never seated correctly. Reseated and now works perfectly. THANK YOU!

Finx O'Mally - crwdns2934203:0crwdne2934203:0

My console won’t boot if I have an SD card inserted after reseating it. What should I do?

Ewan MacInnis - crwdns2934203:0crwdne2934203:0

Easy guide, fixed my problem. Changed the SD card reader cause I was abusing of it by putting SD in and out constantly.

Nicola Bonardi - crwdns2934203:0crwdne2934203:0

Great guide! My 11-year-old son was able to fix his Switch himself with no difficulty.

Matt - crwdns2934203:0crwdne2934203:0

Some one can help me, when I tried to put the connector again I damage the fpc connector of the motherboard so I try to find out again can any one know the kind of model of this connector I really appreciate the help

Best regards

Philip Milian - crwdns2934203:0crwdne2934203:0

crwdns2917038:0crwdne2917038:0

crwdns2936625:0crwdne2936625:0:

crwdns2936751:024crwdne2936751:0 118

crwdns2936753:07crwdne2936753:0 679

crwdns2936753:030crwdne2936753:0 3,103

crwdns2942667:0crwdne2942667:0 243,152