crwdns2933423:0crwdne2933423:0

Sony Xperia Z Ultra Motherboard Replacement

crwdns2942213:0crwdne2942213:0

  1. Sony Xperia Z Ultra Motherboard Replacement, Battery: crwdns2935265:01crwdnd2935265:01crwdnd2935265:01crwdne2935265:0
    • Use the small suction cup to lift the back panel:

    • Press the small suction cup on to the middle of the back panel.

  2. Sony Xperia Z Ultra Motherboard Replacement: crwdns2935265:02crwdnd2935265:01crwdnd2935265:01crwdne2935265:0
    • While holding the Sony Xperia Z ultra down with your left hand, slightly pull the small suction cup upwards to create a small opening between the back panel and the front panel.

    • While continuing to pull the small suction cup upwards, insert the spudger in the small opening.

    • Pry the front panel downwards with the spudger while continuing to pull the small suction cup upwards.

  3. Sony Xperia Z Ultra Motherboard Replacement: crwdns2935265:03crwdnd2935265:01crwdnd2935265:01crwdne2935265:0
    • Remove the back panel by pulling the small suction cup upwards.

  4. Sony Xperia Z Ultra Motherboard Replacement: crwdns2935265:04crwdnd2935265:01crwdnd2935265:01crwdne2935265:0
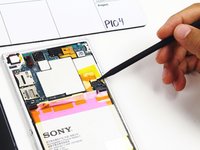
    • Remove the following six screws with a Phillips #000 screwdriver:

    • five silver 2.1 mm screws

    • one gold 3.1 mm screw

  5. Sony Xperia Z Ultra Motherboard Replacement: crwdns2935265:05crwdnd2935265:01crwdnd2935265:01crwdne2935265:0
    • Pry the plastic motherboard shield open by placing the spudger under the shield and running it along the edges.

  6. Sony Xperia Z Ultra Motherboard Replacement: crwdns2935265:06crwdnd2935265:01crwdnd2935265:01crwdne2935265:0
    • Use care to remove the motherboard shield, as it may break. The motherboard shield is made of a very thin plastic.

    • Remove the motherboard shield by lifting the lower end upwards first.

  7. Sony Xperia Z Ultra Motherboard Replacement: crwdns2935265:07crwdnd2935265:01crwdnd2935265:02crwdne2935265:0 Sony Xperia Z Ultra Motherboard Replacement: crwdns2935265:07crwdnd2935265:02crwdnd2935265:02crwdne2935265:0
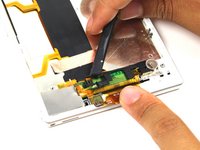
    • Detach the battery connection cable by prying it upward with the spudger.

  8. Sony Xperia Z Ultra Motherboard Replacement: crwdns2935265:08crwdnd2935265:01crwdnd2935265:01crwdne2935265:0
    • Pry the upper end of the antenna upwards with the spudger.

  9. Sony Xperia Z Ultra Motherboard Replacement: crwdns2935265:09crwdnd2935265:01crwdnd2935265:01crwdne2935265:0
    • Detach the antenna by pulling the upper end upwards and outwards.

  10. Sony Xperia Z Ultra Motherboard Replacement: crwdns2935265:010crwdnd2935265:01crwdnd2935265:01crwdne2935265:0
    • Insert the spudger underneath the battery and run it back and forth to remove any adhesive.

  11. Sony Xperia Z Ultra Motherboard Replacement: crwdns2935265:011crwdnd2935265:01crwdnd2935265:01crwdne2935265:0
    • Remove the battery from the phone.

  12. Sony Xperia Z Ultra Motherboard Replacement, Motherboard: crwdns2935265:012crwdnd2935265:01crwdnd2935265:01crwdne2935265:0
    • Pry the antenna assembly upwards with the spudger.

  13. Sony Xperia Z Ultra Motherboard Replacement: crwdns2935265:013crwdnd2935265:01crwdnd2935265:01crwdne2935265:0
    • You should hear a slight "click" when the antenna assembly has been completely loosened.

    • Remove the antenna assembly by pulling it upwards from the right end.

  14. Sony Xperia Z Ultra Motherboard Replacement: crwdns2935265:014crwdnd2935265:01crwdnd2935265:01crwdne2935265:0
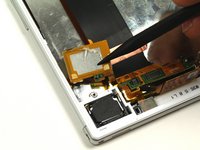
    • Remove the mic cover by placing the spudger underneath the cover and prying it upward.

  15. Sony Xperia Z Ultra Motherboard Replacement: crwdns2935265:015crwdnd2935265:01crwdnd2935265:01crwdne2935265:0
    • The metal shield is very thin, so use care to remove the metal shield as it can easily be bent.

    • Remove the metal shield cover by prying its right end upwards with the flat part of the spudger.

  16. Sony Xperia Z Ultra Motherboard Replacement: crwdns2935265:016crwdnd2935265:01crwdnd2935265:01crwdne2935265:0
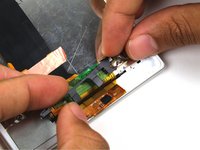
    • Remove the mic connection from the motherboard ribbon by prying it upwards with the spudger.

    • Once released, the orange ribbon will resemble a flap.

  17. Sony Xperia Z Ultra Motherboard Replacement: crwdns2935265:017crwdnd2935265:01crwdnd2935265:02crwdne2935265:0 Sony Xperia Z Ultra Motherboard Replacement: crwdns2935265:017crwdnd2935265:02crwdnd2935265:02crwdne2935265:0
    • Use care to remove the black plastic spacer, as it may bend if excessive force is used. The black plastic spacer is very thin and extremely fragile.

    • Gently pry the black plastic spacer upwards with the spudger.

    • Remove the black plastic spacer from the phone by gently pulling it upwards.

  18. Sony Xperia Z Ultra Motherboard Replacement: crwdns2935265:018crwdnd2935265:01crwdnd2935265:01crwdne2935265:0
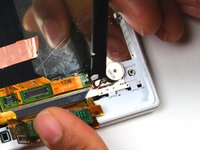
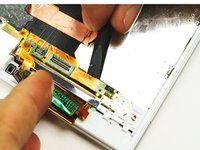
    • Release the LCD digitizer connection by prying it upwards with the spudger.

    • The LCD digitizer is distinguished by a longer connection strip.

  19. Sony Xperia Z Ultra Motherboard Replacement: crwdns2935265:019crwdnd2935265:01crwdnd2935265:02crwdne2935265:0 Sony Xperia Z Ultra Motherboard Replacement: crwdns2935265:019crwdnd2935265:02crwdnd2935265:02crwdne2935265:0
    • Use care to detach the vibration motor connection, as it may break if excessive pressure is applied. The vibration motor connection is tiny and fragile.

    • Use the flat part of a spudger to detach the vibration motor connection. It is a tiny white box with red and black wires leading to the motor.

    • Once the connection has been removed, slide the spudger underneath the vibration motor to release it from the adhesive.

  20. Sony Xperia Z Ultra Motherboard Replacement: crwdns2935265:020crwdnd2935265:01crwdnd2935265:02crwdne2935265:0 Sony Xperia Z Ultra Motherboard Replacement: crwdns2935265:020crwdnd2935265:02crwdnd2935265:02crwdne2935265:0
    • Remove the loudspeaker connection by prying it upwards with the spudger.

  21. Sony Xperia Z Ultra Motherboard Replacement: crwdns2935265:021crwdnd2935265:01crwdnd2935265:01crwdne2935265:0
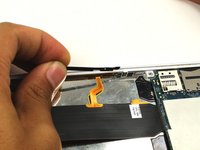
    • Remove the orange ribbon connection by prying it upwards with the spudger.

  22. Sony Xperia Z Ultra Motherboard Replacement: crwdns2935265:022crwdnd2935265:01crwdnd2935265:02crwdne2935265:0 Sony Xperia Z Ultra Motherboard Replacement: crwdns2935265:022crwdnd2935265:02crwdnd2935265:02crwdne2935265:0
    • Pry the small black metal bracket off with the spudger.

    • Gently remove the ribbons that are attached to the side of the phone to avoid cracking them.

    • Remove the small black metal bracket by lifting it upwards and outwards.

  23. Sony Xperia Z Ultra Motherboard Replacement: crwdns2935265:023crwdnd2935265:01crwdnd2935265:01crwdne2935265:0
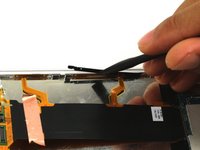
    • Detach the orange ribbon by wedging the spudger between the phone's casing and the ribbon. This will help prevent damage to the strip.

  24. Sony Xperia Z Ultra Motherboard Replacement: crwdns2935265:024crwdnd2935265:01crwdnd2935265:01crwdne2935265:0
    • Detach smaller orange ribbon by wedging the spudger between the phone's casing and the ribbon. This will help prevent damage to the strip.

  25. Sony Xperia Z Ultra Motherboard Replacement: crwdns2935265:025crwdnd2935265:01crwdnd2935265:02crwdne2935265:0 Sony Xperia Z Ultra Motherboard Replacement: crwdns2935265:025crwdnd2935265:02crwdnd2935265:02crwdne2935265:0
    • All parts connected to the motherboard with an orange ribbon are fragile and should be treated with extreme care.

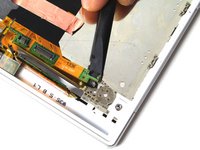
    • Pry up the connection strip at the end of the motherboard using the flat part of the spudger to free the motherboard.

    • The connection strip has adhesive underneath.

  26. Sony Xperia Z Ultra Motherboard Replacement: crwdns2935265:026crwdnd2935265:01crwdnd2935265:01crwdne2935265:0
    • Manually remove the copper tape anchoring the motherboard's black ribbon.

    • When removing the motherboard in its entirety, make sure all securing points have been released.

crwdns2915888:0crwdne2915888:0

To reassemble your device, follow these instructions in reverse order.

crwdns2935229:017crwdne2935229:0

Omar Herrera

crwdns2935283:010/07/15crwdne2935283:0

1,309 crwdns2915208:0crwdne2915208:0

crwdns2935295:0crwdne2935295:0

crwdns2915084:0crwdne2915084:0

Cal Poly, Team 4-6, Maness Fall 2015 crwdns2935289:0Cal Poly, Team 4-6, Maness Fall 2015crwdne2935289:0

CPSU-MANESS-F15S4G6

crwdns2931471:04crwdne2931471:0

crwdns2935297:010crwdne2935297:0

crwdns2944067:011crwdne2944067:0

Most grateful very helpful and easy to follow thank you very much

Edward - crwdns2934203:0crwdne2934203:0

please help me how to solder the flex cable to the motherboard

jawadsupercool - crwdns2934203:0crwdne2934203:0

very helpful. thanks.

can anyone suggest me where to buy the motherboard of sony z ultra?

neko - crwdns2934203:0crwdne2934203:0

Can anyone tell me how to replace flex connected to motherboard. Sony z ultra 4g

smaran727 - crwdns2934203:0crwdne2934203:0

crwdns2917038:0crwdne2917038:0

crwdns2936625:0crwdne2936625:0:

crwdns2936751:024crwdne2936751:0 0

crwdns2936753:07crwdne2936753:0 5

crwdns2936753:030crwdne2936753:0 19

crwdns2942667:0crwdne2942667:0 9,639