crwdns2915892:0crwdne2915892:0
This guide will lead you through the steps necessary to replace the motherboard if it is not functioning properly.
crwdns2942213:0crwdne2942213:0
-
-
Turn hair dryer to medium heat.
-
Slowly move the hair dryer along the seams on the back of the phone. Keep the dryer a few inches away from the case.
-
Circulate the dryer for a full minute to soften the adhesive binding the phone together.
-
-
-
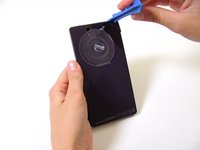
Once the adhesive is loosened, stick the suction cup to the top-center of the back of your phone and gently pull back.
-
-
-
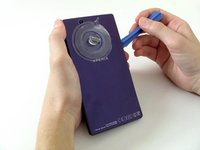
Once you've opened a small space with the back cover, stick the plastic opening tool into the seam of the phone.
-
Move the tool along the seam to loosen the adhesive.
-
-
-
Once the adhesive has been adequately loosened, pull back slowly on the suction cup to remove the back panel of the phone.
-
-
-
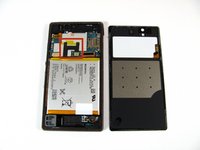
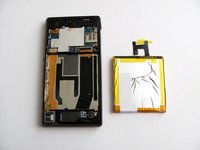
Now that the back is removed, the battery is visible. You now have access to the battery and its connecting components.
-
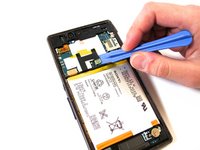
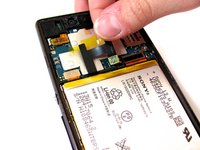
With the plastic opening tool, gently remove the connector from the motherboard.
-
Use your fingers to peel the rest of the adhesive away from the phone.
-
-
-
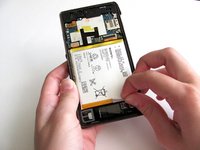
With the plastic opening tool, carefully peel the white adhesive tape up from the bottom of the battery.
-
Use your fingers to peel back the rest of the adhesive tape away from the battery.
I found this white adhesive tape just wrapped around the battery, so didn’t need to be removed
-
-
-
-
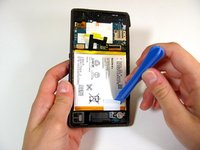
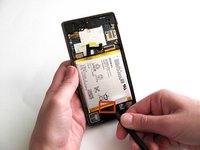
Slide the spudger firmly along the right side of the battery, loosening the adhesive between the casing and battery.
-
Insert the spudger in the bottom-center to further loosen the adhesive. Carefully separate the battery from the phone by sliding the spudger vertically underneath the battery and prying up. This may take some time and work as the adhesive is very strong.
it would be better to show in overlay red the two vertical cables that should not be touched; i damaged by 1 mm at the bottom one of the cable and the display is no longer working, even if can hear touch feedbacks and sound and now if if it charges well :o((
if you do what is shown on the picture at step 7 (i did) you can still damage the cable right, because it deviates at the bottom towards the left !
Why not start the instructions by saying "This battery replacement operation is too difficult unless you are highly experienced. You are very likely to damage the phone beyond repair. Sony prefer you to buy a new phone every 2 years when the battery fails"
I agree that it would be better to overlay red the two vertical cables. Other than that, this step is rather time consuming, than complicated. Obviously you should be attentive to not damage the cables, but if you put moderate force during 3-4 minutes, the battery will finally separate from the case.
Wondering if it’s safe to use hair dryer at this step.
Patient manuevering to extract the bat. is surely preferable to forced heat on the exposed traces and PCB.
-
-
-
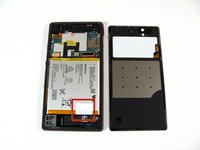
Remove the one 3 mm screw with the Phillips #000 screwdriver. The screw is located at the top right corner of the motherboard. The motherboard is the green/silver circuit board at the top of the phone.
-
-
-
Using with the plastic opening tool, pry up firmly from the bottom and top of the plastic housing. The housing is black and located at the top right corner of the phone.
-
Release the charging cover, located on the right side of the phone at the top. This should cause the housing piece to pop out effortlessly.
-
-
-
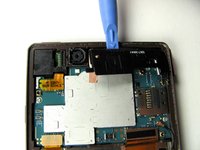
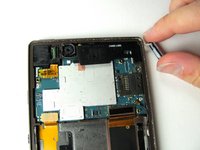
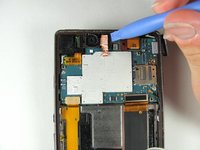
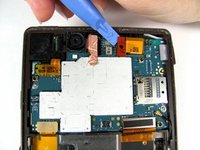
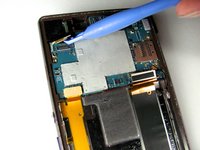
Release the copper tape located at the top middle of the phone with a plastic opening tool. This will take some force since the adhesive is rather strong.
-
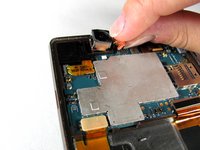
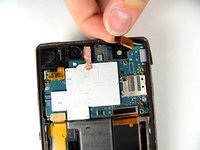
With the plastic opening tool, release the pop connector, by lifting up to release it. The pop connector should still be attached to the copper tape.
-
Pull up gently on the copper tape and pop connector to remove the back camera. It should pop out easily.
-
-
-
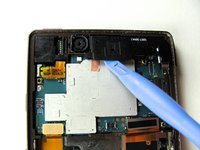
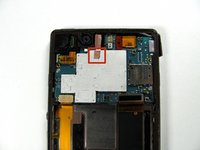
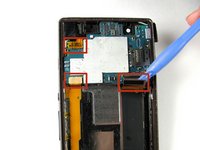
With the plastic opening tool, gently pry the red tape away from motherboard. This pop connector is located at the top right corner of the phone.
-
Using your fingers, gently pull up on the pop connector to remove the front camera. The front camera piece should lift out effortlessly.
-
-
-
The SIM card of the Xperia Z is located in the unlabeled slot above the power button.
-
Gently open the cover by pushing it to the left.
-
-
-
Carefully pull the SIM card and SIM card tray out of the phone
-
-
-
Remove the two 3mm Phillips #000 screws located at the middle left and lower right of motherboard.
-
-
-
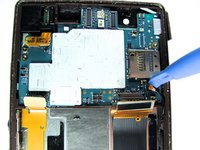
Gently pry the three flex cables away from the motherboard. They are located on the bottom right, bottom left, and top left corners of the motherboard.
-
-
-
With the plastic opening tool pry up the antenna located at the bottom right of the motherboard.
-
-
-
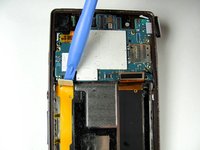
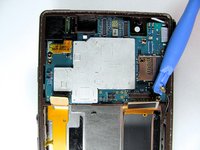
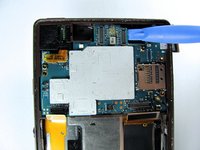
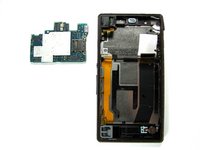
With the plastic opening tool, firmly pry the motherboard up out of the phone case. Pry from the right side of the motherboard where the back camera was previously located.
-
Firmly lift the section up where the silver part of the motherboard comes to the edge of the green base board.
-


To reassemble your device, follow these instructions in reverse order.
To reassemble your device, follow these instructions in reverse order.
crwdns2935221:0crwdne2935221:0
crwdns2935229:030crwdne2935229:0
crwdns2915084:0crwdne2915084:0

Cal Poly, Team 2-7, Amido Winter 2014 crwdns2935289:0Cal Poly, Team 2-7, Amido Winter 2014crwdne2935289:0
CPSU-AMIDO-W14S2G7
crwdns2931471:04crwdne2931471:0
crwdns2935297:025crwdne2935297:0
crwdns2947412:06crwdne2947412:0
Where can you get a motherboard from need on asap
what is on the back glass panel Wight chip (inner part )
i broke 1 of 2 pins connecting 2 them is it necessary
can i repair it,,?
the "white chip" is the nfc antenna, and no its not required for the device to function unless you desire a working nfc device..
i would also like to know where to purchase a master logic board for the c6603 xperia z
My xperia has wrong negtive postive cnection while charging and now device is not power on and apso not charging can you help me to repair it what is the salution
Do I need to reinstall the operating system after replacing the motherboard? And how to install?
My phone xperia z had a tiny bit of water that had went into a gab of my mobile it's been over 10 months my phone has signs of positive results of rechargeing with notification led lights, unsure what to do and another my precious memory's, I really would like the screen and phone to function properly asap.