crwdns2915892:0crwdne2915892:0
Follow this guide to replace the ear pads on the Sony WH-1000XM4 wireless headphones.
Note: The left and right ear pads are different on this model.
crwdns2942213:0crwdne2942213:0
-
-
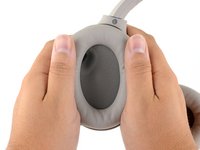
Place your headphones onto a work surface, ear pads facing up.
-
-
-
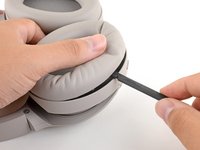
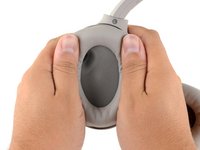
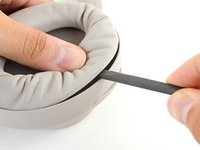
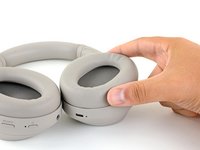
Use your thumb to depress the LEFT ear pad near the long outer edge, creating a gap between the cushion and the frame.
-
-
-
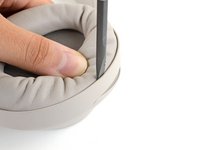
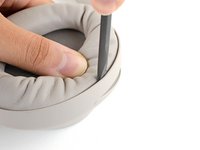
Insert the flat end of a spudger into the gap you've created, between the edge of the cushion and the frame.
-
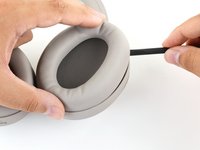
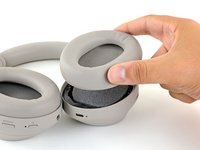
Pivot the spudger down to unclip the long edge of the ear pad.
-
-
-
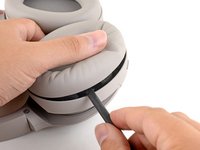
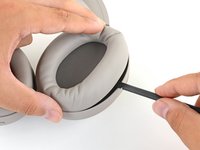
Repeat the previous step around the perimeter of the ear cup to disconnect the remaining clips.
-
-
-
-
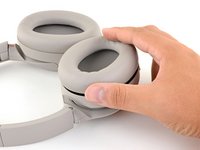
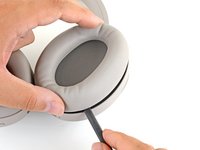
Remove the left ear pad.
-
-
-
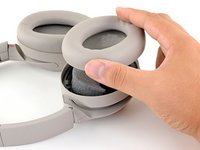
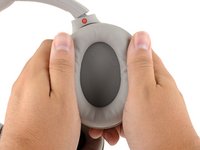
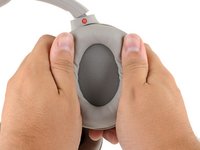
Align the cushion over the speaker and press them firmly together to snap it into place.
-
Press around the entire edge of the cushion, making sure all the clips have engaged.
-
-
-
Use your thumb to depress the RIGHT ear pad near the long outer edge, creating a gap between the cushion and the frame.
-
-
-
Insert the flat end of a spudger into the gap you've created, between the edge of the cushion and the frame.
-
Pivot the spudger down to unclip the long edge of the ear pad.
-
-
-
Repeat the previous step around the perimeter of the ear cup to disconnect the remaining clips.
-
-
-
Remove the right ear pad.
-
-
-
Align the cushion over the speaker and press them firmly together to snap it into place.
-
Press around the entire edge of the cushion, making sure all the clips have engaged.
-


Compare your new replacement part to the original part—you may need to transfer remaining components or remove adhesive backings from the new part before installing.
To reassemble your device, follow the above steps in reverse order.
Repair didn’t go as planned? Try some basic troubleshooting or search our Answers community for help.
crwdns2935221:0crwdne2935221:0
crwdns2935229:033crwdne2935229:0


crwdns2947412:016crwdne2947412:0
This is a great guide!
it is also the solution to the ticking problem on the left ear cup!
there is a small cable linking the microphone to the headset that is beneath the earcup. it has a small holder that should prevent it from moving.
if it’s not attached properly, the noise canceling will start ticking every few seconds in a very annoying way.
removing the earcup and cleaning there is the best solution I found!
Thanks a lot for the amazing guide!!
I was having a similar issue where the right ear cup was making an annoying scratching sound. Turned out to be a hair that was stuck in and brushing against the speaker. Fixed by opening and removing with tweezers!
spencer -
Very comprehensible instructions, thank you! I have rather the problem that the original ear pads are not available anywhere and are not shipped to Germany by Sony. Does anyone have a tip on how to get the replacement pads or any idea which third-party pads can be recommendet?
Where can I buy official replacement earpads?
i also need to know that, i found some OEM on amazon, but i don't trust any of them
I don't know where to find the originals but you might want to look into Dekoni earpads, I just recieved mine for the Sony.
Haven't applied them yet but own plenty of other headphones with Dekoni eapads and I'm always satisfied with them.
Sony outsources the replacement parts to a company named Encompass. https://sony.encompass.com/model/SONWH10...
Would be great to see a photo of the BACK side of the earned and the headphones with earpad removed so we know what we are dealing with.
Consumable: Ear Pads When you need to replace them, please consult with Sony's consultation window, or with the store where you purchased them.
This is an automatic translation of the Japanese version of the reference guide.
If you are prying off the ear pads with something too thin you can actually accidentally slide it past the the ear pad and down far enough to catch the next "layer" which is what the ear pad attaches to, so be careful not to pry too hard in case that happens or you risk breaking the plastic. You might have to pull it back up a bit, it should give fairly easy when you have caught just the ear pad.
go to sony.encompass.com for the official parts
The aftermarket service provider for Sony products in Germany seems to be "Service Center Baumeister":
https://shop.scbaumeister.de/Ohrpolster-...
https://shop.scbaumeister.de/Ohrpolster-...
They come at a premium price, though.
70+56€ for replacement earpads?!?
FelixBan -
Thanks for the Tutorial I wish that sony would make the proper OEM pads available. In my opinion the original ones are the best. I have had my xm4 Headphones for years and would buy them again any day. I have had the annoying screeching problem. I think that i know what it is. I maybe moisture and humidity that gets in and affects the microphones. i wear mine constantly and have for many years. I have noticed a pattern and its moisture. I have spoken to sony and they were great. its not really a fault as far as i can tell. sony could not find OEM ear pads which is a shame all other pads are just not the same.
Here's two links for the earpads, https://sony.encompass.com/model/SONWH10...
https://sony.encompass.com/item/11687300...
You can get the battery from here as well!
Will - crwdns2934203:0crwdne2934203:0