crwdns2915892:0crwdne2915892:0
In this guide, you will learn to remove and replace the RAM of a Sony Vaio VPCEA3C5E computer. Some common reasons to replace the RAM include performance issues, such as errors, freezes, or instability. This can come in the form of boot time (taking a while for the computer to start), multitasking (running multiple applications at once), and internet browsing speed. Replacing the RAM is simple and requires no technical knowledge or skill, however, it is important to replace it with compatible RAM (refer to the laptop manual). The tools required are only a Phillips #0 screwdriver and optionally a spudger (or any prying tool).
crwdns2942213:0crwdne2942213:0
-
-
Remove the single Phillips #00 screw from the back cover of the laptop.
-
-
-
Lift the cover up and remove it from the computer.
-
-
-
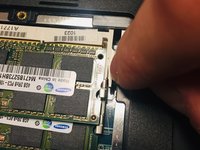
Push out the two outer white catch pieces holding the both sides of the RAM in position. Begin gently removing the RAM from its position.
-
-
-
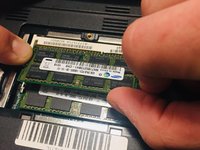
Once you have the RAM out on its own, replace it or put it back into the correct position.
-


To reassemble your device, follow these instructions in reverse order.
crwdns2935221:0crwdne2935221:0
crwdns2935227:0crwdne2935227:0
crwdns2935287:0crwdne2935287:0

McKendree University, Team S1-G3, Quinn Fall 2018 crwdns2935289:0McKendree University, Team S1-G3, Quinn Fall 2018crwdne2935289:0
MCKU-QUINN-F18S1G3
crwdns2931471:02crwdne2931471:0
crwdns2935297:06crwdne2935297:0