crwdns2933423:0crwdne2933423:0

Sony Vaio VGN-SZ120P Logic Board Replacement

crwdns2942213:0crwdne2942213:0

  1. Sony Vaio VGN-SZ120P Logic Board Replacement, Battery: crwdns2935265:01crwdnd2935265:01crwdnd2935265:01crwdne2935265:0
    • Set the computer display-side down.

    • Unlock the battery by sliding the port-side latch to the 'unlock' position.

  2. Sony Vaio VGN-SZ120P Logic Board Replacement: crwdns2935265:02crwdnd2935265:01crwdnd2935265:01crwdne2935265:0
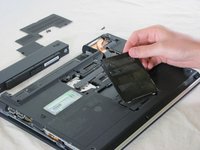
    • On the opposite side of the battery, press the release latch and slide the battery away from the main body to remove.

  3. Sony Vaio VGN-SZ120P Logic Board Replacement, Memory: crwdns2935265:03crwdnd2935265:01crwdnd2935265:02crwdne2935265:0 Sony Vaio VGN-SZ120P Logic Board Replacement, Memory: crwdns2935265:03crwdnd2935265:02crwdnd2935265:02crwdne2935265:0
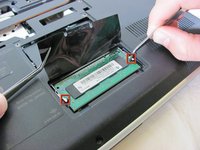
    • Unscrew the two memory panel screws and set the panel aside.

    • Ignore the removal of the heatsink panel. This does not need to be removed for RAM module access.

  4. Sony Vaio VGN-SZ120P Logic Board Replacement: crwdns2935265:04crwdnd2935265:01crwdnd2935265:03crwdne2935265:0 Sony Vaio VGN-SZ120P Logic Board Replacement: crwdns2935265:04crwdnd2935265:02crwdnd2935265:03crwdne2935265:0 Sony Vaio VGN-SZ120P Logic Board Replacement: crwdns2935265:04crwdnd2935265:03crwdnd2935265:03crwdne2935265:0
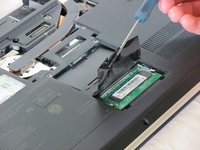
    • Lift the film covering to reveal the memory module with the tweezers.

    • Pull the tabs on both sides of the RAM away from the module. The module will pop up.

    • Repeat this step for the other RAM module located directly above the memory module just removed.

  5. Sony Vaio VGN-SZ120P Logic Board Replacement, Keyboard: crwdns2935265:05crwdnd2935265:01crwdnd2935265:01crwdne2935265:0
    • Ignore the removal of the heat sink and memory panels as depicted. They do not need to be removed for the completion of this guide.

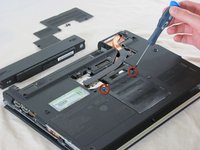
    • Remove the Torx security screw near the center of the battery-side edge.

  6. Sony Vaio VGN-SZ120P Logic Board Replacement: crwdns2935265:06crwdnd2935265:01crwdnd2935265:02crwdne2935265:0 Sony Vaio VGN-SZ120P Logic Board Replacement: crwdns2935265:06crwdnd2935265:02crwdnd2935265:02crwdne2935265:0
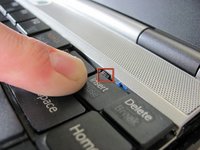
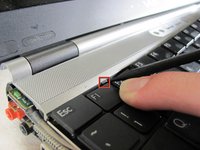
    • Press the tabs on each side of the display-side of the keyboard with the flat edge of a spudger.

    • Pull the keyboard toward the mouse pad and gently lift up.

  7. Sony Vaio VGN-SZ120P Logic Board Replacement: crwdns2935265:07crwdnd2935265:01crwdnd2935265:02crwdne2935265:0 Sony Vaio VGN-SZ120P Logic Board Replacement: crwdns2935265:07crwdnd2935265:02crwdnd2935265:02crwdne2935265:0
    • The keyboard is still attached by ribbon cable, don't try to remove the keyboard entirely yet.

    • Disconnect the ribbon cable by pressing the tabs on either side of the connector. Pull the cable out parallel to the connector.

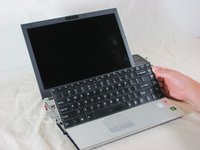
    • Remove the keyboard.

  8. Sony Vaio VGN-SZ120P Logic Board Replacement, Mouse Assembly: crwdns2935265:08crwdnd2935265:01crwdnd2935265:01crwdne2935265:0
    • Turn the laptop upside down.

    • Remove the three screws from the front mouse panel located on the bottom of the laptop.

    • Carefully flip the laptop back over. Remove three more screws from the top securing the panel. A ribbon cable will still be attached to the panel when you remove it.

  9. Sony Vaio VGN-SZ120P Logic Board Replacement: crwdns2935265:09crwdnd2935265:01crwdnd2935265:02crwdne2935265:0 Sony Vaio VGN-SZ120P Logic Board Replacement: crwdns2935265:09crwdnd2935265:02crwdnd2935265:02crwdne2935265:0
    • Lift the mouse assembly just enough to access the connecting ribbon cable.

    • Lift the ribbon cable lock to remove the cable.

    • Carefully remove the mouse panel assembly and set aside.

  10. Sony Vaio VGN-SZ120P Logic Board Replacement, Hard Drive: crwdns2935265:010crwdnd2935265:01crwdnd2935265:01crwdne2935265:0
    • This is where your hard drive would be located. The replacement must be a Serial ATA(SATA) hard drive

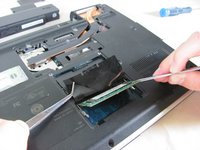
    • Remove the four hard drive securing screws.

  11. Sony Vaio VGN-SZ120P Logic Board Replacement, Optical Drive: crwdns2935265:011crwdnd2935265:01crwdnd2935265:01crwdne2935265:0
    • Remove the securing screw on the bottom left of the optical drive.

  12. Sony Vaio VGN-SZ120P Logic Board Replacement: crwdns2935265:012crwdnd2935265:01crwdnd2935265:01crwdne2935265:0
    • Carefully slide the optical drive out right.

    • The IDE connector on the left will pop out.

  13. Sony Vaio VGN-SZ120P Logic Board Replacement, Speaker Assembly: crwdns2935265:013crwdnd2935265:01crwdnd2935265:03crwdne2935265:0 Sony Vaio VGN-SZ120P Logic Board Replacement, Speaker Assembly: crwdns2935265:013crwdnd2935265:02crwdnd2935265:03crwdne2935265:0 Sony Vaio VGN-SZ120P Logic Board Replacement, Speaker Assembly: crwdns2935265:013crwdnd2935265:03crwdnd2935265:03crwdne2935265:0
    • Remove the four screws from the underside of the computer. These screws are located underneath where the battery sits and secure the top keyboard panel.

    • To remove the panel below the screen, press up on the two tabs holding the panel in and lift up. The panel should pop off.

    • Before proceeding, remove all black tape holding down wires and other cabling.

  14. Sony Vaio VGN-SZ120P Logic Board Replacement: crwdns2935265:014crwdnd2935265:01crwdnd2935265:01crwdne2935265:0
    • Pop off the antenna using a pair of tweezers.

  15. Sony Vaio VGN-SZ120P Logic Board Replacement: crwdns2935265:015crwdnd2935265:01crwdnd2935265:01crwdne2935265:0
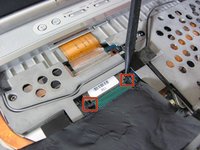
    • Remove the seven philips screws holding the speaker assembly in place.

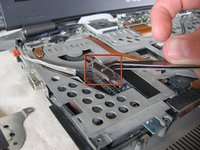
    • Before removing the assembly, disconnect the ribbon cable located at the top left corner of the assembly.

    • The speaker assembly will come off with the display assembly.

  16. Sony Vaio VGN-SZ120P Logic Board Replacement, screen: crwdns2935265:016crwdnd2935265:01crwdnd2935265:02crwdne2935265:0 Sony Vaio VGN-SZ120P Logic Board Replacement, screen: crwdns2935265:016crwdnd2935265:02crwdnd2935265:02crwdne2935265:0
    • Caution: Be careful of snags when pulling up assembly and speakers.

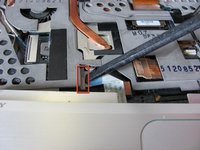
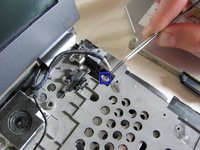
    • To remove the VGA cable, lift up on the metal bracket and gently lift the connector off the logic board.

    • To remove the webcam cable, lift up the connector from the logic board gently.

  17. Sony Vaio VGN-SZ120P Logic Board Replacement: crwdns2935265:017crwdnd2935265:01crwdnd2935265:03crwdne2935265:0 Sony Vaio VGN-SZ120P Logic Board Replacement: crwdns2935265:017crwdnd2935265:02crwdnd2935265:03crwdne2935265:0 Sony Vaio VGN-SZ120P Logic Board Replacement: crwdns2935265:017crwdnd2935265:03crwdnd2935265:03crwdne2935265:0
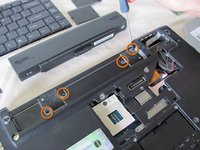
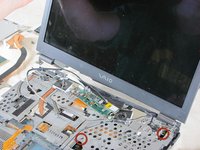
    • Unscrew the four securing screws, two on each side of the LCD.

    • Carefully remove the LCD. The speaker, bluetooth, and webcam assembly will come up with the display assembly.

    • Caution: Be careful of snags when pulling up display and speaker assemblies.

  18. Sony Vaio VGN-SZ120P Logic Board Replacement, Internal Fan: crwdns2935265:018crwdnd2935265:01crwdnd2935265:02crwdne2935265:0 Sony Vaio VGN-SZ120P Logic Board Replacement, Internal Fan: crwdns2935265:018crwdnd2935265:02crwdnd2935265:02crwdne2935265:0
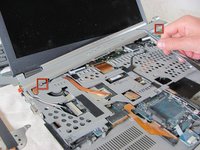
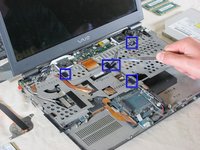
    • Remove screws from keyboard tray

    • Remove keyboard tray

  19. Sony Vaio VGN-SZ120P Logic Board Replacement: crwdns2935265:019crwdnd2935265:01crwdnd2935265:01crwdne2935265:0
    • Caution: When removing the fan, be careful to not tear the attached ribbon cable.

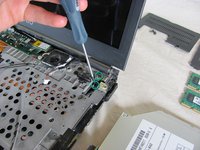
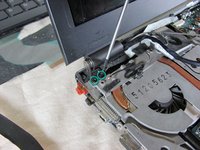
    • Unscrew all five screws from the internal fan.

    • Gently remove the internal fan.

  20. Sony Vaio VGN-SZ120P Logic Board Replacement, Logic Board: crwdns2935265:020crwdnd2935265:01crwdnd2935265:01crwdne2935265:0
    • Caution: Ground yourself before removing the logic board. Static electricity can damage the logic board.

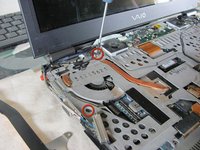
    • Unscrew and remove the logic board from the backing.

crwdns2915888:0crwdne2915888:0

To reassemble your device, follow these instructions in reverse order.

crwdns2935229:02crwdne2935229:0

David Hoyt

crwdns2935283:004/09/10crwdne2935283:0

4,023 crwdns2915208:0crwdne2915208:0

crwdns2935297:043crwdne2935297:0

crwdns2915084:0crwdne2915084:0

Cal Poly, Team 25-89, Amido Spring 2010 crwdns2935289:0Cal Poly, Team 25-89, Amido Spring 2010crwdne2935289:0

CPSU-AMIDO-S10S25G89

crwdns2931471:04crwdne2931471:0

crwdns2935297:063crwdne2935297:0

crwdns2944067:00crwdne2944067:0

crwdns2917038:0crwdne2917038:0

crwdns2936625:0crwdne2936625:0:

crwdns2936751:024crwdne2936751:0 0

crwdns2936753:07crwdne2936753:0 1

crwdns2936753:030crwdne2936753:0 5

crwdns2942667:0crwdne2942667:0 6,564