crwdns2933423:0crwdne2933423:0

Sony Vaio VGN-SR140E RAM Replacement

crwdns2942213:0crwdne2942213:0

  1. Sony Vaio VGN-SR140E RAM Replacement, Battery: crwdns2935265:01crwdnd2935265:01crwdnd2935265:01crwdne2935265:0
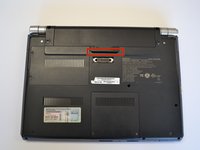
    • Turn the laptop over and orient it as shown in the figure.

  2. Sony Vaio VGN-SR140E RAM Replacement: crwdns2935265:02crwdnd2935265:01crwdnd2935265:01crwdne2935265:0
    • Slide the lock latch to the right to release the battery lock.

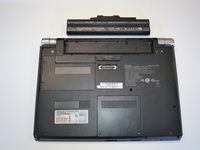
    • Slide and hold the release latch to the left.

  3. Sony Vaio VGN-SR140E RAM Replacement: crwdns2935265:03crwdnd2935265:01crwdnd2935265:02crwdne2935265:0 Sony Vaio VGN-SR140E RAM Replacement: crwdns2935265:03crwdnd2935265:02crwdnd2935265:02crwdne2935265:0
    • Use a fingernail or plastic opening tool lift the battery while holding the release latch.Rotate the battery up and away from you to remove it from the laptop.

  4. Sony Vaio VGN-SR140E RAM Replacement, RAM: crwdns2935265:04crwdnd2935265:01crwdnd2935265:01crwdne2935265:0
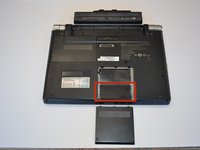
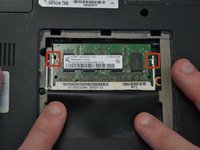
    • Using a Phillips #1 screwdriver, remove both screws. The screws are secured to the cover with retaining clips.

  5. Sony Vaio VGN-SR140E RAM Replacement: crwdns2935265:05crwdnd2935265:01crwdnd2935265:02crwdne2935265:0 Sony Vaio VGN-SR140E RAM Replacement: crwdns2935265:05crwdnd2935265:02crwdnd2935265:02crwdne2935265:0
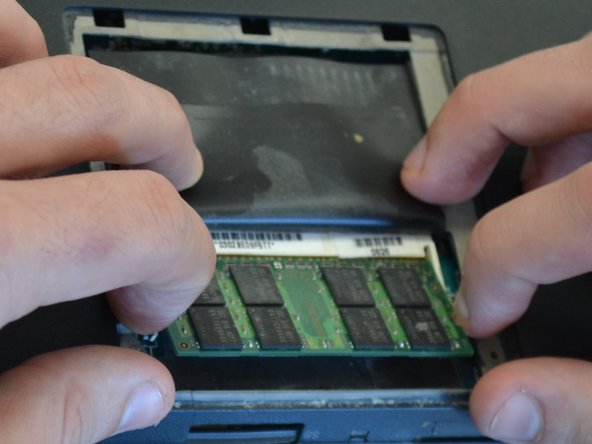
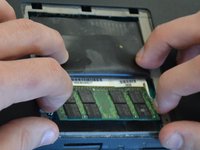
    • Lift the thin black plastic cover to access the RAM.

  6. Sony Vaio VGN-SR140E RAM Replacement: crwdns2935265:06crwdnd2935265:01crwdnd2935265:02crwdne2935265:0 Sony Vaio VGN-SR140E RAM Replacement: crwdns2935265:06crwdnd2935265:02crwdnd2935265:02crwdne2935265:0
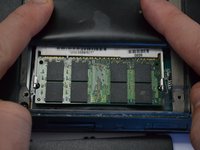
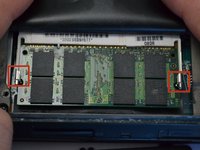
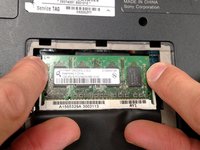
    • Apply light outward pressure to the locks on either side of the RAM. Rotate the RAM up slightly. Pull the RAM toward you to remove it.

  7. Sony Vaio VGN-SR140E RAM Replacement: crwdns2935265:07crwdnd2935265:01crwdnd2935265:03crwdne2935265:0 Sony Vaio VGN-SR140E RAM Replacement: crwdns2935265:07crwdnd2935265:02crwdnd2935265:03crwdne2935265:0 Sony Vaio VGN-SR140E RAM Replacement: crwdns2935265:07crwdnd2935265:03crwdnd2935265:03crwdne2935265:0
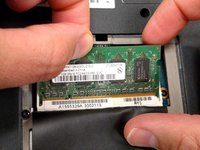
    • Using the same light outward pressure on the locks, lift the secondary RAM up and slide it away from you to remove it from its slot.

crwdns2915888:0crwdne2915888:0

To reassemble your device, follow these instructions in reverse order.

Jeremy

crwdns2935283:003/18/15crwdne2935283:0

722 crwdns2915208:0crwdne2915208:0

crwdns2935297:04crwdne2935297:0

crwdns2915084:0crwdne2915084:0

Michigan Tech, Team 1-6, Lauer Spring 2015 crwdns2935289:0Michigan Tech, Team 1-6, Lauer Spring 2015crwdne2935289:0

MTU-LAUER-S15S1G6

crwdns2931471:02crwdne2931471:0

crwdns2935297:010crwdne2935297:0

crwdns2944067:00crwdne2944067:0

crwdns2917038:0crwdne2917038:0

crwdns2936625:0crwdne2936625:0:

crwdns2936751:024crwdne2936751:0 0

crwdns2936753:07crwdne2936753:0 0

crwdns2936753:030crwdne2936753:0 15

crwdns2942667:0crwdne2942667:0 481