crwdns2933423:0crwdne2933423:0

Sony Vaio VGN-NW240F (PCG-7184L) Motherboard Replacement

crwdns2942213:0crwdne2942213:0

  1. Sony Vaio VGN-NW240F (PCG-7184L) Motherboard Replacement, Battery: crwdns2935265:01crwdnd2935265:01crwdnd2935265:01crwdne2935265:0
    • Power off the laptop.

    • Unplug the charging cable and any other cables plugged into the laptop.

    • Failure to remove or unplug any cables could result in electric shock.

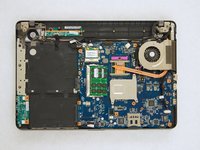
    • Turn the laptop over so that the back panel is facing upwards.

  2. Sony Vaio VGN-NW240F (PCG-7184L) Motherboard Replacement: crwdns2935265:02crwdnd2935265:01crwdnd2935265:01crwdne2935265:0
    • Locate two switches above the battery that lock it into place.

    • Push the left-hand switch, that says "lock" above it, so that it is unlocked.

  3. Sony Vaio VGN-NW240F (PCG-7184L) Motherboard Replacement: crwdns2935265:03crwdnd2935265:01crwdnd2935265:01crwdne2935265:0
    • Push and hold the right-hand switch, which says "release" above it, and lift the battery up out of its place.

  4. Sony Vaio VGN-NW240F (PCG-7184L) Motherboard Replacement, Back Panel: crwdns2935265:04crwdnd2935265:01crwdnd2935265:03crwdne2935265:0 Sony Vaio VGN-NW240F (PCG-7184L) Motherboard Replacement, Back Panel: crwdns2935265:04crwdnd2935265:02crwdnd2935265:03crwdne2935265:0 Sony Vaio VGN-NW240F (PCG-7184L) Motherboard Replacement, Back Panel: crwdns2935265:04crwdnd2935265:03crwdnd2935265:03crwdne2935265:0
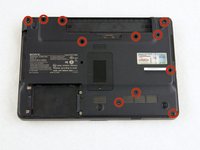
    • Remove all the 8mm Phillips #1 screws on the backside of the laptop.

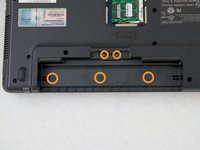
    • There are three 3mm and two 5.3mm screws under the battery that also need to be taken out.

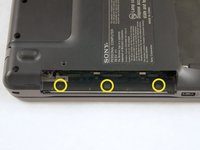
    • There are three 3mm screws under the optical drives that also need to be taken out.

    • Remove the RAM panel in addition to the other screws. For further instructions, refer to the RAM replacement guide.

  5. Sony Vaio VGN-NW240F (PCG-7184L) Motherboard Replacement: crwdns2935265:05crwdnd2935265:01crwdnd2935265:03crwdne2935265:0 Sony Vaio VGN-NW240F (PCG-7184L) Motherboard Replacement: crwdns2935265:05crwdnd2935265:02crwdnd2935265:03crwdne2935265:0 Sony Vaio VGN-NW240F (PCG-7184L) Motherboard Replacement: crwdns2935265:05crwdnd2935265:03crwdnd2935265:03crwdne2935265:0
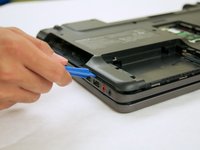
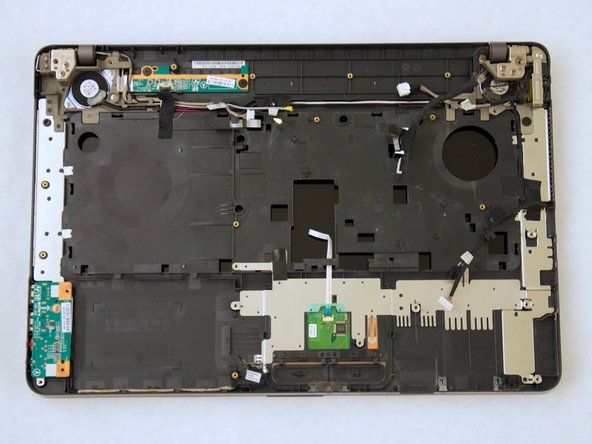
    • Pry along the edges of the back panel using the spudger.

    • If you are struggling to remove the back panel with a moderate amount of force, do NOT apply any additional force, instead double check to make sure all the screws were removed before attempting again.

  6. Sony Vaio VGN-NW240F (PCG-7184L) Motherboard Replacement, Fan: crwdns2935265:06crwdnd2935265:01crwdnd2935265:01crwdne2935265:0
    • Locate and remove three 5.3 mm Phillips #1 screws on the bottom of the fan.

    • Locate and remove the four 5.3 mm Phillips #1 screws on the top of the fan.

  7. Sony Vaio VGN-NW240F (PCG-7184L) Motherboard Replacement: crwdns2935265:07crwdnd2935265:01crwdnd2935265:01crwdne2935265:0
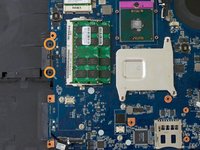
    • Locate and remove the four 3mm Phillips #1 screws above the processor and attached to the bronze heat-pipes.

    • Gently lift up the fan and heatsink from the the laptop.

    • If the fan and heatsink will not lift up with ease, do NOT apply any additional force. Check again to see if all necessary screws are removed.

  8. Sony Vaio VGN-NW240F (PCG-7184L) Motherboard Replacement: crwdns2935265:08crwdnd2935265:01crwdnd2935265:01crwdne2935265:0
    • The fan attached onto the heat sink with electrical tape. Removing the electrical tape allows you to replace the fan.

  9. Sony Vaio VGN-NW240F (PCG-7184L) Motherboard Replacement, Keyboard: crwdns2935265:09crwdnd2935265:01crwdnd2935265:01crwdne2935265:0
    • Locate the two highlighted circular openings and push the keyboard out.

    • There is a ribbon cable attaching the keyboard to the back of the motherboard. Avoid damaging the ribbon when pushing out the keyboard.

  10. Sony Vaio VGN-NW240F (PCG-7184L) Motherboard Replacement: crwdns2935265:010crwdnd2935265:01crwdnd2935265:01crwdne2935265:0
    • Detach the ribbon cable to separate the keyboard from the laptop.

    • Push open the brown clamp at the base of the ribbon to release it.

  11. Sony Vaio VGN-NW240F (PCG-7184L) Motherboard Replacement, Motherboard: crwdns2935265:011crwdnd2935265:01crwdnd2935265:01crwdne2935265:0
    • Remove the highlighted ribbon cables from their place underneath the keyboard. To do so, lift up on the black clamps to release the cables.

  12. Sony Vaio VGN-NW240F (PCG-7184L) Motherboard Replacement: crwdns2935265:012crwdnd2935265:01crwdnd2935265:02crwdne2935265:0 Sony Vaio VGN-NW240F (PCG-7184L) Motherboard Replacement: crwdns2935265:012crwdnd2935265:02crwdnd2935265:02crwdne2935265:0
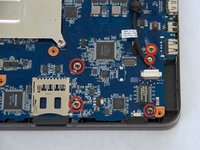
    • Remove the highlighted 3mm Phillips #1 screws.

    • Remove the two 8mm Phillips #1 screws that are highlighted.

  13. Sony Vaio VGN-NW240F (PCG-7184L) Motherboard Replacement: crwdns2935265:013crwdnd2935265:01crwdnd2935265:03crwdne2935265:0 Sony Vaio VGN-NW240F (PCG-7184L) Motherboard Replacement: crwdns2935265:013crwdnd2935265:02crwdnd2935265:03crwdne2935265:0 Sony Vaio VGN-NW240F (PCG-7184L) Motherboard Replacement: crwdns2935265:013crwdnd2935265:03crwdnd2935265:03crwdne2935265:0
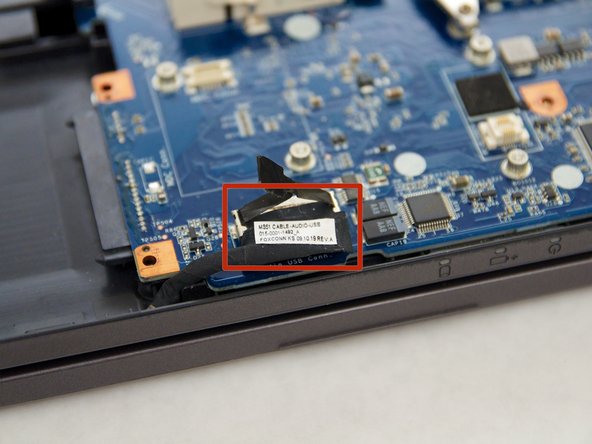
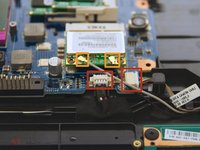
    • Detach all of the highlighted connectors.

    • If the connector has a plastic cable, use it to assist in removal.

    • Detach the black and grey network card cables.

  14. Sony Vaio VGN-NW240F (PCG-7184L) Motherboard Replacement: crwdns2935265:014crwdnd2935265:01crwdnd2935265:02crwdne2935265:0 Sony Vaio VGN-NW240F (PCG-7184L) Motherboard Replacement: crwdns2935265:014crwdnd2935265:02crwdnd2935265:02crwdne2935265:0
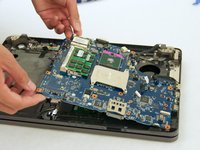
    • Carefully lift up the motherboard from its place.

    • The USB input/output area sits within the back plate of the laptop. To ensure safe removal, lift up and pull away from the USB input panel.

    • If the motherboard does lift up or come out easily, do not apply any additional force. Check again for any unattached cables or connects before attempting again.

crwdns2915888:0crwdne2915888:0

To reassemble your device, follow these instructions in reverse order.

crwdns2935229:06crwdne2935229:0

Kevin McGowan

crwdns2935283:004/22/14crwdne2935283:0

619 crwdns2915208:0crwdne2915208:0

crwdns2935297:04crwdne2935297:0

crwdns2915084:0crwdne2915084:0

Cal Poly, Team 9-17, Regan Spring 2014 crwdns2935289:0Cal Poly, Team 9-17, Regan Spring 2014crwdne2935289:0

CPSU-REGAN-S14S9G17

crwdns2931471:04crwdne2931471:0

crwdns2935297:018crwdne2935297:0

crwdns2917034:0crwdne2917034:0

Excellent instructions and pics. Thank you for this guide!

stbza - crwdns2934203:0crwdne2934203:0

crwdns2917038:0crwdne2917038:0

crwdns2936625:0crwdne2936625:0:

crwdns2936751:024crwdne2936751:0 0

crwdns2936753:07crwdne2936753:0 5

crwdns2936753:030crwdne2936753:0 32

crwdns2942667:0crwdne2942667:0 11,006