crwdns2933423:0crwdne2933423:0

Sony Vaio PCG-41216L Disk Drive Replacement

crwdns2942213:0crwdne2942213:0

  1. Sony Vaio PCG-41216L Disk Drive Replacement, Disk Drive: crwdns2935265:01crwdnd2935265:01crwdnd2935265:02crwdne2935265:0 Sony Vaio PCG-41216L Disk Drive Replacement, Disk Drive: crwdns2935265:01crwdnd2935265:02crwdnd2935265:02crwdne2935265:0
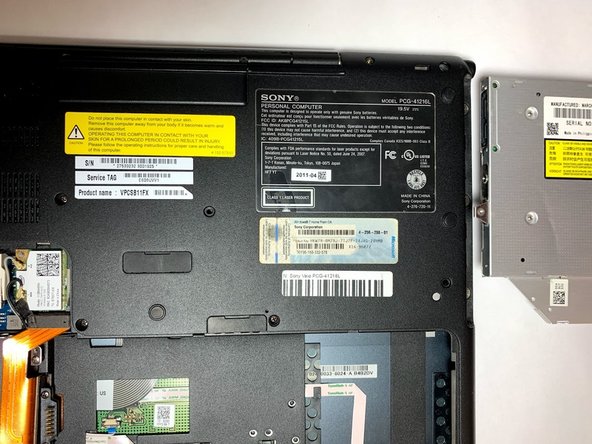
    • Flip the laptop over to begin the process.

    • Make sure the laptop is turned off and unplugged from the power cable.

  2. Sony Vaio PCG-41216L Disk Drive Replacement: crwdns2935265:02crwdnd2935265:01crwdnd2935265:02crwdne2935265:0 Sony Vaio PCG-41216L Disk Drive Replacement: crwdns2935265:02crwdnd2935265:02crwdnd2935265:02crwdne2935265:0
    • Remove the two 7mm Phillips #1 screws which hold the disk drive in place.

  3. Sony Vaio PCG-41216L Disk Drive Replacement: crwdns2935265:03crwdnd2935265:01crwdnd2935265:02crwdne2935265:0 Sony Vaio PCG-41216L Disk Drive Replacement: crwdns2935265:03crwdnd2935265:02crwdnd2935265:02crwdne2935265:0
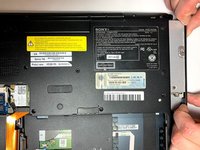
    • Carefully remove the disk drive by gripping the disk drive by the edges and pulling it out of the computer. Insert the replacement unit in the same orientation and reassemble the unit.

crwdns2915888:0crwdne2915888:0

To reassemble your device, follow these instructions in reverse order.

Aaron B

crwdns2935283:001/10/19crwdne2935283:0

220 crwdns2915208:0crwdne2915208:0

crwdns2935297:02crwdne2935297:0

crwdns2915084:0crwdne2915084:0

Oregon Institute of Technology, Team S1-G4, Lancaster Winter 2019 crwdns2935289:0Oregon Institute of Technology, Team S1-G4, Lancaster Winter 2019crwdne2935289:0

OIT-LANCASTER-W19S1G4

crwdns2931471:03crwdne2931471:0

crwdns2935297:010crwdne2935297:0

crwdns2944067:00crwdne2944067:0

crwdns2917038:0crwdne2917038:0

crwdns2936625:0crwdne2936625:0:

crwdns2936751:024crwdne2936751:0 0

crwdns2936753:07crwdne2936753:0 1

crwdns2936753:030crwdne2936753:0 11

crwdns2942667:0crwdne2942667:0 560