crwdns2933423:0crwdne2933423:0

Sony Handycam HDR-CX580V Recording Button Replacement

crwdns2942213:0crwdne2942213:0

  1. Sony Handycam HDR-CX580V Recording Button Replacement, Battery: crwdns2935265:01crwdnd2935265:01crwdnd2935265:01crwdne2935265:0
    • Locate the slider labeled "BATT" and pull it back from the battery with your thumb.

  2. Sony Handycam HDR-CX580V Recording Button Replacement: crwdns2935265:02crwdnd2935265:01crwdnd2935265:01crwdne2935265:0
    • At this point, you should be able to remove the battery by simply lifting it from the camera.

    • The camera provided for guide-creation did not include a battery. However, the battery position should be the same.

  3. Sony Handycam HDR-CX580V Recording Button Replacement, Recording Button: crwdns2935265:03crwdnd2935265:01crwdnd2935265:03crwdne2935265:0 Sony Handycam HDR-CX580V Recording Button Replacement, Recording Button: crwdns2935265:03crwdnd2935265:02crwdnd2935265:03crwdne2935265:0 Sony Handycam HDR-CX580V Recording Button Replacement, Recording Button: crwdns2935265:03crwdnd2935265:03crwdnd2935265:03crwdne2935265:0
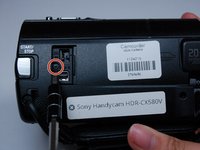
    • Use the Phillips #00 head to remove the following 5.5mm screws on the left-hand side.

  4. Sony Handycam HDR-CX580V Recording Button Replacement: crwdns2935265:04crwdnd2935265:01crwdnd2935265:01crwdne2935265:0
    • Use the Phillips #00 head to remove the following 5.5mm screws on the empty battery socket.

  5. Sony Handycam HDR-CX580V Recording Button Replacement: crwdns2935265:05crwdnd2935265:01crwdnd2935265:01crwdne2935265:0
    • Use the Phillips #00 head to remove the following 5.5mm screws on the bottom.

  6. Sony Handycam HDR-CX580V Recording Button Replacement: crwdns2935265:06crwdnd2935265:01crwdnd2935265:01crwdne2935265:0
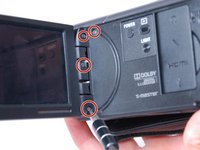
    • Fold back the hinging panel on the top of the camera located near the lens.

    • Use the Phillips #00 head to remove the following 5.5mm screws on the top under the hinging panel.

  7. Sony Handycam HDR-CX580V Recording Button Replacement: crwdns2935265:07crwdnd2935265:01crwdnd2935265:02crwdne2935265:0 Sony Handycam HDR-CX580V Recording Button Replacement: crwdns2935265:07crwdnd2935265:02crwdnd2935265:02crwdne2935265:0
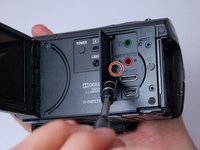
    • Slide back the cover for the DC and A/V ports on the right-hand side.

    • Use the Phillips #00 head to remove the following 5.5mm screws underneath the cover and on the right-hand side.

  8. Sony Handycam HDR-CX580V Recording Button Replacement: crwdns2935265:08crwdnd2935265:01crwdnd2935265:01crwdne2935265:0
    • Use the plastic opener tool to loosen the casing on the bottom and the right-hand side.

    • At this point, the right-hand side should simply come off, although it will still be connected with internal wiring.

    • Be delicate with the wiring still attached to the side casing until you have access to removing them later.

  9. Sony Handycam HDR-CX580V Recording Button Replacement: crwdns2935265:09crwdnd2935265:01crwdnd2935265:03crwdne2935265:0 Sony Handycam HDR-CX580V Recording Button Replacement: crwdns2935265:09crwdnd2935265:02crwdnd2935265:03crwdne2935265:0 Sony Handycam HDR-CX580V Recording Button Replacement: crwdns2935265:09crwdnd2935265:03crwdnd2935265:03crwdne2935265:0
    • Carefully remove the bottom casing with your fingers.

    • Be careful not to loose the small metal stand-mount pieces that lay underneath the casing.

  10. Sony Handycam HDR-CX580V Recording Button Replacement: crwdns2935265:010crwdnd2935265:01crwdnd2935265:01crwdne2935265:0
    • Look at the right side of the camera (the side with the recording button) while holding back the detached casing.

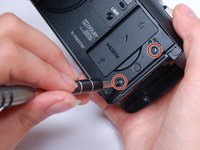
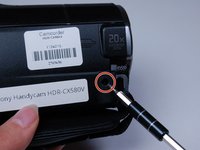
    • Use the Phillips #00 head to remove the following 5.5mm screws near the recording button.

  11. Sony Handycam HDR-CX580V Recording Button Replacement: crwdns2935265:011crwdnd2935265:01crwdnd2935265:01crwdne2935265:0
    crwdns2935267:0crwdne2935267:0
    Tweezers
    $4.99
    crwdns2942207:0crwdne2942207:0
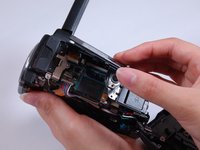
    • Use the curved tweezers to carefully detach the blue ribbon cable connector from the body of the camera.

    • The recording button and its blue ribbon cable connector should become detached from the body, but remain connected to the top casing.

  12. Sony Handycam HDR-CX580V Recording Button Replacement: crwdns2935265:012crwdnd2935265:01crwdnd2935265:02crwdne2935265:0 Sony Handycam HDR-CX580V Recording Button Replacement: crwdns2935265:012crwdnd2935265:02crwdnd2935265:02crwdne2935265:0
    • Pull off the top casing by lightly grabbing either side and pulling towards the back of the camera.

  13. Sony Handycam HDR-CX580V Recording Button Replacement: crwdns2935265:013crwdnd2935265:01crwdnd2935265:01crwdne2935265:0
    • Use the Phillips #00 head to remove the following 5.5mm screws on the inside of the top casing.

  14. Sony Handycam HDR-CX580V Recording Button Replacement: crwdns2935265:014crwdnd2935265:01crwdnd2935265:01crwdne2935265:0
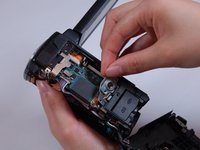
    • Carefully remove the metal frame from the top casing.

  15. Sony Handycam HDR-CX580V Recording Button Replacement: crwdns2935265:015crwdnd2935265:01crwdnd2935265:01crwdne2935265:0
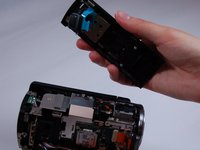
    • You are now free to remove the recording button, as well as its connection strip.

crwdns2915888:0crwdne2915888:0

To reassemble your device, follow these instructions in reverse order.

Derek Fritz

crwdns2935283:003/21/17crwdne2935283:0

378 crwdns2915208:0crwdne2915208:0

crwdns2935297:03crwdne2935297:0

crwdns2915084:0crwdne2915084:0

Texas Tech, Team S46-G5, Bennett Spring 2017 crwdns2935289:0Texas Tech, Team S46-G5, Bennett Spring 2017crwdne2935289:0

TTU-BENNETT-S17S46G5

crwdns2931471:04crwdne2931471:0

crwdns2935297:010crwdne2935297:0

crwdns2944067:00crwdne2944067:0

crwdns2917038:0crwdne2917038:0

crwdns2936625:0crwdne2936625:0:

crwdns2936751:024crwdne2936751:0 0

crwdns2936753:07crwdne2936753:0 2

crwdns2936753:030crwdne2936753:0 6

crwdns2942667:0crwdne2942667:0 414