crwdns2915892:0crwdne2915892:0
In this guide you will work through the process of removing the lens from the camera. This involves removing many moving parts of the camera, as well as some wiring and large amount of casing. This will, however, allow you to clean the lens more directly.
crwdns2942213:0crwdne2942213:0
-
-
Locate the slider labeled "BATT" and pull it back from the battery with your thumb.
-
-
-
At this point, you should be able to remove the battery by simply lifting it from the camera.
-
-
-
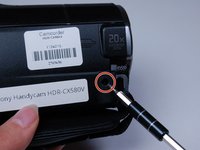
Use the Phillips #00 head to remove the following 5.5mm screws on the left-hand side.
-
-
-
Use the Phillips #00 head to remove the following 5.5mm screws on the empty battery socket.
-
-
-
Use the Phillips #00 head to remove the following 5.5mm screws on the bottom.
-
-
-
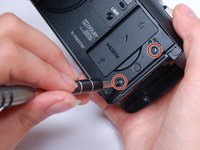
Fold back the hinging panel on the top of the camera located near the lens.
-
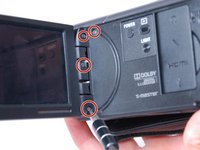
Use the Phillips #00 head to remove the following 5.5mm screws on the top under the hinging panel.
-
-
-
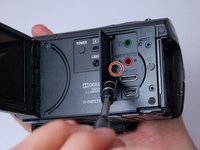
Slide back the cover for the DC and A/V ports on the right-hand side.
-
Use the Phillips #00 head to remove the following 5.5mm screws underneath the cover and on the right-hand side.
-
-
-
Use the plastic opener tool to loosen the casing on the bottom and the right-hand side.
-
-
-
-
Carefully remove the bottom casing with your fingers.
-
-
-
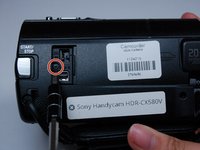
Look at the right side of the camera (the side with the recording button) while holding back the detached casing.
-
Use the Phillips #00 head to remove the following 5.5mm screws near the recording button.
-
-
crwdns2935267:0crwdne2935267:0Tweezers$4.99
-
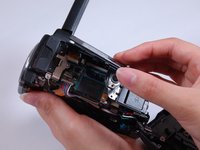
Use the curved tweezers to carefully detach the blue ribbon cable connector from the body of the camera.
-
-
-
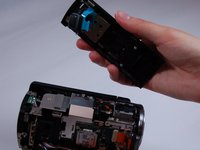
Pull off the top casing by lightly grabbing either side and pulling towards the back of the camera.
-
-
-
Use the Phillips #00 head to remove the following 5.5mm screws on the inside of the top casing.
-
-
-
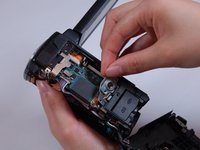
Carefully remove the metal frame from the top casing.
-
-
-
You are now free to remove the recording button, as well as its connection strip.
-
-
-
Use the Phillips #00 head to remove the following 5.5mm screws on the right-hand side near the lens.
-
-
-
Use the Phillips #00 head to remove the following 5.5mm screws on the top near the lens.
-
-
-
Carefully pop off the casing strip on the camera's left-hand side near the lens.
-
-
-
Use the Phillips #00 head to remove the following 5.5mm screws underneath the casing strip.
-
-
-
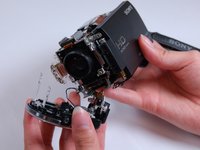
Carefully pull the lens cover and shutter assembly off of the front of the camera.
-
-
-
Use the Phillips #00 head to remove the following 5.5mm screws on the lens shell.
-
-
-
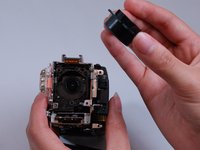
Carefully remove the lens from the body of the camera.
-


To reassemble your device, follow these instructions in reverse order.
To reassemble your device, follow these instructions in reverse order.

crwdns2915084:0crwdne2915084:0

Texas Tech, Team S46-G5, Bennett Spring 2017 crwdns2935289:0Texas Tech, Team S46-G5, Bennett Spring 2017crwdne2935289:0
TTU-BENNETT-S17S46G5
crwdns2931471:04crwdne2931471:0
crwdns2935297:010crwdne2935297:0