crwdns2915892:0crwdne2915892:0
The hard drive is one of the most important parts of the camera, but can be easily damaged by being shaken, exposed to liquid or extreme temperatures, or exposed to magnetic fields. The hard drive may also wear out over time. A defective or broken hard drive may prevent the camera from turning on, recording images, or connecting to a computer and transferring files.
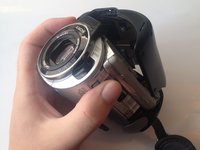
Luckily, replacing the hard drive of the DCR-SR42 is a simple procedure that will take no more than 20 minutes. However, the user should be careful when disassembling the camera in order to avoid damaging the flex cable or any other internal components of the camera. The user should also ensure that the battery is disconnected from the camera at least an hour before disassembly is attempted, since capacitors inside the camera can remain charged with electricity some time after the battery is removed. It is necessary to allow capacitors to discharge to prevent injury to the user or damage to the camera.
For problems pertaining to the hard drive, please refer to the Sony Handycam DCR SR-42 Troubleshooting Guide
crwdns2942213:0crwdne2942213:0
-
-
Remove the battery, and use the Phillips #00 precision screwdriver to then remove the three 3mm Phillips #00 screws under the battery.
-
-
-
Remove the three 3mm #00 Phillips screws on the bottom of the camera.
-
-
-
Remove the three 3mm Phillips #00 screws on the side of the camera.
-
Remove the 4mm Phillips #00 screw under the AV port cover.
-
-
-
-
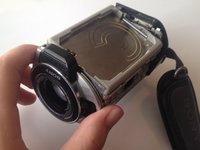
Gently pull the black plastic hard drive cover away from the body of the camera. This will expose the hard drive.
-
-
-
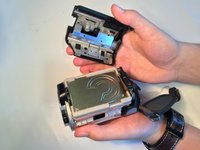
Lift the hard drive out of the camera by grasping the grey rubber mounting brackets and pulling them upwards.
-
-
-
Remove the rubber mounting brackets by pulling them off the hard drive.
-
-
-
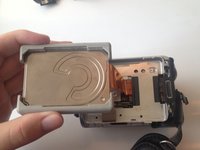
Carefully unplug the flex cable from the hard drive.
-


To reassemble your device, follow these instructions in reverse order.
To reassemble your device, follow these instructions in reverse order.
crwdns2935221:0crwdne2935221:0
crwdns2935229:07crwdne2935229:0
crwdns2915084:0crwdne2915084:0

Baylor, Team 7-13, Williams Spring 2015 crwdns2935289:0Baylor, Team 7-13, Williams Spring 2015crwdne2935289:0
BU-WILLIAMS-S15S7G13
crwdns2931471:04crwdne2931471:0
crwdns2935297:010crwdne2935297:0
crwdns2947412:04crwdne2947412:0
Gracias por el post. Muy buenas las explicaciones.
Una consulta.
Tengo filmadora SONY DRC-SR21 cuyo disco original es Toshiba MKL8034GAL.
Puedo usar un disco de 30GB para reemplazarlo ?
Intenté hacerlo pero al encender la filmadora, vuelve a apagarse.
El disco original es de 500mA y el de 30GB es de 400mA.
Gracias por la ayuda
Hi, that’s a very comprehensive tutorial, well done!
I’m trying to find out if I can access video footage recorded onto a sony handycam ( DCR-SR75) The LCD screen stopped working and I can’t seem to operate the memory. I would appreciate any advise or suggestions as how to sort this problem thanks, Ger
Any recommendations on bigger drives to replace it with? SSD?
Where can I buy a replacement hdd to do this repair with?