crwdns2933423:0crwdne2933423:0

Sony Handycam DCR-HC30 LCD Screen Replacement

crwdns2942213:0crwdne2942213:0

  1. Sony Handycam DCR-HC30 LCD Screen Replacement, LCD Screen: crwdns2935265:01crwdnd2935265:01crwdnd2935265:02crwdne2935265:0 Sony Handycam DCR-HC30 LCD Screen Replacement, LCD Screen: crwdns2935265:01crwdnd2935265:02crwdnd2935265:02crwdne2935265:0
    • To begin, the LCD screen must be removed.

    • Bring the LCD screen to the fully open position.

    • Remove the three 5 MM Phillips #1 screws on the front of the LCD screen.

  2. Sony Handycam DCR-HC30 LCD Screen Replacement: crwdns2935265:02crwdnd2935265:01crwdnd2935265:03crwdne2935265:0 Sony Handycam DCR-HC30 LCD Screen Replacement: crwdns2935265:02crwdnd2935265:02crwdnd2935265:03crwdne2935265:0 Sony Handycam DCR-HC30 LCD Screen Replacement: crwdns2935265:02crwdnd2935265:03crwdnd2935265:03crwdne2935265:0
    • Flip the camera with the lens facing up.

    • Turn the LCD screen so you can see the 5 MM Phillips #1 screw on the inside; remove the screw.

    • Spin the LCD screen around to get the 5 MM Phillips #1 screw in the same place on the other side.

    • Use the plastic opening tool to gently separate the back of the screen from the unit.

  3. Sony Handycam DCR-HC30 LCD Screen Replacement: crwdns2935265:03crwdnd2935265:01crwdnd2935265:03crwdne2935265:0 Sony Handycam DCR-HC30 LCD Screen Replacement: crwdns2935265:03crwdnd2935265:02crwdnd2935265:03crwdne2935265:0 Sony Handycam DCR-HC30 LCD Screen Replacement: crwdns2935265:03crwdnd2935265:03crwdnd2935265:03crwdne2935265:0
    • These parts are very small and fragile and can break easily.

    • With the back off, spin the LCD screen back around.

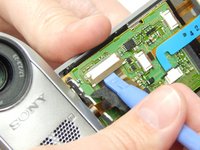
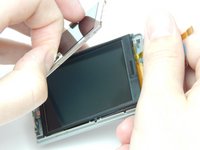
    • Using the plastic opening tool, gently lift up the holder that keeps the ribbon in place.

    • Gently slip the ribbon from its housing.

    • When this step is completed the LCD screen will separate from the rest of the camera. From here on you will only be working with the screen.

  4. Sony Handycam DCR-HC30 LCD Screen Replacement: crwdns2935265:04crwdnd2935265:01crwdnd2935265:03crwdne2935265:0 Sony Handycam DCR-HC30 LCD Screen Replacement: crwdns2935265:04crwdnd2935265:02crwdnd2935265:03crwdne2935265:0 Sony Handycam DCR-HC30 LCD Screen Replacement: crwdns2935265:04crwdnd2935265:03crwdnd2935265:03crwdne2935265:0
    • Ensure that you are gentle when handling the parts of the board within. Even small mistakes can permanently damage the board.

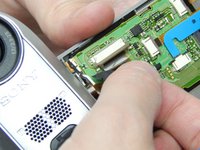
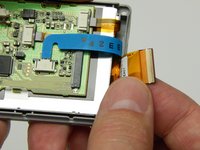
    • While holding the entire LCD screen unit in the palm of your hand use your thumb and forefinger to grasp the big ribbon and gently wiggle it out of its housing.

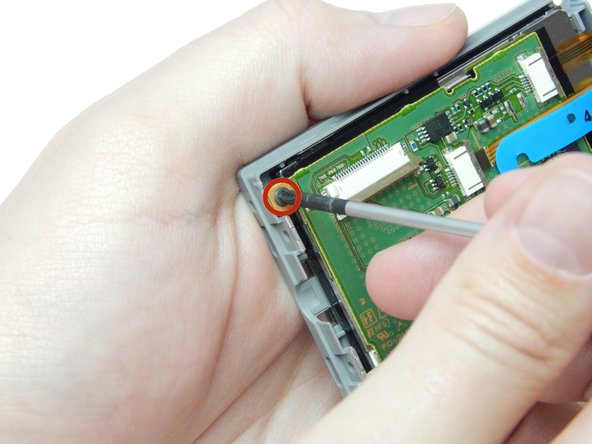
    • Remove the one screw that holds the board onto the back of the LCD screen unit.

  5. Sony Handycam DCR-HC30 LCD Screen Replacement: crwdns2935265:05crwdnd2935265:01crwdnd2935265:03crwdne2935265:0 Sony Handycam DCR-HC30 LCD Screen Replacement: crwdns2935265:05crwdnd2935265:02crwdnd2935265:03crwdne2935265:0 Sony Handycam DCR-HC30 LCD Screen Replacement: crwdns2935265:05crwdnd2935265:03crwdnd2935265:03crwdne2935265:0
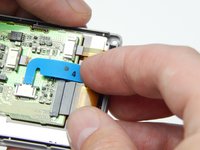
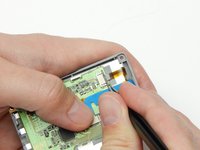
    • Using tweezers, gently wiggle the locks up and out on the ribbon housings of the three ribbons still connected to the LCD board.

    • Slip the ribbons out of their housings.

  6. Sony Handycam DCR-HC30 LCD Screen Replacement: crwdns2935265:06crwdnd2935265:01crwdnd2935265:03crwdne2935265:0 Sony Handycam DCR-HC30 LCD Screen Replacement: crwdns2935265:06crwdnd2935265:02crwdnd2935265:03crwdne2935265:0 Sony Handycam DCR-HC30 LCD Screen Replacement: crwdns2935265:06crwdnd2935265:03crwdnd2935265:03crwdne2935265:0
    • Within the LCD unit there are three layers to remove.

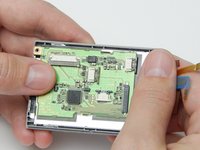
    • While holding the ribbons back with your thumb remove the board and set in a safe place.

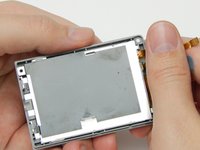
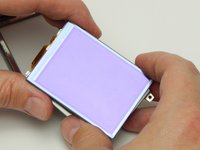
    • Keeping the ribbons to the side remove the LCD filter. This exposes the LCD screen.

  7. Sony Handycam DCR-HC30 LCD Screen Replacement: crwdns2935265:07crwdnd2935265:01crwdnd2935265:02crwdne2935265:0 Sony Handycam DCR-HC30 LCD Screen Replacement: crwdns2935265:07crwdnd2935265:02crwdnd2935265:02crwdne2935265:0
    crwdns2935267:0crwdne2935267:0
    Microfiber Cleaning Cloths
    $3.99
    crwdns2942207:0crwdne2942207:0
    • Remove the LCD screen.

    • Be sure to clean the new screen with a microfiber cloth before re-installation.

crwdns2915888:0crwdne2915888:0

To reassemble your device, follow these instructions in reverse order.

crwdns2935227:0crwdne2935227:0

Matthew Hurt

crwdns2935283:001/15/15crwdne2935283:0

583 crwdns2915208:0crwdne2915208:0

crwdns2935297:03crwdne2935297:0

crwdns2915084:0crwdne2915084:0

USF Sarasota-Manatee, Team 1-2, Stewart Winter 2015 crwdns2935289:0USF Sarasota-Manatee, Team 1-2, Stewart Winter 2015crwdne2935289:0

USFSM-STEWART-W15S1G2

crwdns2931471:04crwdne2931471:0

crwdns2935297:011crwdne2935297:0

crwdns2917034:0crwdne2917034:0

What can be done if one of the locks get broken when wiggled. What is the name of the part I need to buy. Thanks

Fab - crwdns2934203:0crwdne2934203:0

crwdns2917038:0crwdne2917038:0

crwdns2936625:0crwdne2936625:0:

crwdns2936751:024crwdne2936751:0 0

crwdns2936753:07crwdne2936753:0 6

crwdns2936753:030crwdne2936753:0 32

crwdns2942667:0crwdne2942667:0 1,732