crwdns2933423:0crwdne2933423:0

Sony H.ear On 2 Motherboard Replacement

crwdns2942213:0crwdne2942213:0

  1. Sony H.ear On 2 Motherboard Replacement, Motherboard: crwdns2935265:01crwdnd2935265:01crwdnd2935265:02crwdne2935265:0 Sony H.ear On 2 Motherboard Replacement, Motherboard: crwdns2935265:01crwdnd2935265:02crwdnd2935265:02crwdne2935265:0
    • Start on the left side by using the plastic opening tool in the crease between the ear cup and plastic. Gently apply pressure until it separates.

    • Do not force any parts off as the plastic holders may snap off if too much pressure is applied.

  2. Sony H.ear On 2 Motherboard Replacement: crwdns2935265:02crwdnd2935265:01crwdnd2935265:02crwdne2935265:0 Sony H.ear On 2 Motherboard Replacement: crwdns2935265:02crwdnd2935265:02crwdnd2935265:02crwdne2935265:0
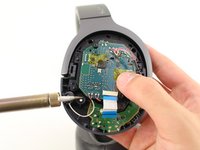
    • Use the JIS #00 Screwdriver to remove the 2 6.4mm screws holding in the motherboard.

  3. Sony H.ear On 2 Motherboard Replacement: crwdns2935265:03crwdnd2935265:01crwdnd2935265:03crwdne2935265:0 Sony H.ear On 2 Motherboard Replacement: crwdns2935265:03crwdnd2935265:02crwdnd2935265:03crwdne2935265:0 Sony H.ear On 2 Motherboard Replacement: crwdns2935265:03crwdnd2935265:03crwdnd2935265:03crwdne2935265:0
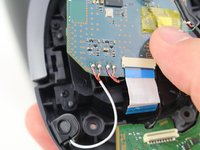
    • De-solder all 18 wire-connections on the motherboard.

    • Record wire positions on board for proper connections when re-soldering the replacement board.

    • Do not overheat joints while de-soldering to prevent board damage.

    • Please see How To Solder and Desolder Connections for help on soldering and desoldering connections.

  4. Sony H.ear On 2 Motherboard Replacement: crwdns2935265:04crwdnd2935265:01crwdnd2935265:02crwdne2935265:0 Sony H.ear On 2 Motherboard Replacement: crwdns2935265:04crwdnd2935265:02crwdnd2935265:02crwdne2935265:0
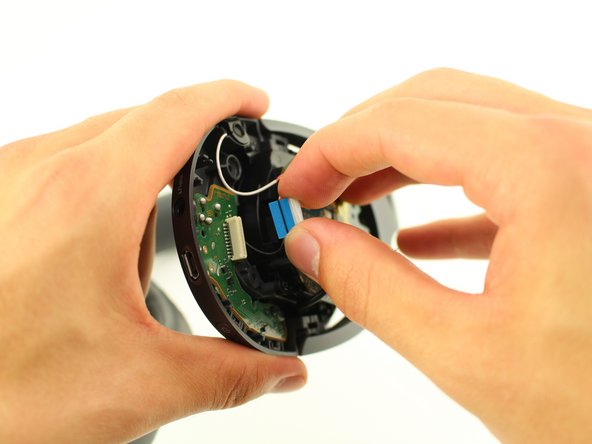
    • Disconnect the white ribbon cable by gently tugging on the white connector while holding the motherboard carefully in place.

  5. Sony H.ear On 2 Motherboard Replacement: crwdns2935265:05crwdnd2935265:01crwdnd2935265:01crwdne2935265:0
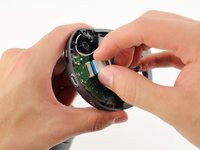
    • Gently remove the old motherboard from the bracket assembly and replace and resolder motherboard.

crwdns2915888:0crwdne2915888:0

To reassemble your device, follow these instructions in reverse order.

Michael Long

crwdns2935283:004/15/19crwdne2935283:0

131 crwdns2915208:0crwdne2915208:0

crwdns2935295:0crwdne2935295:0

crwdns2915084:0crwdne2915084:0

Cal Poly, Team S9-G11, Maness Spring 2019 crwdns2935289:0Cal Poly, Team S9-G11, Maness Spring 2019crwdne2935289:0

CPSU-MANESS-S19S9G11

crwdns2931471:05crwdne2931471:0

crwdns2935297:016crwdne2935297:0

crwdns2917034:0crwdne2917034:0

where can i find a replacement motherboard for these headphones?

MTL - crwdns2934203:0crwdne2934203:0

crwdns2917038:0crwdne2917038:0

crwdns2936625:0crwdne2936625:0:

crwdns2936751:024crwdne2936751:0 4

crwdns2936753:07crwdne2936753:0 9

crwdns2936753:030crwdne2936753:0 19

crwdns2942667:0crwdne2942667:0 1,526