crwdns2933423:0crwdne2933423:0
crwdns2947577:0crwdnd2947577:0crwdne2947577:0

Sony Ericsson s710a SIM Card Replacement

  1. Sony Ericsson s710a SIM Card Replacement, SIM Card: crwdns2935265:01crwdnd2935265:01crwdnd2935265:01crwdne2935265:0
    • Slide the battery cover off by pushing it away from the camera side of the device.

    • This may require a good amount of force.

    crwdns2952109:0crwdne2952109:0

    crwdns2917038:0crwdne2917038:0

  2. Sony Ericsson s710a SIM Card Replacement: crwdns2935265:02crwdnd2935265:01crwdnd2935265:01crwdne2935265:0
    • Next remove the battery

    • Lift it out of the phone using the tab on the battery (marked in the image)

    crwdns2952109:0crwdne2952109:0

    crwdns2917038:0crwdne2917038:0

  3. Sony Ericsson s710a SIM Card Replacement: crwdns2935265:03crwdnd2935265:01crwdnd2935265:01crwdne2935265:0
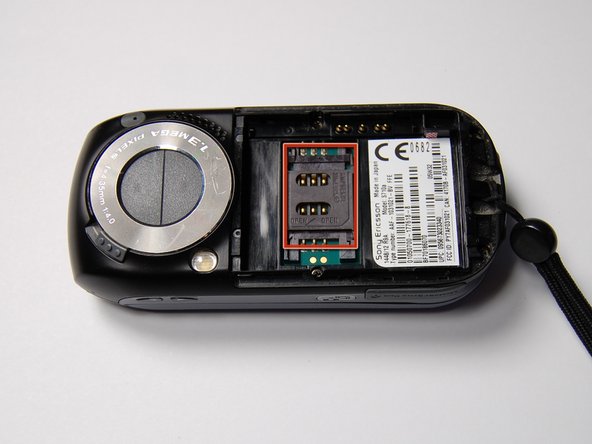
    • The SIM card holder is now exposed (marked in image).

    • This will likely already have an existing SIM card in it if the phone has been previously used.

    • To open this, slide the holder upward (assuming the same orientation as in the image)

    crwdns2952109:0crwdne2952109:0

    crwdns2917038:0crwdne2917038:0

  4. Sony Ericsson s710a SIM Card Replacement: crwdns2935265:04crwdnd2935265:01crwdnd2935265:01crwdne2935265:0
    • The holder will then hinge open.

    • You are now able to insert a new SIM card.

    crwdns2952109:0crwdne2952109:0

    crwdns2917038:0crwdne2917038:0

  5. Sony Ericsson s710a SIM Card Replacement: crwdns2935265:05crwdnd2935265:01crwdnd2935265:01crwdne2935265:0
    • Insert the new SIM card in the orientation shown.

    • This is important, as the phone will not work if the metal contacts on the card are not properly aligned with the contacts on the phone.

    crwdns2952109:0crwdne2952109:0

    crwdns2917038:0crwdne2917038:0

  6. Sony Ericsson s710a SIM Card Replacement: crwdns2935265:06crwdnd2935265:01crwdnd2935265:01crwdne2935265:0
    • Now hinge the SIM card holder down so that it lays flat in the phone.

    • Slide the plastic holder downwards to lock it in place.

    • Now the battery and cover can be put back in place.

    crwdns2952109:0crwdne2952109:0

    crwdns2917038:0crwdne2917038:0

crwdns2915888:0crwdne2915888:0

To reassemble your device, follow these instructions in reverse order.

crwdns2935221:0crwdne2935221:0

crwdns2935227:0crwdne2935227:0

Alexander

crwdns2935283:010/29/11crwdne2935283:0

75 crwdns2915208:0crwdne2915208:0

crwdns2935297:04crwdne2935297:0

crwdns2935287:0crwdne2935287:0

University of Maryland, Team 1-1, Calloway Fall 2011 crwdns2935289:0University of Maryland, Team 1-1, Calloway Fall 2011crwdne2935289:0

UMD-CALLOWAY-F11S1G1

crwdns2931471:03crwdne2931471:0

crwdns2935297:014crwdne2935297:0

crwdns2947412:00crwdne2947412:0

crwdns2917038:0crwdne2917038:0

crwdns2936625:0crwdne2936625:0:

crwdns2936751:024crwdne2936751:0 1

crwdns2936753:07crwdne2936753:0 11

crwdns2936753:030crwdne2936753:0 43

crwdns2942667:0crwdne2942667:0 2,179