crwdns2933423:0crwdne2933423:0

Sony DVP-SR200P Button Circuit Board Replacement

crwdns2942213:0crwdne2942213:0

  1. Sony DVP-SR200P Button Circuit Board Replacement, Top Cover: crwdns2935265:01crwdnd2935265:01crwdnd2935265:02crwdne2935265:0 Sony DVP-SR200P Button Circuit Board Replacement, Top Cover: crwdns2935265:01crwdnd2935265:02crwdnd2935265:02crwdne2935265:0
    • Remove the five #1 Phillips screws (black, 3/16") attaching the cover to the DVD player.

    • One 3/16" screw on the right side of the DVD player.

    • One 3/16" screw on the left side of the DVD player (directly opposite of other screw).

    • Three 3/16" screws on the back of the DVD player.

  2. Sony DVP-SR200P Button Circuit Board Replacement: crwdns2935265:02crwdnd2935265:01crwdnd2935265:02crwdne2935265:0 Sony DVP-SR200P Button Circuit Board Replacement: crwdns2935265:02crwdnd2935265:02crwdnd2935265:02crwdne2935265:0
    • Slide the cover away from the front of the DVD player until it is off.

  3. Sony DVP-SR200P Button Circuit Board Replacement, Processing Board: crwdns2935265:03crwdnd2935265:01crwdnd2935265:01crwdne2935265:0
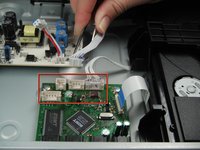
    • Remove the blue tape from the processing board by gently pulling upward.

  4. Sony DVP-SR200P Button Circuit Board Replacement: crwdns2935265:04crwdnd2935265:01crwdnd2935265:02crwdne2935265:0 Sony DVP-SR200P Button Circuit Board Replacement: crwdns2935265:04crwdnd2935265:02crwdnd2935265:02crwdne2935265:0
    • Use the tweezers to remove the four sets of wires connected to the processing board. Start with the cord located in front of the row of three cords.

    • The wires may be difficult to remove. Wiggling them while lifting them up may help remove them.

  5. Sony DVP-SR200P Button Circuit Board Replacement: crwdns2935265:05crwdnd2935265:01crwdnd2935265:01crwdne2935265:0
    • Handle the processing board with care. It is fragile.

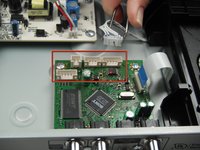
    • Unscrew the two #1 Phillips screws (silver, 3/16") located on the two edge corners of the processing board.

  6. Sony DVP-SR200P Button Circuit Board Replacement: crwdns2935265:06crwdnd2935265:01crwdnd2935265:01crwdne2935265:0
    • Orient the DVD player so that you are facing the video and audio jacks.

    • Unscrew the two #1 Phillips screws (silver, 3/16") located on the outside of the DVD player

    • The processing board is now free to be removed and replaced.

  7. Sony DVP-SR200P Button Circuit Board Replacement, DVD Drive: crwdns2935265:07crwdnd2935265:01crwdnd2935265:01crwdne2935265:0
    • Orient the DVD player so the front of the DVD player is opposite of you.

    • Remove the two #1 Phillips screws (silver, 3/16") that attach the DVD drive to the bottom of the DVD player.

  8. Sony DVP-SR200P Button Circuit Board Replacement: crwdns2935265:08crwdnd2935265:01crwdnd2935265:01crwdne2935265:0
    • Remove the DVD drive by pulling it backward and upward while ensuring that it is free of any braces.

  9. Sony DVP-SR200P Button Circuit Board Replacement, Button Circuit Board: crwdns2935265:09crwdnd2935265:01crwdnd2935265:03crwdne2935265:0 Sony DVP-SR200P Button Circuit Board Replacement, Button Circuit Board: crwdns2935265:09crwdnd2935265:02crwdnd2935265:03crwdne2935265:0 Sony DVP-SR200P Button Circuit Board Replacement, Button Circuit Board: crwdns2935265:09crwdnd2935265:03crwdnd2935265:03crwdne2935265:0
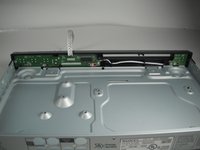
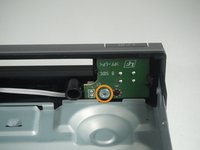
    • Orient the DVD player so the button circuit board is facing you.

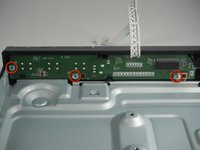
    • Remove the four #1 Phillips screws (silver, 3/16") from the button circuit board.

    • Three 3/16" screws from the longer button circuit board.

    • One 3/16" screw from the smaller button circuit board.

  10. Sony DVP-SR200P Button Circuit Board Replacement: crwdns2935265:010crwdnd2935265:01crwdnd2935265:03crwdne2935265:0 Sony DVP-SR200P Button Circuit Board Replacement: crwdns2935265:010crwdnd2935265:02crwdnd2935265:03crwdne2935265:0 Sony DVP-SR200P Button Circuit Board Replacement: crwdns2935265:010crwdnd2935265:03crwdnd2935265:03crwdne2935265:0
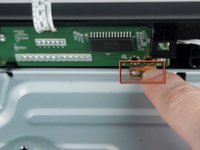
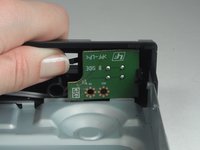
    • Hold down the copper brace that is near the far right screw hole of the long circuit board.

    • Lift the longer button circuit board over the copper brace and out of its position.

  11. Sony DVP-SR200P Button Circuit Board Replacement: crwdns2935265:011crwdnd2935265:01crwdnd2935265:03crwdne2935265:0 Sony DVP-SR200P Button Circuit Board Replacement: crwdns2935265:011crwdnd2935265:02crwdnd2935265:03crwdne2935265:0 Sony DVP-SR200P Button Circuit Board Replacement: crwdns2935265:011crwdnd2935265:03crwdnd2935265:03crwdne2935265:0
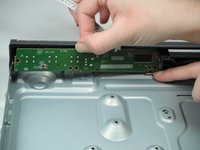
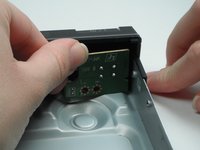
    • Push back the black, plastic clip near the left center of the shorter button circuit board.

    • Pull the shorter button circuit board out of its position.

  12. Sony DVP-SR200P Button Circuit Board Replacement: crwdns2935265:012crwdnd2935265:01crwdnd2935265:02crwdne2935265:0 Sony DVP-SR200P Button Circuit Board Replacement: crwdns2935265:012crwdnd2935265:02crwdnd2935265:02crwdne2935265:0
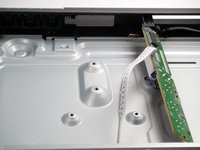
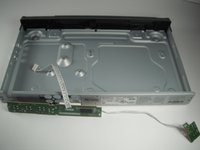
    • Wiggle the white cord connecting the two boards out from under the plastic pieces securing the cord.

    • Lift the button circuit board out of the DVD player.

crwdns2915888:0crwdne2915888:0

To reassemble your device, follow these instructions in reverse order.

crwdns2935229:02crwdne2935229:0

Jeffrey Powell

crwdns2935283:001/11/13crwdne2935283:0

157 crwdns2915208:0crwdne2915208:0

crwdns2935295:0crwdne2935295:0

crwdns2915084:0crwdne2915084:0

Cal Poly, Team 5-17, Forte Winter 2013 crwdns2935289:0Cal Poly, Team 5-17, Forte Winter 2013crwdne2935289:0

CPSU-FORTE-W13S5G17

crwdns2931471:05crwdne2931471:0

crwdns2935297:06crwdne2935297:0

crwdns2944067:00crwdne2944067:0

crwdns2917038:0crwdne2917038:0

crwdns2936625:0crwdne2936625:0:

crwdns2936751:024crwdne2936751:0 2

crwdns2936753:07crwdne2936753:0 3

crwdns2936753:030crwdne2936753:0 5

crwdns2942667:0crwdne2942667:0 2,317