crwdns2933423:0crwdne2933423:0

Sony Cyber-shot DSC-W800 Motherboard Replacement

crwdns2942213:0crwdne2942213:0

  1. Sony Cyber-shot DSC-W800 Motherboard Replacement, Button Board: crwdns2935265:01crwdnd2935265:01crwdnd2935265:03crwdne2935265:0 Sony Cyber-shot DSC-W800 Motherboard Replacement, Button Board: crwdns2935265:01crwdnd2935265:02crwdnd2935265:03crwdne2935265:0 Sony Cyber-shot DSC-W800 Motherboard Replacement, Button Board: crwdns2935265:01crwdnd2935265:03crwdnd2935265:03crwdne2935265:0
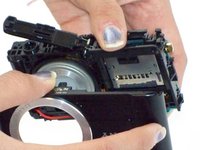
    • Remove the five 4.0 mm Phillips #000 screws on the back panel.

  2. Sony Cyber-shot DSC-W800 Motherboard Replacement: crwdns2935265:02crwdnd2935265:01crwdnd2935265:02crwdne2935265:0 Sony Cyber-shot DSC-W800 Motherboard Replacement: crwdns2935265:02crwdnd2935265:02crwdnd2935265:02crwdne2935265:0
    • Using the Spudger, remove the back panel from the device.

    • The loose piece circled in the picture will most likely fall off the camera housing.

  3. Sony Cyber-shot DSC-W800 Motherboard Replacement: crwdns2935265:03crwdnd2935265:01crwdnd2935265:03crwdne2935265:0 Sony Cyber-shot DSC-W800 Motherboard Replacement: crwdns2935265:03crwdnd2935265:02crwdnd2935265:03crwdne2935265:0 Sony Cyber-shot DSC-W800 Motherboard Replacement: crwdns2935265:03crwdnd2935265:03crwdnd2935265:03crwdne2935265:0
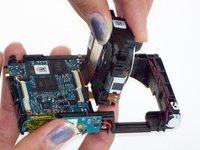
    • Remove the two 2.15mm Phillips #000 screws from the circuit board.

    • Gently pull on the ribbon wire from ZIF connector with the tweezers to remove the button board.

    • Ribbon wires can easily be damaged.

  4. Sony Cyber-shot DSC-W800 Motherboard Replacement, LCD Screen: crwdns2935265:04crwdnd2935265:01crwdnd2935265:01crwdne2935265:0
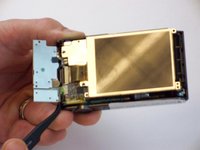
    • Remove the four 3.75 mm Phillips #000 screws from the LCD back panel.

  5. Sony Cyber-shot DSC-W800 Motherboard Replacement: crwdns2935265:05crwdnd2935265:01crwdnd2935265:01crwdne2935265:0
    • Lift the back panel and separate the LCD Screen by prying it up.

    • Remove the back panel.

  6. Sony Cyber-shot DSC-W800 Motherboard Replacement: crwdns2935265:06crwdnd2935265:01crwdnd2935265:02crwdne2935265:0 Sony Cyber-shot DSC-W800 Motherboard Replacement: crwdns2935265:06crwdnd2935265:02crwdnd2935265:02crwdne2935265:0
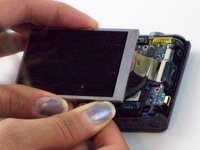
    • Gently pull on the ribbon wire disconnecting from the ZIF connector (connecting the LCD screen to the motherboard) with the tweezers.

    • Ribbon wires can be easily damaged.

  7. Sony Cyber-shot DSC-W800 Motherboard Replacement, Lens: crwdns2935265:07crwdnd2935265:01crwdnd2935265:02crwdne2935265:0 Sony Cyber-shot DSC-W800 Motherboard Replacement, Lens: crwdns2935265:07crwdnd2935265:02crwdnd2935265:02crwdne2935265:0
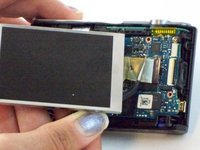
    • With plastic opening tool, gently pry loose the front panel.

    • Separate front panel from the camera housing.

  8. Sony Cyber-shot DSC-W800 Motherboard Replacement: crwdns2935265:08crwdnd2935265:01crwdnd2935265:03crwdne2935265:0 Sony Cyber-shot DSC-W800 Motherboard Replacement: crwdns2935265:08crwdnd2935265:02crwdnd2935265:03crwdne2935265:0 Sony Cyber-shot DSC-W800 Motherboard Replacement: crwdns2935265:08crwdnd2935265:03crwdnd2935265:03crwdne2935265:0
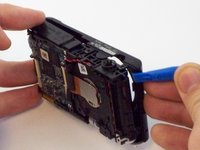
    • Remove the lens housing by pushing it, from the front, through the housing and lifting it out.

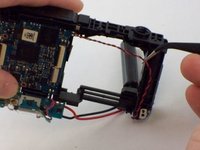
    • Gently pull on the large ribbon wire (connecting the Lens housing to the motherboard via ZIF connector) with the tweezers.

    • Gently pull on the small ribbon wire (connecting the Lens housing to the motherboard) with the tweezers.

    • Be careful not to damage either of the ribbon wires.

  9. Sony Cyber-shot DSC-W800 Motherboard Replacement, Motherboard: crwdns2935265:09crwdnd2935265:01crwdnd2935265:01crwdne2935265:0
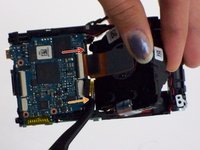
    • Remove the single 3.75 mm Phillips #000 screw from the base of the motherboard.

  10. Sony Cyber-shot DSC-W800 Motherboard Replacement: crwdns2935265:010crwdnd2935265:01crwdnd2935265:01crwdne2935265:0
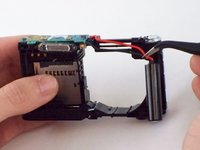
    • Remove the two 3.5 mm Phillips #000 screws from the secondary board that is attached to the flash bulb.

  11. Sony Cyber-shot DSC-W800 Motherboard Replacement: crwdns2935265:011crwdnd2935265:01crwdnd2935265:03crwdne2935265:0 Sony Cyber-shot DSC-W800 Motherboard Replacement: crwdns2935265:011crwdnd2935265:02crwdnd2935265:03crwdne2935265:0 Sony Cyber-shot DSC-W800 Motherboard Replacement: crwdns2935265:011crwdnd2935265:03crwdnd2935265:03crwdne2935265:0
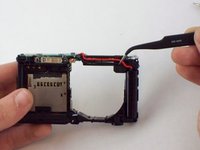
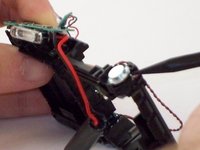
    • Use the tweezers. Move the thick red cable, attached to the secondary board, outside of its place in the camera housing.

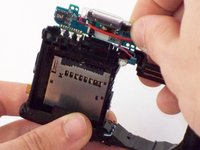
    • Gently pull on the red/black wire in order to free the photo lens cylinder from the housing.

    • Remove the secondary board from its position and move it upward, out of the way.

    • From this point on, do not damage the connection between the motherboard and the secondary board.

  12. Sony Cyber-shot DSC-W800 Motherboard Replacement: crwdns2935265:012crwdnd2935265:01crwdnd2935265:02crwdne2935265:0 Sony Cyber-shot DSC-W800 Motherboard Replacement: crwdns2935265:012crwdnd2935265:02crwdnd2935265:02crwdne2935265:0
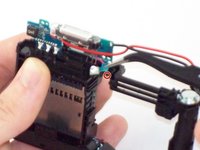
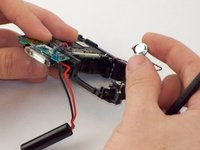
    • Using the tweezers, pull the indicator bulb out , freeing it from its position on the housing.

    • Thread the indicator bulb under and through the secondary boards position.

  13. Sony Cyber-shot DSC-W800 Motherboard Replacement: crwdns2935265:013crwdnd2935265:01crwdnd2935265:03crwdne2935265:0 Sony Cyber-shot DSC-W800 Motherboard Replacement: crwdns2935265:013crwdnd2935265:02crwdnd2935265:03crwdne2935265:0 Sony Cyber-shot DSC-W800 Motherboard Replacement: crwdns2935265:013crwdnd2935265:03crwdnd2935265:03crwdne2935265:0
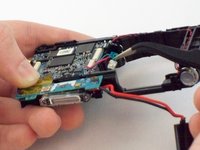
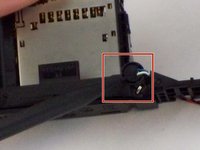
    • Using the tweezers, remove the black/red speaker wire from camera housing.

    • Pry loose and remove the speaker from the camera housing.

    • The speaker is attached with adhesive and must be removed with the spudger and moderate force.

  14. Sony Cyber-shot DSC-W800 Motherboard Replacement: crwdns2935265:014crwdnd2935265:01crwdnd2935265:02crwdne2935265:0 Sony Cyber-shot DSC-W800 Motherboard Replacement: crwdns2935265:014crwdnd2935265:02crwdnd2935265:02crwdne2935265:0
    • Using the spudger, remove the mini speaker from the housing.

  15. Sony Cyber-shot DSC-W800 Motherboard Replacement: crwdns2935265:015crwdnd2935265:01crwdnd2935265:03crwdne2935265:0 Sony Cyber-shot DSC-W800 Motherboard Replacement: crwdns2935265:015crwdnd2935265:02crwdnd2935265:03crwdne2935265:0 Sony Cyber-shot DSC-W800 Motherboard Replacement: crwdns2935265:015crwdnd2935265:03crwdnd2935265:03crwdne2935265:0
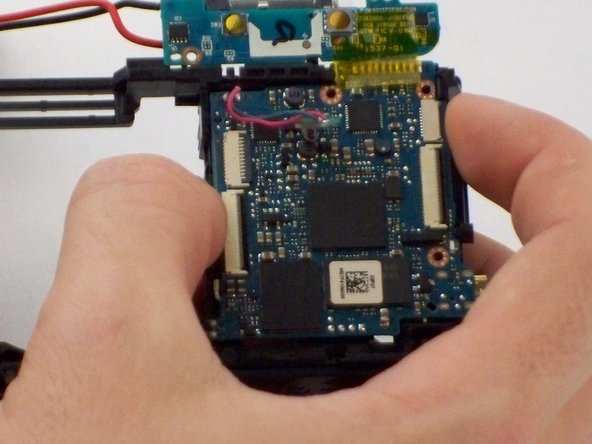
    • Pull up on the bottom-half of the motherboard, slightly removing it from its position in the housing.

    • With enough force, pull up on the top right of the motherboard, pulling it entirely from its position in the housing.

    • Once again, be sure to keep the motherboard and secondary board connection intact.

  16. Sony Cyber-shot DSC-W800 Motherboard Replacement: crwdns2935265:016crwdnd2935265:01crwdnd2935265:01crwdne2935265:0
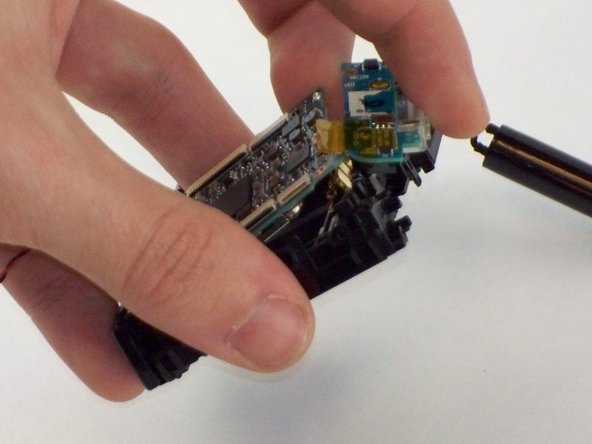
    • Once apart, completely separate motherboard from the housing.

crwdns2915888:0crwdne2915888:0

To reassemble your device, follow these instructions in reverse order.

crwdns2935229:02crwdne2935229:0

Thomas Campo

crwdns2935283:002/09/16crwdne2935283:0

788 crwdns2915208:0crwdne2915208:0

crwdns2935297:04crwdne2935297:0

crwdns2915084:0crwdne2915084:0

USF Tampa, Team 17-5, Blackwell Winter 2016 crwdns2935289:0USF Tampa, Team 17-5, Blackwell Winter 2016crwdne2935289:0

USFT-BLACKWELL-W16S17G5

crwdns2931471:05crwdne2931471:0

crwdns2935297:05crwdne2935297:0

crwdns2944067:00crwdne2944067:0

crwdns2917038:0crwdne2917038:0

crwdns2936625:0crwdne2936625:0:

crwdns2936751:024crwdne2936751:0 3

crwdns2936753:07crwdne2936753:0 9

crwdns2936753:030crwdne2936753:0 19

crwdns2942667:0crwdne2942667:0 1,227