crwdns2933423:0crwdne2933423:0

Sony Cyber-shot DSC-HX100V Viewfinder Replacement

crwdns2942213:0crwdne2942213:0

  1. Sony Cyber-shot DSC-HX100V Viewfinder Replacement, Viewfinder: crwdns2935265:01crwdnd2935265:01crwdnd2935265:01crwdne2935265:0
    • Make sure camera is turned off.

    • Press the ON/Off button to turn off the camera.

    • WARNING: Data may be lost if the camera remains on.

  2. Sony Cyber-shot DSC-HX100V Viewfinder Replacement: crwdns2935265:02crwdnd2935265:01crwdnd2935265:03crwdne2935265:0 Sony Cyber-shot DSC-HX100V Viewfinder Replacement: crwdns2935265:02crwdnd2935265:02crwdnd2935265:03crwdne2935265:0 Sony Cyber-shot DSC-HX100V Viewfinder Replacement: crwdns2935265:02crwdnd2935265:03crwdnd2935265:03crwdne2935265:0
    • Use the Phillips screwdriver size #00 to remove the 1.59mm #00 screws.

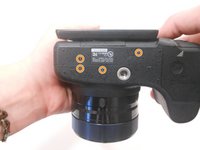
    • Remove 2 screws from the side of the camera.

    • Remove 4 screws on the bottom of the camera.

    • Remove 1 screw next to the eyepiece.

  3. Sony Cyber-shot DSC-HX100V Viewfinder Replacement: crwdns2935265:03crwdnd2935265:01crwdnd2935265:01crwdne2935265:0
    • Flip the screen back to reveal 2 hidden screws.

    • Remove the two 1.59mm #00 screws on the left with the Phillips #00 screwdriver.

  4. Sony Cyber-shot DSC-HX100V Viewfinder Replacement: crwdns2935265:04crwdnd2935265:01crwdnd2935265:01crwdne2935265:0
    • Pull the back panel of the camera upward.

    • Use a spudger to help pry open the back panel.

  5. Sony Cyber-shot DSC-HX100V Viewfinder Replacement: crwdns2935265:05crwdnd2935265:01crwdnd2935265:01crwdne2935265:0
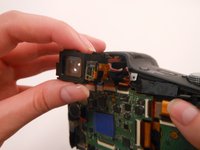
    • Open the back panel to view the inside of the camera.

    • If the orange ribbon cable disconnects from its designated port, do not panic. The cable is easy to reinsert.

  6. Sony Cyber-shot DSC-HX100V Viewfinder Replacement: crwdns2935265:06crwdnd2935265:01crwdnd2935265:03crwdne2935265:0 Sony Cyber-shot DSC-HX100V Viewfinder Replacement: crwdns2935265:06crwdnd2935265:02crwdnd2935265:03crwdne2935265:0 Sony Cyber-shot DSC-HX100V Viewfinder Replacement: crwdns2935265:06crwdnd2935265:03crwdnd2935265:03crwdne2935265:0
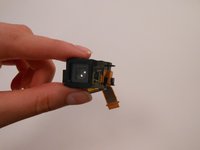
    • Carefully pull out the the eyepiece.

    • Detach the orange ribbon cable that connects it to the green panel by carefully pulling outwards.

crwdns2915888:0crwdne2915888:0

To reassemble your device, follow these instructions in reverse order.

crwdns2935227:0crwdne2935227:0

DaQuawn

crwdns2935283:003/05/15crwdne2935283:0

254 crwdns2915208:0crwdne2915208:0

crwdns2935297:02crwdne2935297:0

crwdns2915084:0crwdne2915084:0

Sam Houston State, Team 11-3, Blackburne Winter 2015 crwdns2935289:0Sam Houston State, Team 11-3, Blackburne Winter 2015crwdne2935289:0

SHSU-BLACKBURNE-W15S11G3

crwdns2931471:03crwdne2931471:0

crwdns2935297:08crwdne2935297:0

crwdns2917034:0crwdne2917034:0

Thank you very much for the importent articles made for us. If I can please put , how to replace the flasher as well.

Satsara Gunaratne - crwdns2934203:0crwdne2934203:0

crwdns2917038:0crwdne2917038:0

crwdns2936625:0crwdne2936625:0:

crwdns2936751:024crwdne2936751:0 2

crwdns2936753:07crwdne2936753:0 2

crwdns2936753:030crwdne2936753:0 9

crwdns2942667:0crwdne2942667:0 915