crwdns2915892:0crwdne2915892:0
To take out and replace the lens assembly, you must first completely remove the central motherboard and all other internal components.
crwdns2942213:0crwdne2942213:0
-
-
Place the camera with the bottom facing you and the lens facing up.
-
-
-
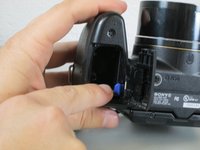
Push down and away from the camera to the left on the indicated indentation in the battery cover. The compartment should slide open as shown.
-
-
-
Push the blue tab towards the camera body to the right, while simultaneously pulling out the battery.
I want to know which typa of battery used in DSC -H1 don't cyber shot
Which type of battery used in DSC H1
Batterie pour DSC-H1 référence: NP-FH50
Where can we get it's battery
-
-
-
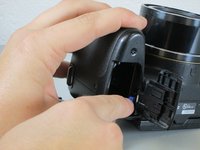
Close the battery cover by pushing the cover inwards and sliding it to the left to allow more maneuverability when disassembling other parts of the camera.
-
-
-
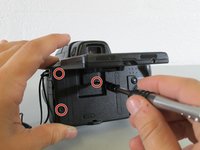
Unscrew the four #00 4.0 mm Phillips screws on the bottom of the camera.
-
-
-
-
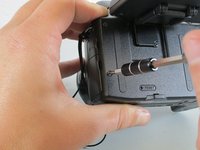
Remove the two #00 4.0 mm Phillips screws shown on the side of the camera.
-
-
-
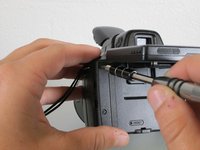
Unscrew the #00 4.0 mm Phillips screw on the top next to the view finder.
-
-
-
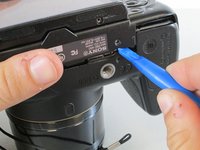
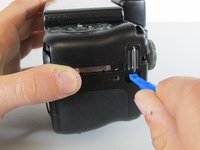
Pull open the plastic port covers on the side of the camera.
-
Remove the revealed #00 4.0 mm Phillips screw.
-
-
-
Lift the back LCD screen to reveal the back of the camera unit.
-
Unscrew the three #00 4.0 mm Phillips screws at the edge and center of the back camera unit.
-
-
-
Using the plastic opening tool, pry apart the bottom of the camera at the line between the four removed screws.
-
Place the camera on its lens and use the plastic opening tool to pry at the crack in the case on all four sides of the camera.
-
Apply moderate force to the backside of the camera enclosure until the two pieces separate.
-
-
-
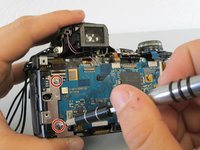
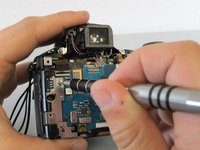
Remove the #00 4.0 mm Phillips screw and the #00 6.0 mm Phillips screw holding the motherboard to the front enclosure.
-
Disconnect the eight ribbon cables from their ports on the motherboard.
Hi,
It would be nice if the locations of the 4.0 mm & 6.0 mm screws were defined.
Also, additional step, or steps are needed to show locations of eight ribbon cable ports and how best to go about disconnecting the cables without damaging the port connectors.
There's one more screw to remove under the ribbon cable top left.
-
-
-
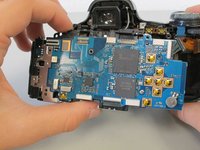
Detach the metal bracket from the enclosure by removing the two #00 4.0 mm Phillips screws.
-
-
-
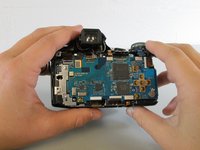
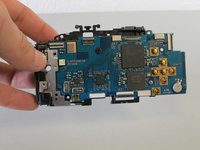
Completely remove the motherboard by gently pulling the board away from the camera.
-
-
-
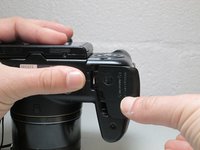
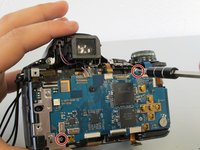
Unscrew the #00 6.0 mm Phillips screw on the left side of the lens.
There's two more screws to remove on the top right and bottom right corners.
-
-
-
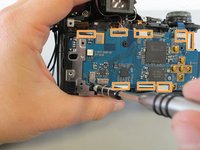
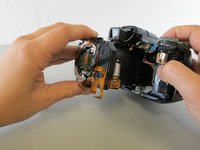
Gently slide the lens assembly out of the front camera housing and remove completely.
-


To reassemble your device, follow these instructions in reverse order.
To reassemble your device, follow these instructions in reverse order.
crwdns2935221:0crwdne2935221:0
crwdns2935229:05crwdne2935229:0
crwdns2915084:0crwdne2915084:0

Cal Poly, Team 17-3, Forte Spring 2015 crwdns2935289:0Cal Poly, Team 17-3, Forte Spring 2015crwdne2935289:0
CPSU-FORTE-S15S17G3
crwdns2931471:04crwdne2931471:0
crwdns2935297:010crwdne2935297:0
crwdns2947412:02crwdne2947412:0
Hi!
Very good tutorial, thanks a lot.
I have a question : after reassembling the device, do you need to do some kind of adjustment or is it "simply plug-and-play"?
Best regards,
Marin
Muy bueno el tutorial felicitaciones, sin embargo faltaron tornillos por nombrar, saludos