crwdns2933423:0crwdne2933423:0

Sony Clie PEG-UX50 Tilt Screen Replacement

crwdns2942213:0crwdne2942213:0

  1. Sony Clie PEG-UX50 Tilt Screen Replacement, Tilt Screen: crwdns2935265:01crwdnd2935265:01crwdnd2935265:03crwdne2935265:0 Sony Clie PEG-UX50 Tilt Screen Replacement, Tilt Screen: crwdns2935265:01crwdnd2935265:02crwdnd2935265:03crwdne2935265:0 Sony Clie PEG-UX50 Tilt Screen Replacement, Tilt Screen: crwdns2935265:01crwdnd2935265:03crwdnd2935265:03crwdne2935265:0
    • Take off the screws located on the two sides of the tilt screen.

    • Unscrew the screw located at the tilt base of the screen.

  2. Sony Clie PEG-UX50 Tilt Screen Replacement: crwdns2935265:02crwdnd2935265:01crwdnd2935265:03crwdne2935265:0 Sony Clie PEG-UX50 Tilt Screen Replacement: crwdns2935265:02crwdnd2935265:02crwdnd2935265:03crwdne2935265:0 Sony Clie PEG-UX50 Tilt Screen Replacement: crwdns2935265:02crwdnd2935265:03crwdnd2935265:03crwdne2935265:0
    • Gently remove the back plate of the tilt screen by sliding it upward.

    • With caution, lift the wires from the track in the back plate.

  3. Sony Clie PEG-UX50 Tilt Screen Replacement: crwdns2935265:03crwdnd2935265:01crwdnd2935265:02crwdne2935265:0 Sony Clie PEG-UX50 Tilt Screen Replacement: crwdns2935265:03crwdnd2935265:02crwdnd2935265:02crwdne2935265:0
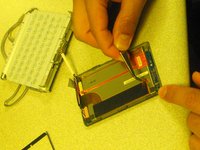
    • Disconnect the thin USB cable attached to the Integrated Circuit.

  4. Sony Clie PEG-UX50 Tilt Screen Replacement: crwdns2935265:04crwdnd2935265:01crwdnd2935265:02crwdne2935265:0 Sony Clie PEG-UX50 Tilt Screen Replacement: crwdns2935265:04crwdnd2935265:02crwdnd2935265:02crwdne2935265:0
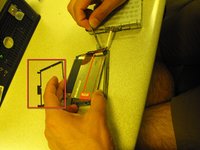
    • Detach the plastic black frame from in between the plate and the LCD.

    • Do not disconnect the display from the board yet.

  5. Sony Clie PEG-UX50 Tilt Screen Replacement: crwdns2935265:05crwdnd2935265:01crwdnd2935265:01crwdne2935265:0
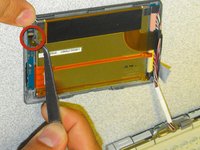
    • Disconnect the thin connector from the face plate using tweezers.

  6. Sony Clie PEG-UX50 Tilt Screen Replacement: crwdns2935265:06crwdnd2935265:01crwdnd2935265:01crwdne2935265:0
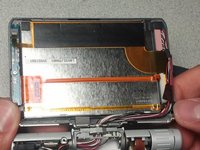
    • Quickly release and disconnect the thick cable with your hands.

crwdns2915888:0crwdne2915888:0

Follow these instructions in reverse order to reassemble your device.

Rishad R Rai

crwdns2935283:004/28/11crwdne2935283:0

1 crwdns2915208:0crwdne2915208:0

crwdns2935295:0crwdne2935295:0

crwdns2915084:0crwdne2915084:0

CSU Los Angeles, Team 1-4, Nelson Spring 2011 crwdns2935289:0CSU Los Angeles, Team 1-4, Nelson Spring 2011crwdne2935289:0

CSULA-NELSON-S11S1G4

crwdns2931471:05crwdne2931471:0

crwdns2935297:02crwdne2935297:0

crwdns2944067:00crwdne2944067:0

crwdns2917038:0crwdne2917038:0

crwdns2936625:0crwdne2936625:0:

crwdns2936751:024crwdne2936751:0 1

crwdns2936753:07crwdne2936753:0 2

crwdns2936753:030crwdne2936753:0 15

crwdns2942667:0crwdne2942667:0 2,722