crwdns2933423:0crwdne2933423:0

Sony Cassette Deck TC KE200 Repair

  1. Sony Cassette Deck TC KE200 Repair, Motor Belt: crwdns2935265:01crwdnd2935265:01crwdnd2935265:03crwdne2935265:0 Sony Cassette Deck TC KE200 Repair, Motor Belt: crwdns2935265:01crwdnd2935265:02crwdnd2935265:03crwdne2935265:0 Sony Cassette Deck TC KE200 Repair, Motor Belt: crwdns2935265:01crwdnd2935265:03crwdnd2935265:03crwdne2935265:0
    • Remove the screws from the bottom.

    • Remove the screws from the side.

    • Carefully remove the cassette deck from the metal base.

  2. Sony Cassette Deck TC KE200 Repair: crwdns2935265:02crwdnd2935265:01crwdnd2935265:02crwdne2935265:0 Sony Cassette Deck TC KE200 Repair: crwdns2935265:02crwdnd2935265:02crwdnd2935265:02crwdne2935265:0
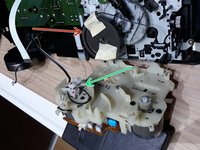
    • Remove the black cable on the left side.

    • Remove the white flat ribbon cables.

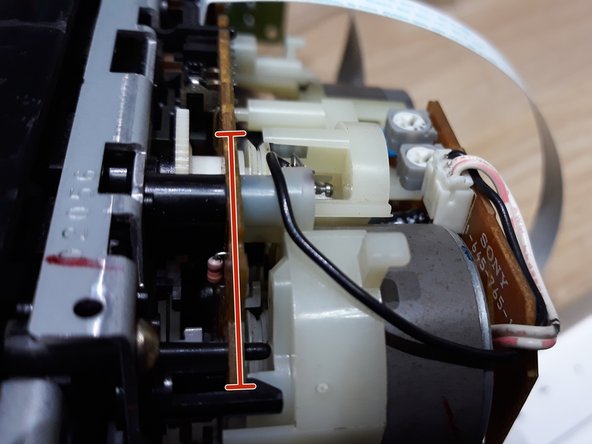
    • Remove the small screw in order to change the ruble inside the cassette player mechanisms.

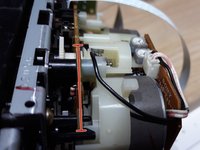
    • Remove the gray power cables.

  3. Sony Cassette Deck TC KE200 Repair: crwdns2935265:03crwdnd2935265:01crwdnd2935265:02crwdne2935265:0 Sony Cassette Deck TC KE200 Repair: crwdns2935265:03crwdnd2935265:02crwdnd2935265:02crwdne2935265:0
    • Remove the small screw.

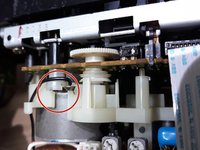
    • Now you should be able to see the wheel location. Change the rubber.

  4. Sony Cassette Deck TC KE200 Repair: crwdns2935265:04crwdnd2935265:01crwdnd2935265:02crwdne2935265:0 Sony Cassette Deck TC KE200 Repair: crwdns2935265:04crwdnd2935265:02crwdnd2935265:02crwdne2935265:0
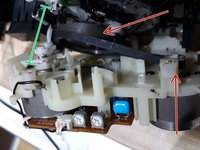
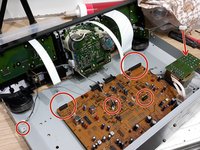
    • Replace the big belt.

    • Replace the small (green) belt.

    • Use a little tape to hold the belt. When closing, remove the tape.

  5. Sony Cassette Deck TC KE200 Repair: crwdns2935265:05crwdnd2935265:01crwdnd2935265:02crwdne2935265:0 Sony Cassette Deck TC KE200 Repair: crwdns2935265:05crwdnd2935265:02crwdnd2935265:02crwdne2935265:0
    • Insert the small screw and close the cassette player with new straps.

    • Connect all cables and flat, white ribbon cables.

    • Close everything up and you're done with the repair!

    • Hope this repair helped you, please leave a comment!

crwdns2915888:0crwdne2915888:0

To reassemble your device, follow these instructions in reverse order.

crwdns2935229:02crwdne2935229:0

crwdns2934873:0crwdne2934873:0

pt en

100%

crwdns2934885:0crwdne2934885:0 crwdns2934875:0crwdne2934875:0
crwdns2934877:0crwdne2934877:0 ›

Cafony

crwdns2935283:002/17/15crwdne2935283:0

687 crwdns2915208:0crwdne2915208:0

crwdns2935297:04crwdne2935297:0

crwdns2944067:00crwdne2944067:0

crwdns2917038:0crwdne2917038:0

crwdns2936625:0crwdne2936625:0:

crwdns2936751:024crwdne2936751:0 1

crwdns2936753:07crwdne2936753:0 6

crwdns2936753:030crwdne2936753:0 20

crwdns2942667:0crwdne2942667:0 1,530