crwdns2915892:0crwdne2915892:0
If the screen on the Sonos Play 1 is dented, cracked or damaged, it may interfere with audio performance and may cause damage to the speakers. In order to prevent damage to the speakers and increase the devices performance, the exterior screen protecting the internal housing of the speakers will need to be replaced. This guide will demonstrate this process of removing the screen.
crwdns2942213:0crwdne2942213:0
-
crwdns2935267:0crwdne2935267:0Tweezers$4.99
-
Remove the rubber footing from the bottom of the device. Pry it up from one end using one of the plastic opening tools.
-
Once you pry open one end, use precision tweezers to remove rubber footing.
-
-
-
Using a metal spudger, pry open a corner of the adhesive tape.
-
Use precision tweezers to remove the adhesive tape.
-
-
-
-
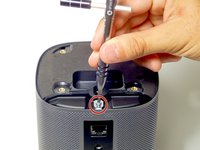
Remove the four 10 mm Torx security #10 screws that hold the base together.
-
Remove the base by lifting it vertically away from the bulk of the device.
The metal lip doesn’t hold down the metal screen. It’s just a connection/conductor between the inside of the metal screen and the shell against which the motherboard is screwed.
-
-
-
Remove the 10 mm Torx security #10 screw that holds down the exterior screen.
-
Using precision tweezers, remove the metal bracket.
-
-
-
Remove the exterior screen by lifting it away from the bulk of the device.
-


To reassemble your device, follow these instructions in reverse order.
To reassemble your device, follow these instructions in reverse order.
crwdns2935221:0crwdne2935221:0
crwdns2935229:015crwdne2935229:0
crwdns2915084:0crwdne2915084:0

USF Tampa, Team 8-4, Eyestone Fall 2015 crwdns2935289:0USF Tampa, Team 8-4, Eyestone Fall 2015crwdne2935289:0
USFT-EYESTONE-F15S8G4
crwdns2931471:04crwdne2931471:0
crwdns2935297:016crwdne2935297:0
crwdns2947412:07crwdne2947412:0
Where can you purchase a replacement screen please? I dented mine by accident.
I have the same question, where can i buy a replacement screen?
I have the same question,. Where can I buy a replacement screen?
worked great, with dents both peened out no metal stretch, can’t tell was ever damaged A+ info thanks. George
Great tip, used your advise and repainted due to missing paint on dents and it looks new!
R RYAN -
where to buy the replacement screen?
Thanks for this guide, had a small but noticeable dent for years, decided it was time to take it out, really strightforward but this guide helps to stop unintended damage working out which bits are removeable!