crwdns2933423:0crwdne2933423:0

Sonos Connect Bottom Motherboard Replacement

crwdns2942213:0crwdne2942213:0

  1. Sonos Connect Bottom Motherboard Replacement, WIFI Card: crwdns2935265:01crwdnd2935265:01crwdnd2935265:03crwdne2935265:0 Sonos Connect Bottom Motherboard Replacement, WIFI Card: crwdns2935265:01crwdnd2935265:02crwdnd2935265:03crwdne2935265:0 Sonos Connect Bottom Motherboard Replacement, WIFI Card: crwdns2935265:01crwdnd2935265:03crwdnd2935265:03crwdne2935265:0
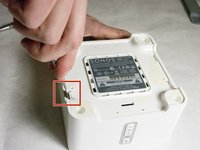
    • Start by using a spudger or plastic opening tool to remove the bottom cover.

    • When working with electronics, it's important to choose a tool that's ESD-safe to avoid accidental damage to the device. The regular black nylon spudger or a plastic opening tool should be used whenever possible.

    • Once enough of the glue is removed, peel the cover off by hand,

  2. Sonos Connect Bottom Motherboard Replacement: crwdns2935265:02crwdnd2935265:01crwdnd2935265:03crwdne2935265:0 Sonos Connect Bottom Motherboard Replacement: crwdns2935265:02crwdnd2935265:02crwdnd2935265:03crwdne2935265:0 Sonos Connect Bottom Motherboard Replacement: crwdns2935265:02crwdnd2935265:03crwdnd2935265:03crwdne2935265:0
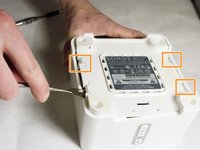
    • Remove the four 7.5mm length Philips head screws under the rubber cover.

  3. Sonos Connect Bottom Motherboard Replacement: crwdns2935265:03crwdnd2935265:01crwdnd2935265:03crwdne2935265:0 Sonos Connect Bottom Motherboard Replacement: crwdns2935265:03crwdnd2935265:02crwdnd2935265:03crwdne2935265:0 Sonos Connect Bottom Motherboard Replacement: crwdns2935265:03crwdnd2935265:03crwdnd2935265:03crwdne2935265:0
    • Use a nylon spudger to unsnap the bottom from the sides.

    • Pry until the remaining three points are unsnapped.

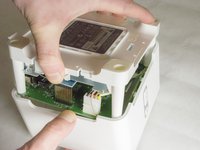
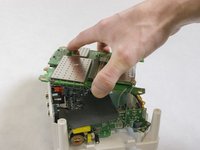
    • Once unsnapped, lift the cover.

  4. Sonos Connect Bottom Motherboard Replacement: crwdns2935265:04crwdnd2935265:01crwdnd2935265:02crwdne2935265:0 Sonos Connect Bottom Motherboard Replacement: crwdns2935265:04crwdnd2935265:02crwdnd2935265:02crwdne2935265:0
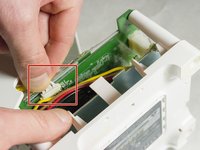
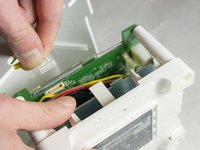
    • Remove the connection for the front buttons to fully remove the cover.

  5. Sonos Connect Bottom Motherboard Replacement: crwdns2935265:05crwdnd2935265:01crwdnd2935265:02crwdne2935265:0 Sonos Connect Bottom Motherboard Replacement: crwdns2935265:05crwdnd2935265:02crwdnd2935265:02crwdne2935265:0
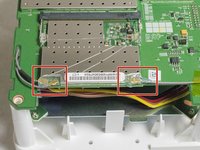
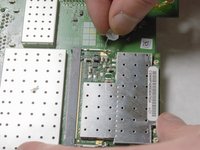
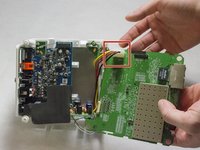
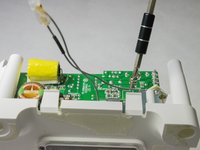
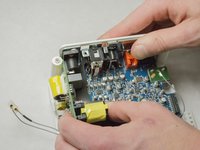
    • Use a plastic opening tool or spudger to remove the adhesive covering the the WIFI connectors.

    • Gently pull the wires at the connection point to disconnect them from the motherboard.

  6. Sonos Connect Bottom Motherboard Replacement: crwdns2935265:06crwdnd2935265:01crwdnd2935265:02crwdne2935265:0 Sonos Connect Bottom Motherboard Replacement: crwdns2935265:06crwdnd2935265:02crwdnd2935265:02crwdne2935265:0
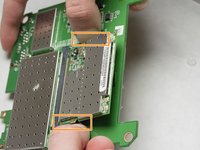
    • Remove the two pieces of glue holding the WIFI card in place.

  7. Sonos Connect Bottom Motherboard Replacement: crwdns2935265:07crwdnd2935265:01crwdnd2935265:03crwdne2935265:0 Sonos Connect Bottom Motherboard Replacement: crwdns2935265:07crwdnd2935265:02crwdnd2935265:03crwdne2935265:0 Sonos Connect Bottom Motherboard Replacement: crwdns2935265:07crwdnd2935265:03crwdnd2935265:03crwdne2935265:0
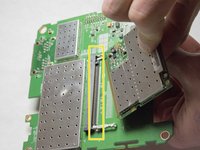
    • Scrape the glued pad underneath the WIFI card to seperate the card from the board.

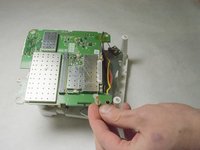
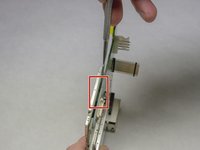
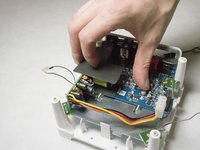
    • Push apart the two clips holding the WIFI card in the connection.

    • Pull the WIFI card out of the connection.

    • When putting the new WIFI card in, put the card in the connector first, then push downward until it clicks.

  8. Sonos Connect Bottom Motherboard Replacement, Top Motherboard: crwdns2935265:08crwdnd2935265:01crwdnd2935265:01crwdne2935265:0
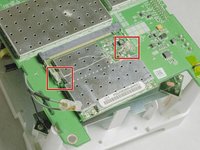
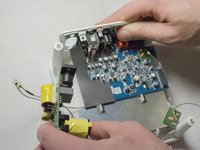
    • Remove the 7mm length Phillips screw holding the board in place.

  9. Sonos Connect Bottom Motherboard Replacement: crwdns2935265:09crwdnd2935265:01crwdnd2935265:02crwdne2935265:0 Sonos Connect Bottom Motherboard Replacement: crwdns2935265:09crwdnd2935265:02crwdnd2935265:02crwdne2935265:0
    • Flip the board over to access the Molex Cable.

  10. Sonos Connect Bottom Motherboard Replacement: crwdns2935265:010crwdnd2935265:01crwdnd2935265:01crwdne2935265:0
    • Disconnect the Molex Cable from the top motherboard.

  11. Sonos Connect Bottom Motherboard Replacement, Internal Power Supply: crwdns2935265:011crwdnd2935265:01crwdnd2935265:02crwdne2935265:0 Sonos Connect Bottom Motherboard Replacement, Internal Power Supply: crwdns2935265:011crwdnd2935265:02crwdnd2935265:02crwdne2935265:0
    • Remove foam protective insulator from the bottom board.

  12. Sonos Connect Bottom Motherboard Replacement: crwdns2935265:012crwdnd2935265:01crwdnd2935265:02crwdne2935265:0 Sonos Connect Bottom Motherboard Replacement: crwdns2935265:012crwdnd2935265:02crwdnd2935265:02crwdne2935265:0
    • Picture shows the side of the device.

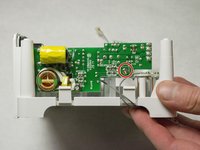
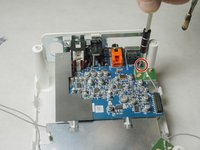
    • Remove the 7mm length Phillips screw from the power supply motherboard.

  13. Sonos Connect Bottom Motherboard Replacement: crwdns2935265:013crwdnd2935265:01crwdnd2935265:03crwdne2935265:0 Sonos Connect Bottom Motherboard Replacement: crwdns2935265:013crwdnd2935265:02crwdnd2935265:03crwdne2935265:0 Sonos Connect Bottom Motherboard Replacement: crwdns2935265:013crwdnd2935265:03crwdnd2935265:03crwdne2935265:0
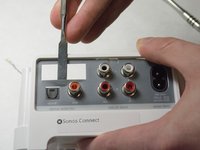
    • Remove the adhesive backed rear label by using a spudger.

    • Remove the two 8mm length screws as shown.

  14. Sonos Connect Bottom Motherboard Replacement: crwdns2935265:014crwdnd2935265:01crwdnd2935265:02crwdne2935265:0 Sonos Connect Bottom Motherboard Replacement: crwdns2935265:014crwdnd2935265:02crwdnd2935265:02crwdne2935265:0
    • Pull the power supply out of the back of the device.

  15. Sonos Connect Bottom Motherboard Replacement, Bottom Motherboard: crwdns2935265:015crwdnd2935265:01crwdnd2935265:02crwdne2935265:0 Sonos Connect Bottom Motherboard Replacement, Bottom Motherboard: crwdns2935265:015crwdnd2935265:02crwdnd2935265:02crwdne2935265:0
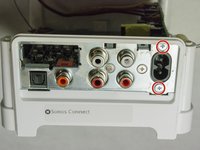
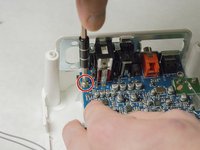
    • Remove the two 7.5mm length screws on the top of the board.

  16. Sonos Connect Bottom Motherboard Replacement: crwdns2935265:016crwdnd2935265:01crwdnd2935265:01crwdne2935265:0
    • Remove the other two 8mm length screws on the back of the device. You might have already removed the screws for the power supply, and that's OK!

  17. Sonos Connect Bottom Motherboard Replacement: crwdns2935265:017crwdnd2935265:01crwdnd2935265:01crwdne2935265:0
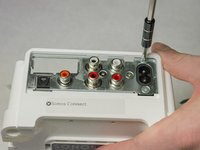
    • Slide the board out from the plastic casing.

    • You must pull the board out from back to front, because of the plugs on the back of the board.

crwdns2915888:0crwdne2915888:0

To reassemble your device, follow these instructions in reverse order.

crwdns2935229:08crwdne2935229:0

Clark Snyder

crwdns2935283:001/21/16crwdne2935283:0

483 crwdns2915208:0crwdne2915208:0

crwdns2935297:04crwdne2935297:0

crwdns2915084:0crwdne2915084:0

IUPUI, Team 3-2, Baechle Spring 2016 crwdns2935289:0IUPUI, Team 3-2, Baechle Spring 2016crwdne2935289:0

IUPUI-BAECHLE-S16S3G2

crwdns2931471:04crwdne2931471:0

crwdns2935297:04crwdne2935297:0

crwdns2917034:0crwdne2917034:0

I have bad audio on one channel, who supplies parts for this equipment?

Luis Nunes - crwdns2934203:0crwdne2934203:0

crwdns2917038:0crwdne2917038:0

crwdns2936625:0crwdne2936625:0:

crwdns2936751:024crwdne2936751:0 0

crwdns2936753:07crwdne2936753:0 11

crwdns2936753:030crwdne2936753:0 45

crwdns2942667:0crwdne2942667:0 6,119