crwdns2915892:0crwdne2915892:0
If the Ion is not shooting properly, the bolt's o-rings may need to be lubricated, or the bolt may be damaged from wear and tear. While working on the Ion, the user should be aware of the pressure due to air inside the gun. Pressurized air can be forceful, causing particles to be ejected from the gun into your eyes and/or skin. When air bubbles enter the bloodstream, they can block blood vessels and cause embolisms. To avoid this, make sure to point the gun in a safe direction when de-gasing the Ion.
crwdns2942213:0crwdne2942213:0
-
-
Remove the air tank by rotating it counterclockwise.
 crwdns2952109:0crwdne2952109:0
-
-
-
Remove the hopper by pulling it out of the feed tube, located on the top of the body. The hopper should easily come off when pulled straight up.
-
-
-
Turn the gun on by pressing the power button until the red light blinks.
-
Turn vision mode off by pressing the power button again.
-
-
-
Pull the trigger to release the air in the gun.
-
-
-
Remove the four 8mm screws on each side of the gun's grip using a Phillips #2 screwdriver.
-
-
-
Remove the grip by sliding it towards the front of the gun.
-
-
-
-
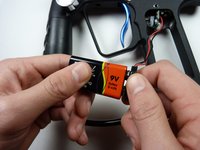
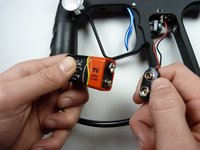
Remove the 9V battery by unsnapping it.
-
-
-
Remove the front and rear 1" screws on the gun's grip frame using a 3/32" Allen Wrench.
-
-
-
Remove the 12 mm screw on the top of the grip frame using a 3/32" Allen wrench.
-
-
-
Separate the gun's body from the frame by gently pulling them in opposite directions.
-
-
-
Remove the 1-1/4" screw that's attached to the blue tube above the front grip using a 3/32" Allen Wrench.
-
-
crwdns2935267:0crwdne2935267:0Tweezers$4.99
-
Gently use tweezers to detach the white vision wire harness, located directly under the feed tube.
-
-
-
Remove the two 1-1/4" screws on either side of the circuit board using a 3/32" allen wrench.
-
-
-
Separate the solenoid from the gun's body by gently pulling it upwards.
-
-
-
Slide the metal body out of the plastic shell by holding one in each hand and gently pulling apart.
-
-
-
Separate the front body breach from the fire chamber by rotating the breach counterclockwise.
-
-
-
Remove the bolt from the front body breach by gently pulling on the bolt.
-


To reassemble your device, follow these instructions in reverse order.
crwdns2935221:0crwdne2935221:0
crwdns2935229:03crwdne2935229:0
crwdns2935287:0crwdne2935287:0

Cal Poly, Team 8-42, Amido Winter 2015 crwdns2935289:0Cal Poly, Team 8-42, Amido Winter 2015crwdne2935289:0
CPSU-AMIDO-W15S8G42
crwdns2931471:04crwdne2931471:0
crwdns2935297:010crwdne2935297:0