crwdns2933423:0crwdne2933423:0
crwdns2947577:0crwdnd2947577:0crwdne2947577:0

Sirius XM Onyx Plus Screen Replacement

crwdns2942213:0crwdne2942213:0

  1. Sirius XM Onyx Plus Screen Replacement, Case: crwdns2935265:01crwdnd2935265:01crwdnd2935265:01crwdne2935265:0
    • Wedge a plastic opening tool in between the case.

    crwdns2952109:0crwdne2952109:0

    crwdns2917038:0crwdne2917038:0

  2. Sirius XM Onyx Plus Screen Replacement: crwdns2935265:02crwdnd2935265:01crwdnd2935265:03crwdne2935265:0 Sirius XM Onyx Plus Screen Replacement: crwdns2935265:02crwdnd2935265:02crwdnd2935265:03crwdne2935265:0 Sirius XM Onyx Plus Screen Replacement: crwdns2935265:02crwdnd2935265:03crwdnd2935265:03crwdne2935265:0
    • Starting with the bottom left corner, press down on the plastic opening tool to unhook the latches on the inside of the device.

    • You have to start with the bottom left and right corners, and then flip the device to over and do the top of the device.

    crwdns2952109:0crwdne2952109:0

    crwdns2917038:0crwdne2917038:0

  3. Sirius XM Onyx Plus Screen Replacement: crwdns2935265:03crwdnd2935265:01crwdnd2935265:01crwdne2935265:0
    • Once unclipped, separate the back casing from the device.

    crwdns2952109:0crwdne2952109:0

    crwdns2917038:0crwdne2917038:0

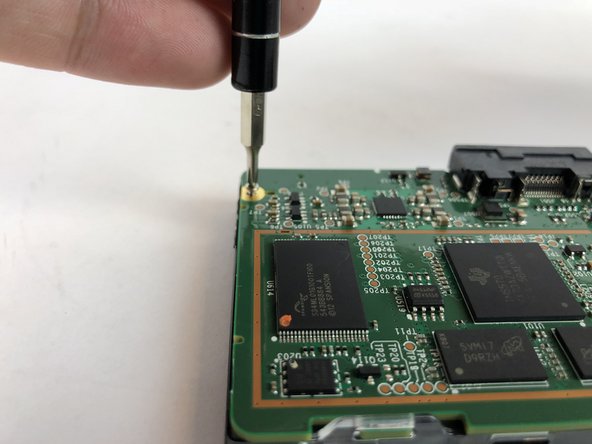
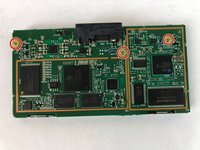
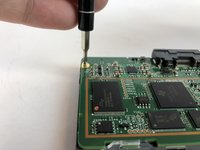
  4. Sirius XM Onyx Plus Screen Replacement, Motherboard: crwdns2935265:04crwdnd2935265:01crwdnd2935265:02crwdne2935265:0 Sirius XM Onyx Plus Screen Replacement, Motherboard: crwdns2935265:04crwdnd2935265:02crwdnd2935265:02crwdne2935265:0
    • Remove the three 5.4mm JIS #00 screws from the motherboard.

    crwdns2952109:0crwdne2952109:0

    crwdns2917038:0crwdne2917038:0

  5. Sirius XM Onyx Plus Screen Replacement: crwdns2935265:05crwdnd2935265:01crwdnd2935265:01crwdne2935265:0
    • Unlatch the two clips located at the top of the device that hold the motherboard in place.

    crwdns2952109:0crwdne2952109:0

    crwdns2917038:0crwdne2917038:0

  6. Sirius XM Onyx Plus Screen Replacement: crwdns2935265:06crwdnd2935265:01crwdnd2935265:01crwdne2935265:0
    • Lift the motherboard up from the bottom.

    crwdns2952109:0crwdne2952109:0

    crwdns2917038:0crwdne2917038:0

  7. Sirius XM Onyx Plus Screen Replacement: crwdns2935265:07crwdnd2935265:01crwdnd2935265:01crwdne2935265:0
    • Lift the screen up, so you can see where it is attached to the motherboard.

    crwdns2952109:0crwdne2952109:0

    crwdns2917038:0crwdne2917038:0

  8. Sirius XM Onyx Plus Screen Replacement: crwdns2935265:08crwdnd2935265:01crwdnd2935265:01crwdne2935265:0
    • Use a spudger to flip up the retaining flap on the display ribbon cable ZIF socket.

    crwdns2952109:0crwdne2952109:0

    crwdns2917038:0crwdne2917038:0

  9. Sirius XM Onyx Plus Screen Replacement: crwdns2935265:09crwdnd2935265:01crwdnd2935265:01crwdne2935265:0
    • Carefully pull the ribbon out from the ZIF connector.

    crwdns2952109:0crwdne2952109:0

    crwdns2917038:0crwdne2917038:0

  10. Sirius XM Onyx Plus Screen Replacement, Screen: crwdns2935265:010crwdnd2935265:01crwdnd2935265:01crwdne2935265:0
    • Take the black casing off the screen.

    crwdns2952109:0crwdne2952109:0

    crwdns2917038:0crwdne2917038:0

crwdns2915888:0crwdne2915888:0

To reassemble your device, follow these instructions in reverse order.

crwdns2935221:0crwdne2935221:0

crwdns2935227:0crwdne2935227:0

Angel Rivera

crwdns2935283:001/25/18crwdne2935283:0

532 crwdns2915208:0crwdne2915208:0

crwdns2935297:05crwdne2935297:0

crwdns2935287:0crwdne2935287:0

USF Tampa, Team S7-G2, Passmore Spring 2018 crwdns2935289:0USF Tampa, Team S7-G2, Passmore Spring 2018crwdne2935289:0

USFT-PASSMORE-S18S7G2

crwdns2931471:04crwdne2931471:0

crwdns2935297:05crwdne2935297:0

crwdns2947412:00crwdne2947412:0

crwdns2917038:0crwdne2917038:0

crwdns2936625:0crwdne2936625:0:

crwdns2936751:024crwdne2936751:0 2

crwdns2936753:07crwdne2936753:0 6

crwdns2936753:030crwdne2936753:0 20

crwdns2942667:0crwdne2942667:0 849