crwdns2933423:0crwdne2933423:0

Single-Speed Bicycle Chain Replacement

crwdns2942213:0crwdne2942213:0

  1. Single-Speed Bicycle Chain Replacement, Chain: crwdns2935265:01crwdnd2935265:01crwdnd2935265:02crwdne2935265:0 Single-Speed Bicycle Chain Replacement, Chain: crwdns2935265:01crwdnd2935265:02crwdnd2935265:02crwdne2935265:0
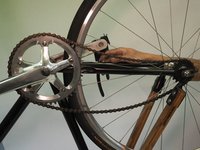
    • Flip the bike upside down for easy access to the rear wheel and chain.

  2. Single-Speed Bicycle Chain Replacement: crwdns2935265:02crwdnd2935265:01crwdnd2935265:02crwdne2935265:0 Single-Speed Bicycle Chain Replacement: crwdns2935265:02crwdnd2935265:02crwdnd2935265:02crwdne2935265:0
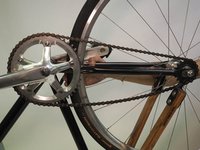
    • Use either an Allen or crescent wrench to loosen the nuts of the rear wheel of the bike. Make sure to do this on both sides of the wheel.

    • This step will require a 5mm Allen wrench or a crescent wrench, depending on the type of wheels you have.

  3. Single-Speed Bicycle Chain Replacement: crwdns2935265:03crwdnd2935265:01crwdnd2935265:02crwdne2935265:0 Single-Speed Bicycle Chain Replacement: crwdns2935265:03crwdnd2935265:02crwdnd2935265:02crwdne2935265:0
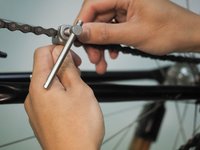
    • Place the chain breaker tool over the old chain.

    • Insert a link of the old chain into the chain breaker tool.

  4. Single-Speed Bicycle Chain Replacement: crwdns2935265:04crwdnd2935265:01crwdnd2935265:03crwdne2935265:0 Single-Speed Bicycle Chain Replacement: crwdns2935265:04crwdnd2935265:02crwdnd2935265:03crwdne2935265:0 Single-Speed Bicycle Chain Replacement: crwdns2935265:04crwdnd2935265:03crwdnd2935265:03crwdne2935265:0
    • Turn the knob on the chain breaker tool until the pin within the chain has popped out.

    • Remove the old chain.

    • This step may take some finesse to ensure that the pin falls out.

  5. Single-Speed Bicycle Chain Replacement: crwdns2935265:05crwdnd2935265:01crwdnd2935265:02crwdne2935265:0 Single-Speed Bicycle Chain Replacement: crwdns2935265:05crwdnd2935265:02crwdnd2935265:02crwdne2935265:0
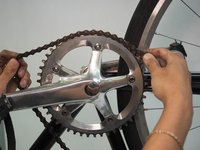
    • Unbox the new chain and place it on the chain ring.

    • Align the rings with the gears to ensure a proper fit.

  6. Single-Speed Bicycle Chain Replacement: crwdns2935265:06crwdnd2935265:01crwdnd2935265:03crwdne2935265:0 Single-Speed Bicycle Chain Replacement: crwdns2935265:06crwdnd2935265:02crwdnd2935265:03crwdne2935265:0 Single-Speed Bicycle Chain Replacement: crwdns2935265:06crwdnd2935265:03crwdnd2935265:03crwdne2935265:0
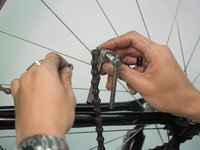
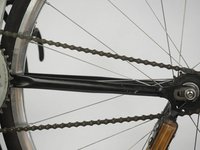
    • Wrap the chain around the cog of the rear wheel and bring the two ends of the chain together.

    • The chain should be long enough so that it can move up and down ~1/2 inch when secured.

    • Remove the excess chain using the chain breaker tool. Refer to steps 3 and 4 for how to use the chain breaker tool.

  7. Single-Speed Bicycle Chain Replacement: crwdns2935265:07crwdnd2935265:01crwdnd2935265:03crwdne2935265:0 Single-Speed Bicycle Chain Replacement: crwdns2935265:07crwdnd2935265:02crwdnd2935265:03crwdne2935265:0 Single-Speed Bicycle Chain Replacement: crwdns2935265:07crwdnd2935265:03crwdnd2935265:03crwdne2935265:0
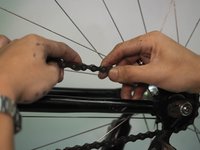
    • Locate the master link of the chain.

    • A master link is a single removable link segment on a bike chain. It connects the two ends of the chain together.

    • Insert the link pins into the two ends of the chain.

  8. Single-Speed Bicycle Chain Replacement: crwdns2935265:08crwdnd2935265:01crwdnd2935265:02crwdne2935265:0 Single-Speed Bicycle Chain Replacement: crwdns2935265:08crwdnd2935265:02crwdnd2935265:02crwdne2935265:0
    • Place the link face onto the link pins.

    • The chain is now secured.

  9. Single-Speed Bicycle Chain Replacement: crwdns2935265:09crwdnd2935265:01crwdnd2935265:03crwdne2935265:0 Single-Speed Bicycle Chain Replacement: crwdns2935265:09crwdnd2935265:02crwdnd2935265:03crwdne2935265:0 Single-Speed Bicycle Chain Replacement: crwdns2935265:09crwdnd2935265:03crwdnd2935265:03crwdne2935265:0
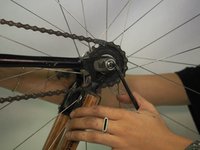
    • Once the chain is on, pull the rear wheel back.

    • Tighten the nut on the drive side (right side) of the rear wheel.

    • The drive side of a bike is the side with the gears. This is usually on the right side, as seen in this model.

  10. Single-Speed Bicycle Chain Replacement: crwdns2935265:010crwdnd2935265:01crwdnd2935265:02crwdne2935265:0 Single-Speed Bicycle Chain Replacement: crwdns2935265:010crwdnd2935265:02crwdnd2935265:02crwdne2935265:0
    • Push the front end of the rear wheel to the non-drive side (left side) of the wheel. This pulls on the chain, creating tension.

    • Tighten the nut on the non-drive side (left side) of the wheel.

  11. Single-Speed Bicycle Chain Replacement: crwdns2935265:011crwdnd2935265:01crwdnd2935265:01crwdne2935265:0
    • Repeat the previous step with the drive side (right side) until the wheel is tightened.

    • Ensure that both nuts are tightened evenly.

  12. Single-Speed Bicycle Chain Replacement: crwdns2935265:012crwdnd2935265:01crwdnd2935265:03crwdne2935265:0 Single-Speed Bicycle Chain Replacement: crwdns2935265:012crwdnd2935265:02crwdnd2935265:03crwdne2935265:0 Single-Speed Bicycle Chain Replacement: crwdns2935265:012crwdnd2935265:03crwdnd2935265:03crwdne2935265:0
    • Check the tension in the gear.

    • It is good to have about half an inch of play in the chain in both directions.

crwdns2915888:0crwdne2915888:0

To reassemble your device, follow these instructions in reverse order.

SaniaHey

crwdns2935283:001/31/24crwdne2935283:0

205 crwdns2915208:0crwdne2915208:0

crwdns2935295:0crwdne2935295:0

crwdns2915084:0crwdne2915084:0

UC Davis, Team 1-7, Andersen Winter 2024 crwdns2935289:0UC Davis, Team 1-7, Andersen Winter 2024crwdne2935289:0

UCD-ANDERSEN-W24S1G7

crwdns2931471:03crwdne2931471:0

crwdns2935297:02crwdne2935297:0

crwdns2947412:00crwdne2947412:0

crwdns2917038:0crwdne2917038:0

crwdns2936625:0crwdne2936625:0:

crwdns2936751:024crwdne2936751:0 3

crwdns2936753:07crwdne2936753:0 26

crwdns2936753:030crwdne2936753:0 112

crwdns2942667:0crwdne2942667:0 1,064