crwdns2933423:0crwdne2933423:0
crwdns2947577:0crwdnd2947577:0crwdne2947577:0

Shop-Vac MC150A Power Switch Replacement

crwdns2869540:0crwdne2869540:0: 19K

crwdns2959988:0crwdne2959988:0

crwdns2959990:0crwdne2959990:0
7
crwdns2959992:0crwdne2959992:0
42
crwdns2959994:0crwdne2959994:0
157
crwdns2959996:0crwdne2959996:0
18,856
crwdns2955950:0crwdne2955950:0: 3

crwdns2960004:03crwdne2960004:0.

crwdns2959984:0crwdne2959984:0: 6

crwdns2959974:06crwdne2959974:0

crwdns2959986:0crwdne2959986:0: 1

crwdns2959980:01crwdne2959980:0

crwdns2955944:0crwdne2955944:0: crwdns2931287:015crwdne2931287:0
crwdns2955970:0crwdne2955970:0: crwdns2937799:0crwdne2937799:0
Shop-Vac MC150A Power Switch Replacement

crwdns2915892:0crwdne2915892:0

crwdns2959928:0crwdne2959928:0 ↓

Follow this guide to remove and replace the power switch on the MC150A Shop-Vac.

crwdns2959930:0crwdne2959930:0

crwdns2943215:0crwdne2943215:0

    1. Shop-Vac MC150A Power Switch Replacement, Unlatch the power unit assembly: crwdns2935265:01crwdnd2935265:01crwdnd2935265:01crwdne2935265:0
      • Before you begin, make sure to switch off the device and unplug it from the outlet.

      • Unlatch the two side clips securing the power unit assembly to the tank.

      • Remove the power unit assembly from the tank assembly.

      crwdns2952109:0crwdne2952109:0

      crwdns2917038:0crwdne2917038:0

    2. Shop-Vac MC150A Power Switch Replacement, Remove the top cover: crwdns2935265:02crwdnd2935265:01crwdnd2935265:02crwdne2935265:0 Shop-Vac MC150A Power Switch Replacement, Remove the top cover: crwdns2935265:02crwdnd2935265:02crwdnd2935265:02crwdne2935265:0
      • Use a 3.5 mm hex key to remove the three screws securing the top cover.

      • Remove the top cover.

      crwdns2952109:0crwdne2952109:0

      crwdns2917038:0crwdne2917038:0

    3. Shop-Vac MC150A Power Switch Replacement: crwdns2935265:03crwdnd2935265:01crwdnd2935265:01crwdne2935265:0
      • Use a 3.5 mm hex key to remove the four screws securing the power unit assembly.

      crwdns2952109:0crwdne2952109:0

      crwdns2917038:0crwdne2917038:0

    4. Shop-Vac MC150A Power Switch Replacement: crwdns2935265:04crwdnd2935265:01crwdnd2935265:01crwdne2935265:0
      • Separate the power unit assembly from the cover.

      crwdns2952109:0crwdne2952109:0

      crwdns2917038:0crwdne2917038:0

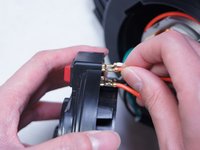
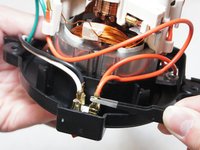
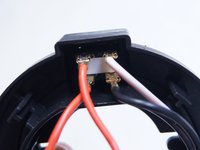
    1. Shop-Vac MC150A Power Switch Replacement, Disconnect the switch: crwdns2935265:05crwdnd2935265:01crwdnd2935265:03crwdne2935265:0 Shop-Vac MC150A Power Switch Replacement, Disconnect the switch: crwdns2935265:05crwdnd2935265:02crwdnd2935265:03crwdne2935265:0 Shop-Vac MC150A Power Switch Replacement, Disconnect the switch: crwdns2935265:05crwdnd2935265:03crwdnd2935265:03crwdne2935265:0
      • Pull out and disconnect the four spade connectors from the switch module.

      • During reassembly, use the last image as a reference for how to connect the wires.

      crwdns2952109:0crwdne2952109:0

      crwdns2917038:0crwdne2917038:0

    2. Shop-Vac MC150A Power Switch Replacement: crwdns2935265:06crwdnd2935265:01crwdnd2935265:01crwdne2935265:0
      • Use a spudger to pry up and remove the red switch from the housing.

      crwdns2952109:0crwdne2952109:0

      crwdns2917038:0crwdne2917038:0

crwdns2915888:0crwdne2915888:0

To reassemble your device, follow these instructions in reverse order.

crwdns2935221:0crwdne2935221:0

crwdns2935229:06crwdne2935229:0

Ngunlian

crwdns2935283:002/08/16crwdne2935283:0

756 crwdns2915208:0crwdne2915208:0

crwdns2935297:05crwdne2935297:0

crwdns2935287:0crwdne2935287:0

IUPUI, Team 1-2, Baechle Spring 2016 crwdns2935289:0IUPUI, Team 1-2, Baechle Spring 2016crwdne2935289:0

IUPUI-BAECHLE-S16S1G2

crwdns2931471:05crwdne2931471:0

crwdns2935297:060crwdne2935297:0

crwdns2947412:00crwdne2947412:0

crwdns2917038:0crwdne2917038:0

crwdns2936625:0crwdne2936625:0:

crwdns2936751:024crwdne2936751:0 7

crwdns2936753:07crwdne2936753:0 42

crwdns2936753:030crwdne2936753:0 157

crwdns2959996:0crwdne2959996:0 18,856