crwdns2933423:0crwdne2933423:0

Shark Rotator Slim-Light Lift-Away Upright Motor Replacement

crwdns2942213:0crwdne2942213:0

  1. Shark Rotator Slim-Light Lift-Away Upright Motor Replacement, Motor: crwdns2935265:01crwdnd2935265:01crwdnd2935265:02crwdne2935265:0 Shark Rotator Slim-Light Lift-Away Upright Motor Replacement, Motor: crwdns2935265:01crwdnd2935265:02crwdnd2935265:02crwdne2935265:0
    • Push the red Lift Away button down and lift up on the vacuum handle to detach the base.

    • The handle was removed for convenience but is not required.

  2. Shark Rotator Slim-Light Lift-Away Upright Motor Replacement: crwdns2935265:02crwdnd2935265:01crwdnd2935265:03crwdne2935265:0 Shark Rotator Slim-Light Lift-Away Upright Motor Replacement: crwdns2935265:02crwdnd2935265:02crwdnd2935265:03crwdne2935265:0 Shark Rotator Slim-Light Lift-Away Upright Motor Replacement: crwdns2935265:02crwdnd2935265:03crwdnd2935265:03crwdne2935265:0
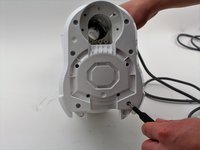
    • Remove the two 19mm Phillips #2 screws located in the red plastic piece behind the filter.

  3. Shark Rotator Slim-Light Lift-Away Upright Motor Replacement: crwdns2935265:03crwdnd2935265:01crwdnd2935265:03crwdne2935265:0 Shark Rotator Slim-Light Lift-Away Upright Motor Replacement: crwdns2935265:03crwdnd2935265:02crwdnd2935265:03crwdne2935265:0 Shark Rotator Slim-Light Lift-Away Upright Motor Replacement: crwdns2935265:03crwdnd2935265:03crwdnd2935265:03crwdne2935265:0
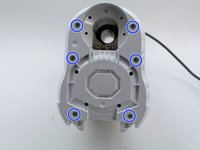
    • Flip over vacuum and remove the six 12.7mm Phillips #2 screws from the base.

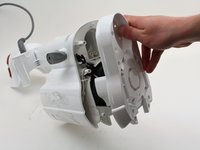
    • Take off white plastic cover exposing the motor in its insulation.

  4. Shark Rotator Slim-Light Lift-Away Upright Motor Replacement: crwdns2935265:04crwdnd2935265:01crwdnd2935265:03crwdne2935265:0 Shark Rotator Slim-Light Lift-Away Upright Motor Replacement: crwdns2935265:04crwdnd2935265:02crwdnd2935265:03crwdne2935265:0 Shark Rotator Slim-Light Lift-Away Upright Motor Replacement: crwdns2935265:04crwdnd2935265:03crwdnd2935265:03crwdne2935265:0
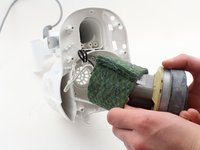
    • Remove the motor from the base and slide the insulation down along the wires.

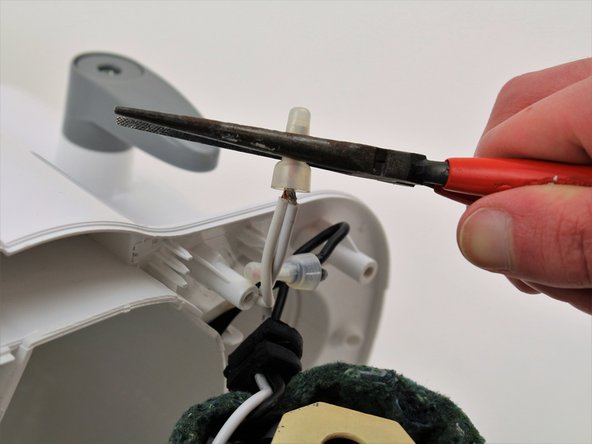
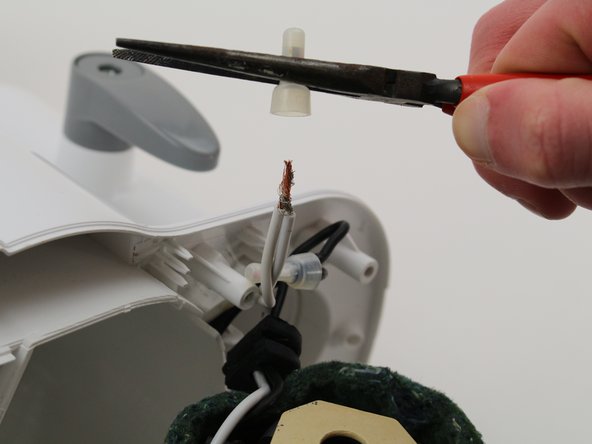
    • Find the plastic caps on top of the black and white wires. Using pliers twist and carefully remove these caps.

    • Needle nosed pliers are recommended but not necessary.

    • These plastic caps are somewhat sensitive and can be difficult to take off. Additionally once taken off they can become unusable.

crwdns2915888:0crwdne2915888:0

To reassemble your device, follow these instructions in reverse order.

crwdns2935229:02crwdne2935229:0

Joshua Morrison

crwdns2935283:001/24/19crwdne2935283:0

211 crwdns2915208:0crwdne2915208:0

crwdns2935297:02crwdne2935297:0

crwdns2915084:0crwdne2915084:0

Cal Poly, Team S19-G3, White Winter 2019 crwdns2935289:0Cal Poly, Team S19-G3, White Winter 2019crwdne2935289:0

CPSU-WHITE-W19S19G3

crwdns2931471:05crwdne2931471:0

crwdns2935297:012crwdne2935297:0

crwdns2947412:02crwdne2947412:0

What is the motor PN and where can I get one?

Dennis Meece - crwdns2934203:0crwdne2934203:0

Somewhere in the process I ended up with a 5" coil spring with a plastic stopper on one end about 1/2" in diameter. Can you tell me where it belongs?

Edward Van Grol - crwdns2934203:0crwdne2934203:0

crwdns2917038:0crwdne2917038:0

crwdns2936625:0crwdne2936625:0:

crwdns2936751:024crwdne2936751:0 0

crwdns2936753:07crwdne2936753:0 1

crwdns2936753:030crwdne2936753:0 22

crwdns2942667:0crwdne2942667:0 1,642