crwdns2933423:0crwdne2933423:0

Shark Rocket Powerhead AH401 Motherboard Replacement

crwdns2942213:0crwdne2942213:0

  1. Shark Rocket Powerhead AH401 Motherboard Replacement, Brushroll: crwdns2935265:01crwdnd2935265:01crwdnd2935265:03crwdne2935265:0 Shark Rocket Powerhead AH401 Motherboard Replacement, Brushroll: crwdns2935265:01crwdnd2935265:02crwdnd2935265:03crwdne2935265:0 Shark Rocket Powerhead AH401 Motherboard Replacement, Brushroll: crwdns2935265:01crwdnd2935265:03crwdnd2935265:03crwdne2935265:0
    • Ensure the device is turned off and unplugged from any power source before beginning work.

    • Locate the two tabs with white arrows on them. They are located on either side of the brushroll cover.

    • Slide the tabs away from the center of the vacuum to unlock the brushroll cover.

    • Lift the brushroll cover upward.

  2. Shark Rocket Powerhead AH401 Motherboard Replacement: crwdns2935265:02crwdnd2935265:01crwdnd2935265:02crwdne2935265:0 Shark Rocket Powerhead AH401 Motherboard Replacement: crwdns2935265:02crwdnd2935265:02crwdnd2935265:02crwdne2935265:0
    • Lift the brushroll out by pulling the tab labeled "pull".

  3. Shark Rocket Powerhead AH401 Motherboard Replacement, Dust Cup: crwdns2935265:03crwdnd2935265:01crwdnd2935265:03crwdne2935265:0 Shark Rocket Powerhead AH401 Motherboard Replacement, Dust Cup: crwdns2935265:03crwdnd2935265:02crwdnd2935265:03crwdne2935265:0 Shark Rocket Powerhead AH401 Motherboard Replacement, Dust Cup: crwdns2935265:03crwdnd2935265:03crwdnd2935265:03crwdne2935265:0
    • Ensure the device is turned off and unplugged from any power source before beginning work.

    • Push down on the dust can lever to release the dust can in order to get to the filter grill.

  4. Shark Rocket Powerhead AH401 Motherboard Replacement: crwdns2935265:04crwdnd2935265:01crwdnd2935265:02crwdne2935265:0 Shark Rocket Powerhead AH401 Motherboard Replacement: crwdns2935265:04crwdnd2935265:02crwdnd2935265:02crwdne2935265:0
    • Remove the dust cup by lifting it off the dock.

  5. Shark Rocket Powerhead AH401 Motherboard Replacement, Back Panel Screws: crwdns2935265:05crwdnd2935265:01crwdnd2935265:02crwdne2935265:0 Shark Rocket Powerhead AH401 Motherboard Replacement, Back Panel Screws: crwdns2935265:05crwdnd2935265:02crwdnd2935265:02crwdne2935265:0
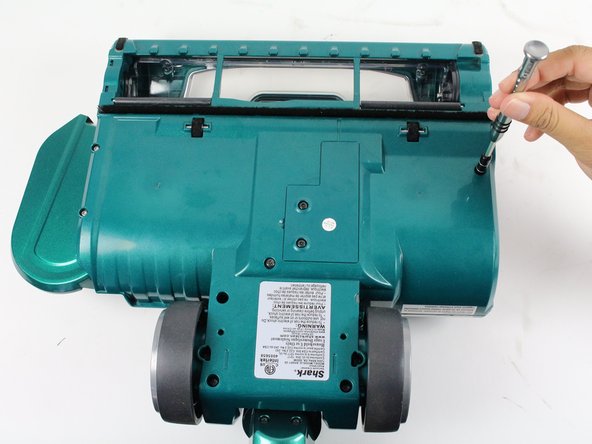
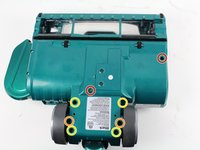
    • Flip the device over so that the bottom is face up.

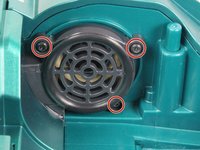
    • Remove the eight screws shown by rotating counter-clockwise with a T15 Torx screwdriver.

    • Two 14 mm Torx screws

    • Two 16 mm Torx screws

    • Four 21 mm Torx screws

  6. Shark Rocket Powerhead AH401 Motherboard Replacement, Motherboard: crwdns2935265:06crwdnd2935265:01crwdnd2935265:03crwdne2935265:0 Shark Rocket Powerhead AH401 Motherboard Replacement, Motherboard: crwdns2935265:06crwdnd2935265:02crwdnd2935265:03crwdne2935265:0 Shark Rocket Powerhead AH401 Motherboard Replacement, Motherboard: crwdns2935265:06crwdnd2935265:03crwdnd2935265:03crwdne2935265:0
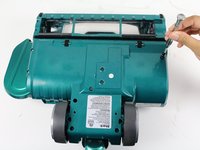
    • Remove the three 10mm screws by rotating counter clockwise with a T15 Torx screwdriver.

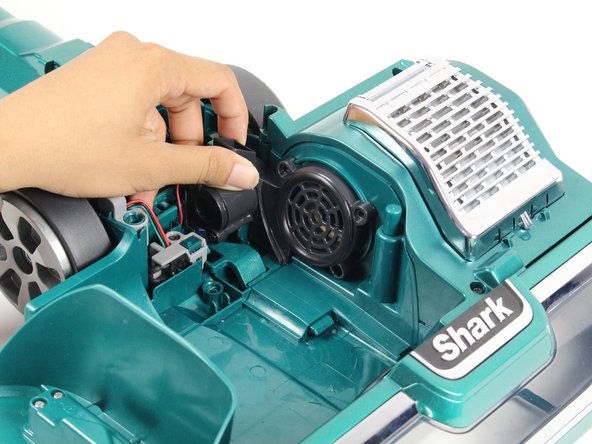
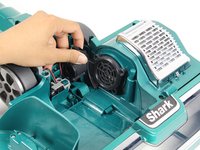
    • Remove the airpath grille by gently lifting up and away from the motor compartment.

  7. Shark Rocket Powerhead AH401 Motherboard Replacement: crwdns2935265:07crwdnd2935265:01crwdnd2935265:01crwdne2935265:0
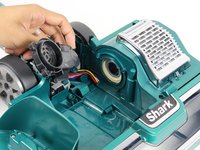
    • Remove two 14mm screws by rotating counter-clockwise with a T15 Torx screwdriver.

  8. Shark Rocket Powerhead AH401 Motherboard Replacement: crwdns2935265:08crwdnd2935265:01crwdnd2935265:03crwdne2935265:0 Shark Rocket Powerhead AH401 Motherboard Replacement: crwdns2935265:08crwdnd2935265:02crwdnd2935265:03crwdne2935265:0 Shark Rocket Powerhead AH401 Motherboard Replacement: crwdns2935265:08crwdnd2935265:03crwdnd2935265:03crwdne2935265:0
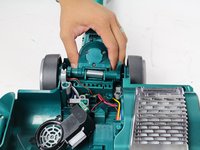
    • Lift and gently remove the hinge compartment covering the motherboard.

  9. Shark Rocket Powerhead AH401 Motherboard Replacement: crwdns2935265:09crwdnd2935265:01crwdnd2935265:01crwdne2935265:0
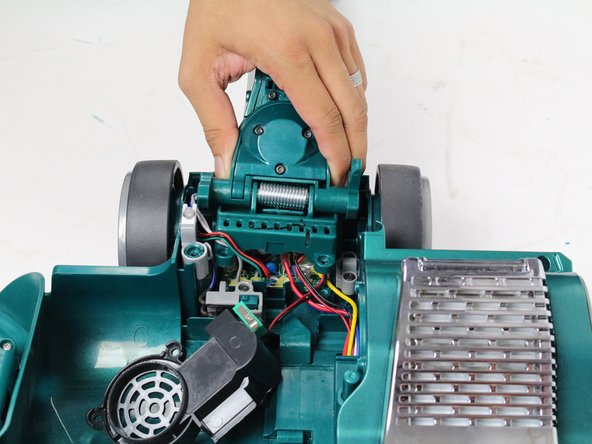
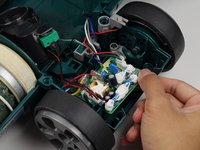
    • Remove the two 10mm screws by rotating counter-clockwise with a T10 Torx screwdriver

  10. Shark Rocket Powerhead AH401 Motherboard Replacement: crwdns2935265:010crwdnd2935265:01crwdnd2935265:02crwdne2935265:0 Shark Rocket Powerhead AH401 Motherboard Replacement: crwdns2935265:010crwdnd2935265:02crwdnd2935265:02crwdne2935265:0
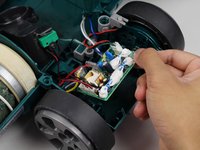
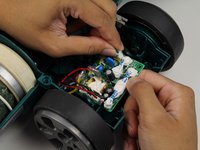
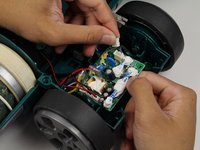
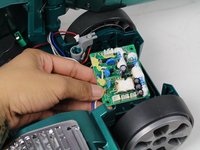
    • Lift the motherboard out of its compartment.

  11. Shark Rocket Powerhead AH401 Motherboard Replacement: crwdns2935265:011crwdnd2935265:01crwdnd2935265:03crwdne2935265:0 Shark Rocket Powerhead AH401 Motherboard Replacement: crwdns2935265:011crwdnd2935265:02crwdnd2935265:03crwdne2935265:0 Shark Rocket Powerhead AH401 Motherboard Replacement: crwdns2935265:011crwdnd2935265:03crwdnd2935265:03crwdne2935265:0
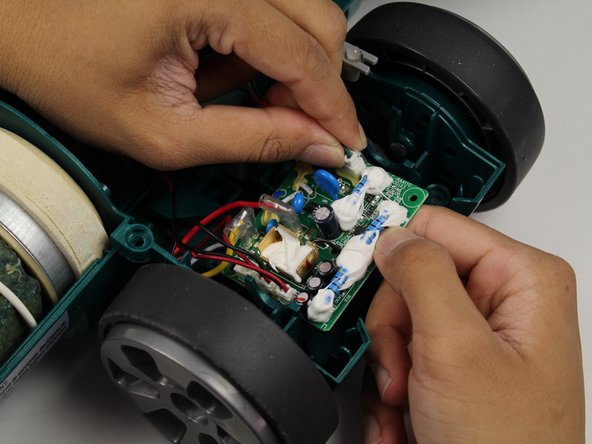
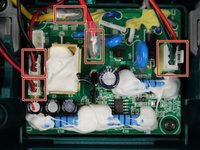
    • Locate and remove these connections by pulling the plugs out of the sockets.

  12. Shark Rocket Powerhead AH401 Motherboard Replacement: crwdns2935265:012crwdnd2935265:01crwdnd2935265:03crwdne2935265:0 Shark Rocket Powerhead AH401 Motherboard Replacement: crwdns2935265:012crwdnd2935265:02crwdnd2935265:03crwdne2935265:0 Shark Rocket Powerhead AH401 Motherboard Replacement: crwdns2935265:012crwdnd2935265:03crwdnd2935265:03crwdne2935265:0
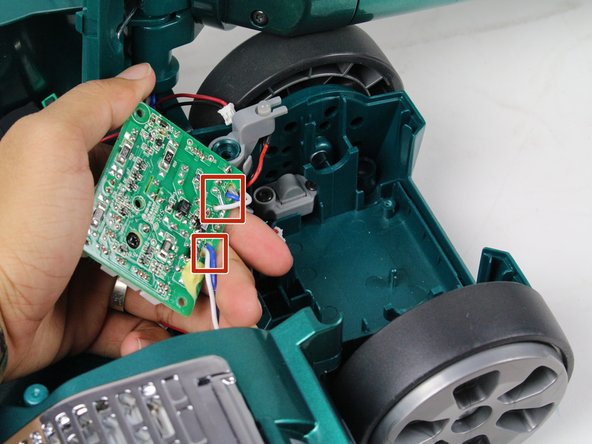
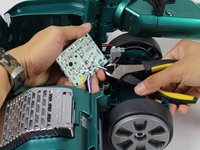
    • Flip the motherboard over to reveal the wires underneath.

    • Locate and cut all the wires connected to the motherboard using cutting pliers.

crwdns2915888:0crwdne2915888:0

To reassemble your device, follow these instructions in reverse order.

Shobhit Dabral

crwdns2935283:001/24/18crwdne2935283:0

913 crwdns2915208:0crwdne2915208:0

crwdns2935297:06crwdne2935297:0

crwdns2915084:0crwdne2915084:0

Cal Poly, Team S19-G3, Livingston Winter 2018 crwdns2935289:0Cal Poly, Team S19-G3, Livingston Winter 2018crwdne2935289:0

CPSU-LIVINGSTON-W18S19G3

crwdns2931471:04crwdne2931471:0

crwdns2935297:018crwdne2935297:0

crwdns2947412:00crwdne2947412:0

crwdns2917038:0crwdne2917038:0

crwdns2936625:0crwdne2936625:0:

crwdns2936751:024crwdne2936751:0 3

crwdns2936753:07crwdne2936753:0 5

crwdns2936753:030crwdne2936753:0 16

crwdns2942667:0crwdne2942667:0 562