crwdns2915892:0crwdne2915892:0
This guide will show the simple procedure of how to replace the battery on your Shark ION Robot R75. Before performing any maintenance or disassembly, ensure that the robot is turned off.
The battery supplies power to the vacuum while it is undocked and performing its cleaning functions throughout the desired area. While the robot should return to its dock at the end of its programmed path, it’s possible that the vacuum starts running out of battery before completing the program, especially as the device ages and the battery degrades. If your Shark Robot starts to die mid-cycle before reaching its charging dock, a battery replacement may restore your trusty vacuum to its former glory.
The part number for a replacement battery is RVBAT700 and can be purchased directly from Shark’s site.
crwdns2942213:0crwdne2942213:0
-
-
Flip the R75 over so that the underside is facing up.
-
Using a Phillips #1 screwdriver, remove the 4mm screw in the battery cover.
-
Remove the battery cover.
-
-
-
-
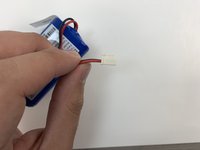
Slowly pull the white tabs outward to remove the battery.
Make sure to review how to appropriately use special bullets. Make sure to check throughout to remove “locate” steps, and instead, just go straight to the action.
-
-
crwdns2935267:0crwdne2935267:0Tweezers$4.99
-
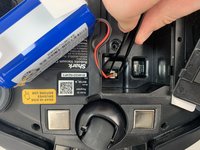
Push down on the tab of the battery connector using a set of tweezers and pull the connector away from the robot to free the wire.
-
Remove the battery from the device.
Here, you’re using tweezers, but you don’t indicate that in the guide steps. Instead of including the information in the special bullet, I would just integrate the tool into the actual procedure. Do you have pictures of you pushing the tab? Can they yank the wire, or do they need to pull gently? I would add a flipbook style action shot to make the procedure clearer in the pictures.
-


To reassemble your device, follow these instructions in reverse order.
To reassemble your device, follow these instructions in reverse order.
crwdns2935221:0crwdne2935221:0
crwdns2935229:03crwdne2935229:0
crwdns2915084:0crwdne2915084:0

Embry-Riddle Aeronautical University, Team S3-G6, Watkins Spring 2020 crwdns2935289:0Embry-Riddle Aeronautical University, Team S3-G6, Watkins Spring 2020crwdne2935289:0
ERAU-WATKINS-S20S3G6
crwdns2931471:04crwdne2931471:0
crwdns2935297:014crwdne2935297:0
crwdns2947410:01crwdne2947410:0
After charging for several hours, my robotic shark stops after 10 minutes. I can push the start button and it will run for another 10 minutes. This has been repeated several times with out it docking itself. What are your thoughts on this?
Here, you have misused the reminder bullet. The note bullet would be better in this case; I would also say how to turn it off, rather than just to do it. Avoid locate steps, and instead, move straight to the information about what to do. Use markup on the images to indicate where the component is. Be careful about using “remove” without other information about how to remove it, especially if there are multiple ways to remove something.
Alex Watkins - crwdns2934203:0crwdne2934203:0