crwdns2933423:0crwdne2933423:0

Shark Cordless Pet Perfect Front Motor Replacement

crwdns2942213:0crwdne2942213:0

  1. Shark Cordless Pet Perfect Front Motor  Replacement, Front Belt: crwdns2935265:01crwdnd2935265:01crwdnd2935265:02crwdne2935265:0 Shark Cordless Pet Perfect Front Motor  Replacement, Front Belt: crwdns2935265:01crwdnd2935265:02crwdnd2935265:02crwdne2935265:0
    • Remove the two 12mm screws from the front face plate with the PH2 bit from the tool kit.

  2. Shark Cordless Pet Perfect Front Motor  Replacement: crwdns2935265:02crwdnd2935265:01crwdnd2935265:03crwdne2935265:0 Shark Cordless Pet Perfect Front Motor  Replacement: crwdns2935265:02crwdnd2935265:02crwdnd2935265:03crwdne2935265:0 Shark Cordless Pet Perfect Front Motor  Replacement: crwdns2935265:02crwdnd2935265:03crwdnd2935265:03crwdne2935265:0
    • Once the screws are removed pull the front face plate off. This will allow access to the belt and motor.

  3. Shark Cordless Pet Perfect Front Motor  Replacement: crwdns2935265:03crwdnd2935265:01crwdnd2935265:03crwdne2935265:0 Shark Cordless Pet Perfect Front Motor  Replacement: crwdns2935265:03crwdnd2935265:02crwdnd2935265:03crwdne2935265:0 Shark Cordless Pet Perfect Front Motor  Replacement: crwdns2935265:03crwdnd2935265:03crwdnd2935265:03crwdne2935265:0
    • Lift the brush roller upwards towards you, and the brush roller should come out along with the belt.

  4. Shark Cordless Pet Perfect Front Motor  Replacement: crwdns2935265:04crwdnd2935265:01crwdnd2935265:02crwdne2935265:0 Shark Cordless Pet Perfect Front Motor  Replacement: crwdns2935265:04crwdnd2935265:02crwdnd2935265:02crwdne2935265:0
    • Remove the belt from the motor mount, and then replace with a new belt.

  5. Shark Cordless Pet Perfect Front Motor  Replacement, Front Motor: crwdns2935265:05crwdnd2935265:01crwdnd2935265:02crwdne2935265:0 Shark Cordless Pet Perfect Front Motor  Replacement, Front Motor: crwdns2935265:05crwdnd2935265:02crwdnd2935265:02crwdne2935265:0
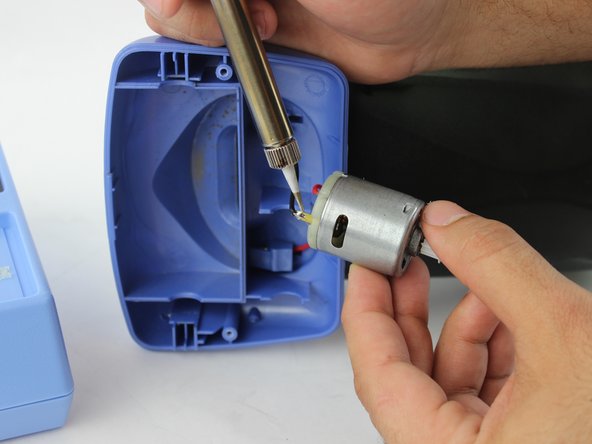
    • Remove the solder from both motor terminals.

crwdns2915888:0crwdne2915888:0

To reassemble your device, follow these instructions in reverse order.

crwdns2935229:03crwdne2935229:0

Ashley Calkins

crwdns2935283:002/02/17crwdne2935283:0

560 crwdns2915208:0crwdne2915208:0

crwdns2935297:03crwdne2935297:0

crwdns2915084:0crwdne2915084:0

USF Tampa, Team 16-2, Blackwell Spring 2017 crwdns2935289:0USF Tampa, Team 16-2, Blackwell Spring 2017crwdne2935289:0

USFT-BLACKWELL-S17S16G2

crwdns2931471:04crwdne2931471:0

crwdns2935297:011crwdne2935297:0

crwdns2944067:02crwdne2944067:0

Well done, Ashley! You might want to note that using a solder remover is helpful.

Jimbo - crwdns2934203:0crwdne2934203:0

Where can I obtain the new motor with the plastic gear?

F V - crwdns2934203:0crwdne2934203:0

crwdns2917038:0crwdne2917038:0

crwdns2936625:0crwdne2936625:0:

crwdns2936751:024crwdne2936751:0 0

crwdns2936753:07crwdne2936753:0 0

crwdns2936753:030crwdne2936753:0 10

crwdns2942667:0crwdne2942667:0 2,646